Work with menus
For Caplin Trader version 3.6.3 onwards, there is a more flexible approach to creating multi-layered drop-down menus for your application, using the Caplin menu API. The following tutorial shows you how to use the menu library to create customised menus. This example focuses on how to replicate the old Webcentric menu functionality, using the Menu API.
The Menu library
The Menu library provides a simple way of adding menus to your application. As with the Webcentric Worked Example, the Menu API uses a simple model that enables manipulation via a simple API and a control that renders this model into the screen. A Menu Factory is also provided to help with the creation of menu models by using simple JSON-like configuration objects. The Menu Library provides a simple presenter integration that enables you to easily embed menus in your presentation models.
| In the following example, a 'model' is the abstraction for any item - and a 'menu' is a particular item type. When we talk about inserting items into a menu, these can be considered either as items or menu items (submenus). |
Menu bar example
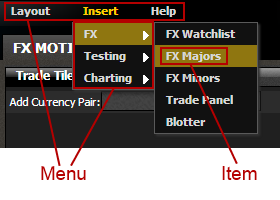
For this example, the menu bar has three labelled submenus, which will be displayed horizontally (Layout, Insert and Help). Each has either single items or further menus within:
Let’s now see how we can create a menu bar using the Menu Library:
1 Creating the parent menu
Let’s start by using the model API to create the top horizontal menu. We won’t be creating any items inside or attaching any handlers, only a model for the three top submenu items displayed horizontally:
function createMenuModel () {
  var layoutMenu = new caplin.menu.model.Menu({
    label: ct.i18n('caplinx.header.menu.layout'),
    classifier: 'menu-layout'
  });
  var insertMenu = new caplin.menu.model.Menu({
    label: ct.i18n('caplinx.header.menu.insert'),
    classifier: 'menu-insert'
  });
  var helpMenu = new caplin.menu.model.Menu({
    label: ct.i18n('caplinx.header.menu.help'),
    classifier: 'menu-help'
  });

  var menuModel = new caplin.menu.model.Menu();
  menuModel.append([layoutMenu, insertMenu, helpMenu]);

  return menuModel;
};
We now have a menu model created which will contain three menu items. We now need to create a menu control that will allow us to render the menu to the screen:
function renderMenu() {
  var menuModel = createMenuModel();
  var menuContainer = document.createElement('DIV');

  document.body.appenchChild(menuContainer);
  var control = new caplin.menu.Control(menuModel, menuContainer);
  control.render();
};
Once this method is called, the resulting mark-up will look something like this, which with a little bit of CSS will set up our horizontal menu:
<div>
  <ul class="menu-items">
    <li class="menu menu-layout">
      <div class="label">Layout</div>
    </li>
    <li class="menu menu-insert">
      <div class="label">Insert</div>
    </li>
    <li class="menu menu-help">
      <div class="label">Help</div>
    </li>
  </ul>
</div>
Keep in mind that when the control renders the menu, it will render all the items inside it. In order to change this behaviour, we can either use CSS to hide different parts of the menu when this is needed, or use custom generators (see step 4).
2 Creating the internal model for each of the menus
Of course, each of the menus we have inserted into our main menu model will contain their own items/menus within. You can take a look at the menu model JSDocs to see how you can add items of any type to it.
In this example we will look at populating each of the menus using the Menu Factory to create the menu model representation of each of them:
function populateLayoutMenu() {
  var model = caplin.menu.model.MenuFactory.create({
    options: {
      label: ct.i18n('caplinx.header.menu.layout'),
      classifier: 'menu-layout',
      type: 'onclick-submenu'
    },
    items: [
      {
        options: {
          label: ct.i18n('caplinx.header.menu.layout.new'),
          classifier: 'menu-layout-new' ,
          eventName: 'menu-layout-new',
        }
      },
      {
        options: {
          label: ct.i18n('caplinx.header.menu.layout.open'),
          classifier: 'menu-layout-open',
          eventName: 'menu-layout-open',
        }
      },
    ...
    ]
  });
  return model;
}
We will then change the way we created the layout menu from the createMenuModel method:
function createMenuModel () {
  var layoutMenu = populateLayoutMenu();
...
};
This is how we will populate each of the menus.
3 Adding Event Handling
The Menu Library uses the emitter library to notify any actions happening on any of the items inserted into a menu. The menu provides two ways of hooking event handlers to each of the items:
-
By listening on the item 'action' event
-
By defining an 'eventName' (within the options map to create the item) and listening to that event on either the item or any of the containing menus for that item
For this particular example, we will be hooking events into the 'eventNames' defined inside our config object:
function populateLayoutMenu() {
  var model = ...;
  var myService = ...;

  model.on('menu-layout-new', function(item) {
    myService.doSomeStuff(););
  });
};
As mentioned before, we could have listened to this event on the container menu:
function createMenuModel () {
  ...
  var menuModel = new caplin.menu.model.Menu();
  menuModel.append([layoutMenu, insertMenu, helpMenu]);
  menuModel.on('menu-layout-new', function(item) {
    doSomething(););
  });
};
4 Extending the functionality
The Menu Library provides, within the control, two custom generators for the two model types that are provided. The control will also provide a mechanism to extend this default functionality (see the caplin.menu.Control). For this example we will be using the standard menu model with a changed menu type (as you can see on the configuration object in step 2) so it can be rendered by a generator we just created:
function renderMenu() {
  ...
  var control = new caplin.menu.Control(menuModel, menuContainer);
  control.addGenerator(new caplinx.SubmenuOnclickGenerator(), 'onclick-submenu');

  control.render();
}
Now, every menu inserted with the type set to 'onclick-submenu' will be rendered by our caplinx.SubmenuOnclickGenerator. This generator will be implementing the caplin.menu.Generator interface (see the Menu Library JSDocs for more information).
5 Presenter integration
The last part of this example will be to use the Menu Library’s presenter integration to wrap all this into a Presenter Component. In order to do this, the Menu Library provides a menu presenter control that can be added to any presenter view template (which will contain a menu control), plus a menu presentation node that will serve as the control node (which contains the menu model):
<div id="caplinx.myViewTemplate">
  <div class="header-menu-container" data-bind="control: 'caplin.menu', controlNode: menuNode"></div>
</div>myMenuPresentationModel = function() {
var menuModel = createMenuModel();
this.menuControlNode = caplin.menu.presenter.node.Menu(menuModel);
this.menuControlNode.addGenerator(new caplinx.SubmenuOnclickGenerator(), 'onclick-submenu');
}As you can see, we need to add our custom generator to the control presentation node as we don’t have access to the presenter view control. Whenever Presenter calls addPresentationNode on the presenter menu control (as part of the control plugin lifecycle), all the generators will be inserted in the underlying menu control.