BladeRunnerJS and Caplin Trader
Caplin Trader is a complete development suite for creating HTML5 web trading apps in a modular fashion using blades, built on BladeRunnerJS - the development framework for enterprise-scale HTML5 applications including display components and domain-specific libraries.
BladeRunnerJS was originally developed in-house as part of Caplin Trader, but as the concepts proved to be applicable to any kind of large-scale HTML5 application, it was released as an open source project, BladeRunnerJS.
In these tutorials we will be using Caplin Trader 4, so that you have all of the financial trading libraries and components available to you in addition to the generic functionality provided by BladeRunnerJS.
Objectives
In this tutorial you are going to:
-
Install Caplin Trader and understand the differences between it and BladeRunnerJS
-
Import a motif (a sample BladeRunnerJS/Caplin Trader app) and run it
-
Understand the structure of BladeRunnerJS/Caplin Trader
-
Understand how a BladeRunnerJS/Caplin Trader app is structured
-
Explore a workbench, which is a space for developing components in a standalone environment
Install and Run Caplin Trader
The same procedure is used to install BladeRunnerJS and Caplin Trader. The difference between these two products is the additional range of libraries that are available in Caplin Trader.
To install Caplin Trader, follow the steps below:
-
Download Caplin Trader and extract to the required location.
-
Using the command line, navigate to the
sdkdirectory. Note that unlike the back end tutorials you don’t need to use Cygwin for any Caplin Trader tasks, just the standard Windows command prompt. -
Run
brjs serve. This will start a jetty server hosting your Caplin Trader development environment. -
Use your browser to navigate to http://localhost:7070. By default, this will redirect to the Caplin Trader dashboard where you can access API documentation, Live Examples and tutorials:

Comparing BladeRunnerJS and Caplin Trader
If you had installed BladeRunnerJS you would be able to create new HTML5 web applications or import motifs that are built on the core libraries available in BladeRunnerJS. These libraries include:
-
Base library (object oriented JavaScript, Internationalisation, Logging, Event Hub, etc.)
-
Presenter (an MVVM framework for creating UI components)
-
Verifier (a framework for creating and running unit and BDD-style acceptance tests)
Since you installed Caplin Trader instead, you will be able to create all the things that are possible with BladeRunnerJS, and make use of additional libraries that facilitate the creation of trading components in a trading web-app. The additional libraries include:
-
Grids and Renderers (polished grids for displaying real-time financial data)
-
Webcentric (layout manager to display all your components on screen)
-
Trading (API for creating trades and communicating trade messages with a trade server)
-
Permissioning (API for retrieving user permissions from the server)
Import a Motif
A motif is a canned application incorporating a set of functionality and components that can be obtained as a whole and imported into the BladeRunnerJS server as a starting point, or to be customised. Motifs consist of a number of bladesets and blades.
To import a motif, follow the steps below:
-
Download SampleMotif.zip. This motif contains two bladesets having one blade each.
-
Use the dashboard to import the ZIP file (
SampleMotif.zip). Then provide an Application name (say, “SampleApp”) and application namespace (say,“mycompany”). -
Open the application via the dashboard.
-
Click Launch App in the top right corner of the screen. You will see a tile on screen.
-
You can also try running the bladesets' and blades' tests and opening the workbenches via the dashboard.
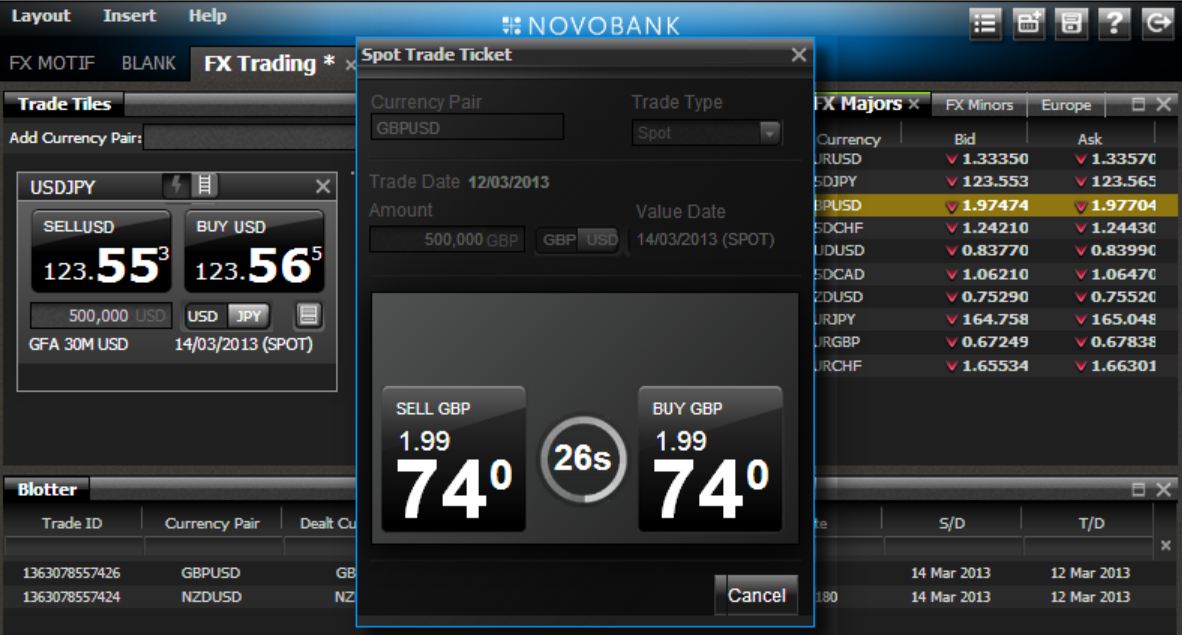
This example is a very simple trading application consisting of only one tile. The image below shows a typical trading application that consists of many components like trade tiles, trade tickets and grids:
BladeRunnerJS/Caplin Trader Structure
Create a new general project in Eclipse (or your preferred IDE) for your Caplin Trader installation and set the location to wherever you unzipped Caplin Trader.
If you are using Eclipse, you will find it useful to install the Eclipse Web Developer Tools and JavaScript Development Tools plugins, so that from this point on you get syntax highlighting and basic auto-complete for JavaScript and HTML files.
-
In Eclipse, click Help > Install New Software.
-
In the "Work with" drop-down menu, select the site named for your version of Eclipse. For example, "Kepler - http://download.eclipse.org/releases/kepler".
-
Expand "Web, XML, Java EE and OSGi Enterprise Development".
-
Find and check the two plugins mentioned above.
-
Click Next and follow the installation through to the end. You will have to restart Eclipse.
Application Structure
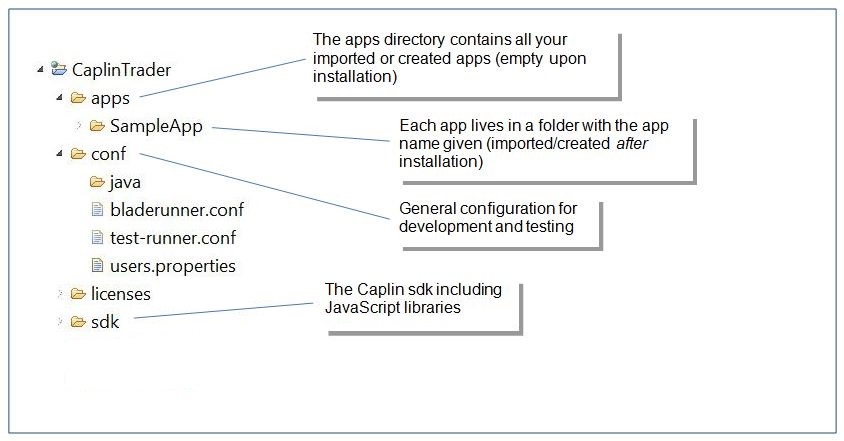
After creating the project In Eclipse, or your favoured IDE, you should see the following BladeRunnerJS/Caplin Trader structure.
A BladeRunnerJS or Caplin Trader application consists of a number of bladesets, which in turn consist of a number of blades. Code and resources for the application can be found at the application, bladeset and blade levels.
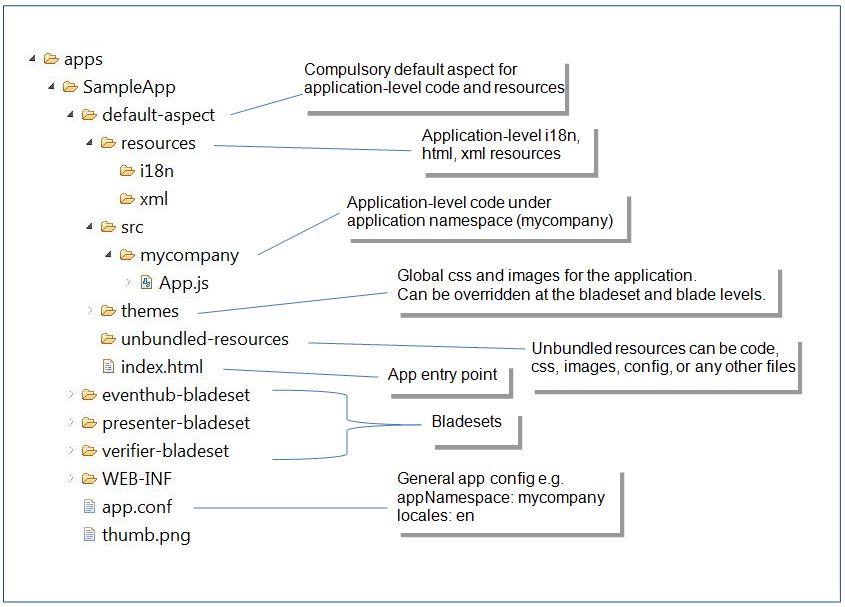
App Structure
The following diagram highlights the main resources and code located at the app-level. The app nests any number of bladesets inside it.
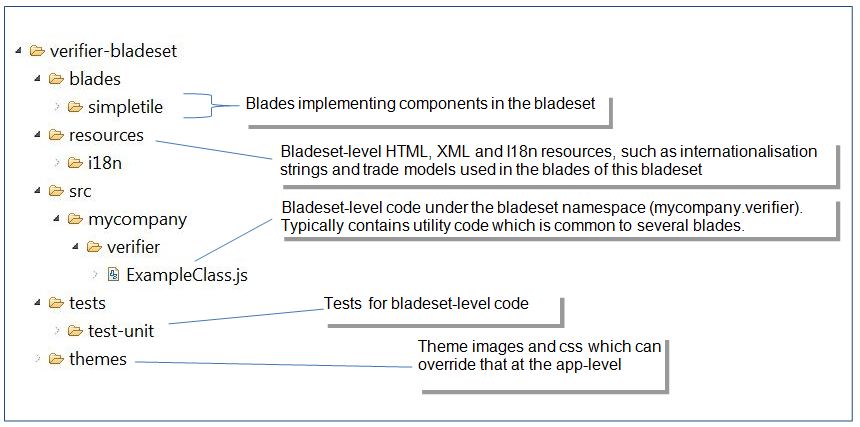
Bladeset Structure
The following diagram highlights the main resources and code located at bladeset level. A bladeset typically contains a number of related blades; for example, an FX bladeset contains an FX tile blade, an FX ticket blade, and so on. Therefore, the bladeset would contain code for making FX trades and resources, such as common FX trade models; or localised FX terms that are used by several of the nested blades.
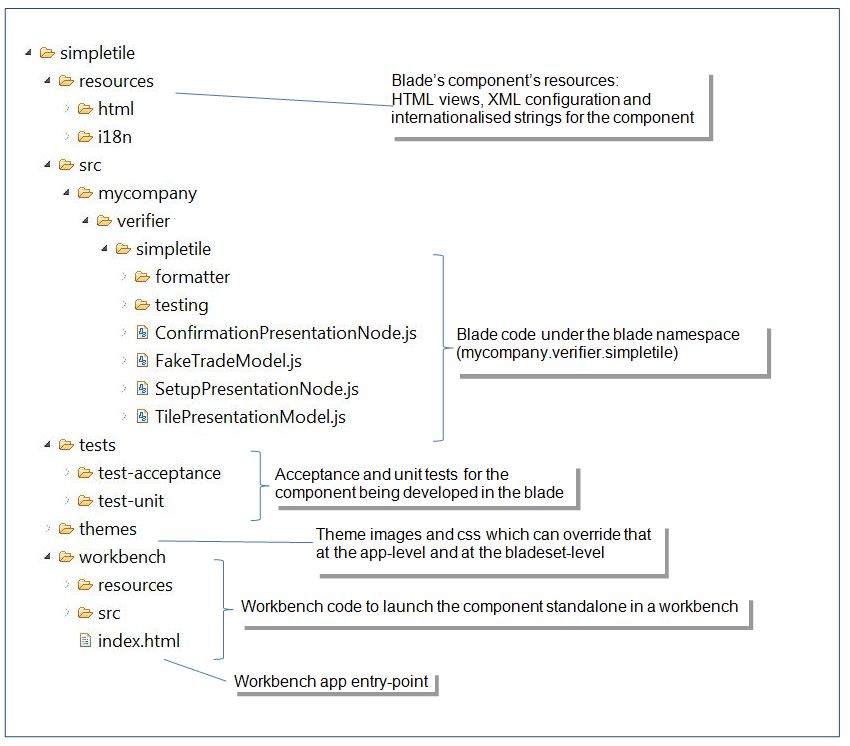
Blade Structure
Components are developed inside blades in such a way that all the components' functionality is encapsulated within the blade. The following diagram highlights the main resources and code located at blade level.
Workbenches
Any component developed with BladeRunnerJS can be showcased and tested in a standalone environment called a workbench. To see the workbench of one of the blades in the motif we have just imported, click Run in workbench:
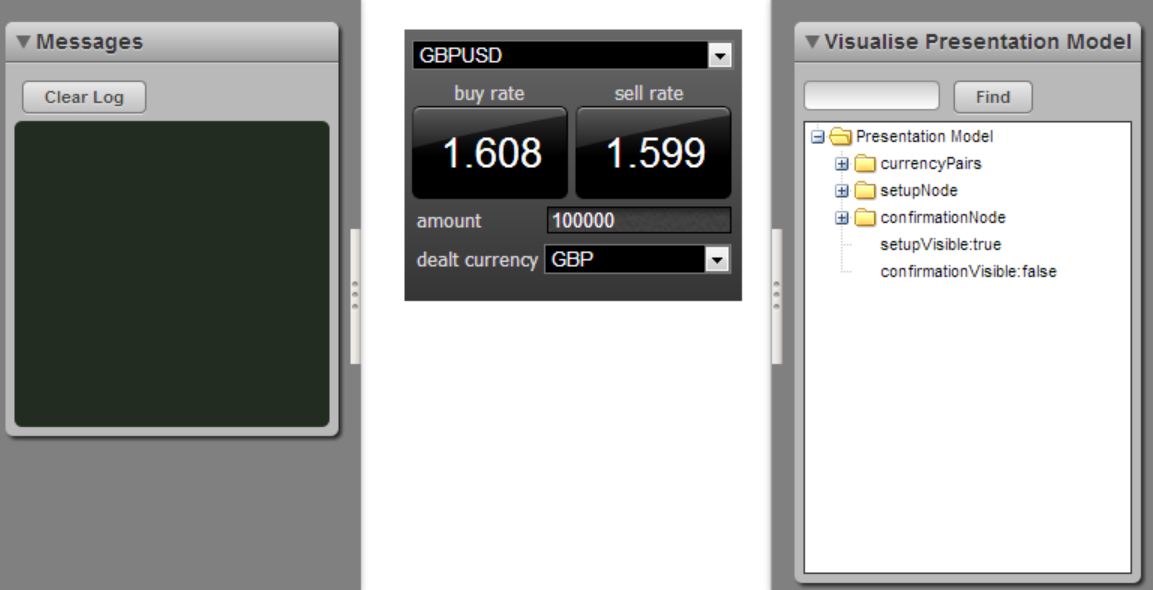
The workbench, being a testing environment, contains no connection to the server. Instead, libraries, such as those for trading and pricing, include workbench widgets that can be connected to stubs to simulate communication with the server.
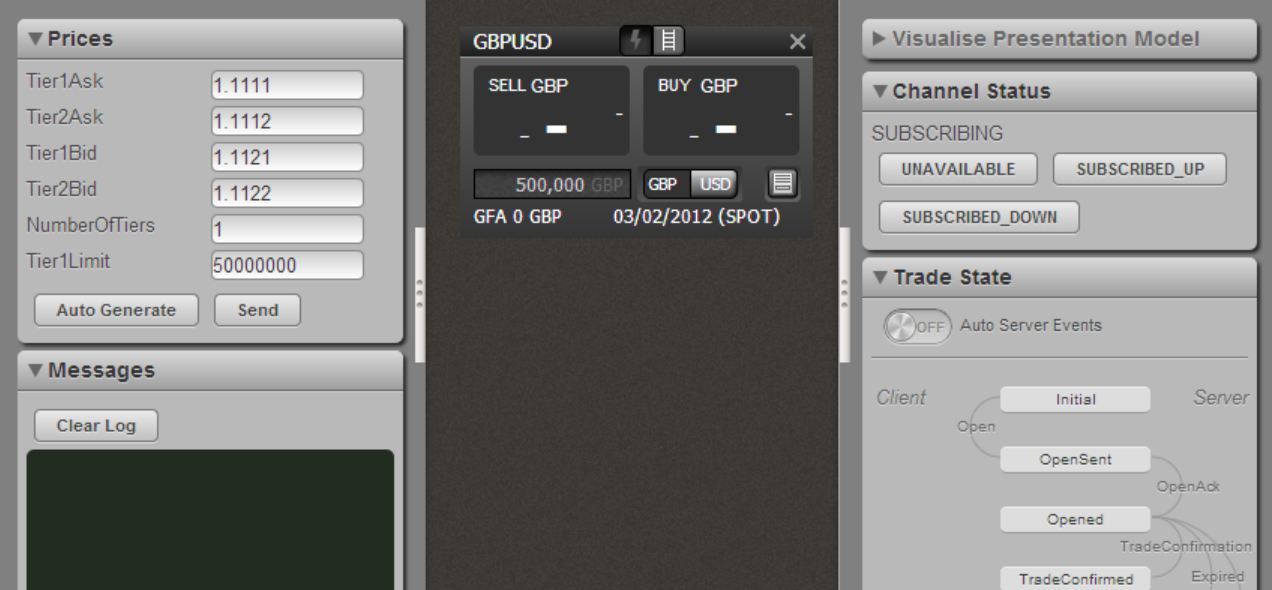
The following image shows a more complete trade tile workbench that contains a widget for sending price updates, toggling trading availability on the server and for following the trade states and simulating server-sent trade events such as TradeConfirmation. This allows you to see the behaviour of the tile component in a completely standalone environment.
We are not going to use the SampleApp for the rest of the training course, so after you have finished looking around you can safely delete it. This will help avoid confusion later on when we import different apps with similarly named files.
Review
Having completed the tutorial, you should now be able to install BladeRunnerJS or Caplin Trader 4 and have a clear understanding of how to structure an HTML 5 or trading application by breaking it down into a set of bladesets and component blades. You should also be aware that you can develop a new component within a blade using a workbench and utility widgets before integrating the component into the application.
More information can be found on the website.