Renderers
A renderer is a display configuration for a specific item displayed on screen. It can consist of:
-
Formatters - format a value before displaying it
-
Parsers - transform a value after reading it from the DOM
-
Handlers - execute some action when an event affects the element
-
Stylers - apply CSS classes you specific elements on screen.
A renderer is also associated with a type of control such as a TextControl, ButtonControl or InputControl. When the renderer is applied on an HTML element, e.g. on a DIV, the HTML representation of that control is inserted inside the DIV.
Objectives
In this tutorial you will configure a number of renderers to apply on the values in the grid. You will also create your own handler and formatter to use within renderers.
Renderer Definitions
Renderer definitions are configured in various files using XML and bundled together by the BladeRunnerJS XML bundler.
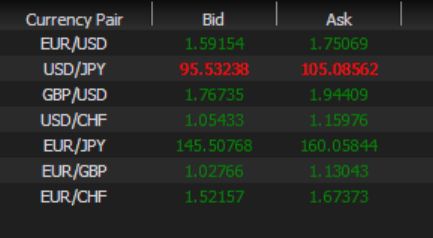
You’re going to create a renderer to be applied on prices, which causes the price to flash with a different colour whenever its value is updated. For this we need a renderer with a Styler so that the style of the price changes when its value changes.
The ClassFlashStyler is a Styler provided in the Caplin Trader SDK which provides this functionality. It can be configured to:
-
apply a CSS class to the element when the value increases ("price-up" in the case of the example below)
-
apply another CSS class when the value decreases ("price-down")
-
remove the classes after a short duration of time (500ms), hence "flash"
The Styler needs to be applied on the "downsteam" side of the renderer because we want to modify the element before it is shown on screen.
Create a new file CaplinTrader/apps/TutorialApp/tutorial-bladeset/resources/xml/rendererDefinitions.xml.
Because we put this file at the bladeset level it can be used by any blades within this bladeset. This would allow us to use the same renderer configurations in both our tile and grid blades, if we wanted to.
Put this content in the new file:
<rendererDefinitions xmlns="http://schema.caplin.com/CaplinTrader/rendererDefinitions">
  <renderer type="mycompany.tutorial.ratesRenderer">
    <control className="caplin.control.basic.TextControl"> </control>
    <downstream>
      <transform className="caplin.element.styler.ClassFlashStyler">
        <attribute name="duration" value="500"/>
        <attribute name="flashing-up" value="price-up" />
        <attribute name="flashing-down" value="price-down" />
      </transform>
    </downstream>
  </renderer>
</rendererDefinitions>
Have a look at this XML and understand what it’s doing. We are defining a renderer called mycompany.tutorial.ratesRenderer, which can be applied to instances of TextControl. The renderer consists of a single Styler on the downstream side, which is the ClassFlashStyler. This Styler requires certain attributes, specifically the CSS classes to apply when the price changes, and the duration of the flash.
Since we specified that we want the Styler to apply CSS classes called "price-up" and "price-down", we need to add these classes to our stylesheets.
Create a new file CaplinTrader/apps/TutorialApp/tutorial-bladeset/themes/noir/style.css with this content:
.price-up {
  color:green;
}

.price-down {
  color:red;
}
Finally, we need to wire up this renderer to a couple of the columns in our grid. Open CaplinTrader/apps/TutorialApp/tutorial-bladeset/blades/grids/resources/xml/gridDefinitions.xml. You set renderers on columns by adding a new attribute cellRenderer to the column definition. For example, this is how you add it to the Bid column:
<column id="bid" fields="BidPrice" displayName="Bid" cellRenderer="mycompany.tutorial.ratesRenderer"/>Set the same renderer on the Ask column and refresh the application. The prices in the grid should now be flashing briefly when updated:
Try this yourself
Now try extending your ratesRenderer by also including the DecimalFormatter to show rates to 2 decimal places.
-
We want to transform the value before it is rendered to the screen, so this will be another downstream transformation.
-
You add it as a second <transform> element within the <downstream> section.
-
You will need to look at the API docs to see the exact class name of the DecimalFormatter.
-
You will also need to consult the API docs to see which attribute to use in order to specify 2 decimal places.
Creating your own Renderer Elements
You’ll find a number of formatters, parsers, handlers and stylers in the caplin.element library and you can also develop your own which extend caplin.element.Formatter, caplin.element.Parser, caplin.element.Handler and caplin.element.Styler.
Creating a Handler
A Handler in a renderer is associated with a particular DOM event. Therefore the handler is invoked when the DOM event is triggered on the associated control. DOM events include things like click, mouseover etc.
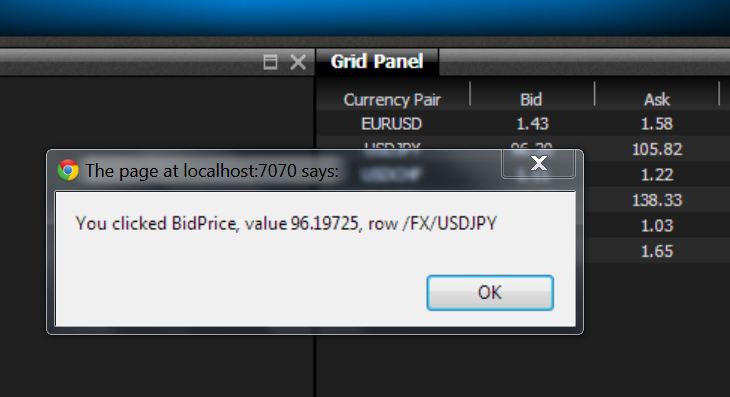
We are going to create a handler which brings up an alert when you click on a price in the grid. The key features are:
-
It extends the caplin.element.Handler interface
-
It creates an instance of itself after it is loaded
-
It has an onclick() method which is the method invoked when the control is clicked
-
When the onclick() callback is invoked, it is passed an instance of the parent renderer. This gives it access to the name (column field name), value (cell value) and namespace (row subject).
Follow the steps below:
-
Create a new class CaplinTrader\apps\TutorialApp\tutorial-bladeset\src\mycompany\tutorial\GridClickHandler.js:
var topiarist = require('topiarist'); var Handler = require('caplin/element/Handler'); function GridClickHandler() { // empty constructor }; topiarist.extend(GridClickHandler, Handler); GridClickHandler.prototype.onclick = function(event, renderer) { window.alert('You clicked ' + renderer.getName() + ', value ' + renderer.getValue() + ', row subject ' + renderer.getNamespace()); }; module.exports = new GridClickHandler(); -
Go back to your rendererDefinitions.xml to wire this up.
Since the handler is invoked from a DOM event on the control, the handler is defined by adding a new element to the control as follows:
<control className="caplin.control.basic.TextControl"> <handler className="mycompany.tutorial.GridClickHandler"/> </control> -
Refresh the app and try clicking on a cell in either the Bid or Ask columns in the grid and you will see a pop-up:
This could easily be extended to do something useful like execute a trade or launch a trade ticket, for example.
Creating a Formatter
Besides the handy set of pre-built Parsers, Formatters and Stylers available you can code your own.
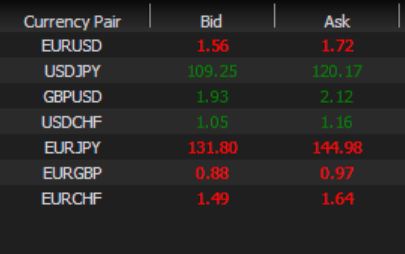
Let’s create a Formatter that strips off the leading "/FX/" part of the Instrument, so that our grid just shows "GBPUSD" rather than "/FX/GBPUSD".
Create a new class CaplinTrader/apps/TutorialApp/tutorial-bladeset/src/mycompany/tutorial/InstrumentNameFormatter.js. Once again we have chosen to place it at the bladeset level, so that it could be used by both the grid and tile blades.
var topiarist = require('topiarist');
var Formatter = require('caplin/element/Formatter');

function InstrumentNameFormatter() {
    // empty constructor
}
topiarist.extend(InstrumentNameFormatter, Formatter);

InstrumentNameFormatter.prototype.format = function(value) {
    return value ? value.replace('/FX/', '') : value;
};

module.exports = new InstrumentNameFormatter();
Note the following important aspects of this class:
-
It implements the caplin.element.Formatter interface.
-
The key method it must implement from this interface is format(), which is passed the unformatted value and, optionally, some attributes. It returns the formatted value.
-
The implementation of the format() method just strips off the initial "/FX/" part of the string. It’s made slightly more complicated because it must handle null values, it’s possible for your Formatter to be called before any value has been set.
-
The Formatter redefines itself as a single instance rather than a class, which makes it a singleton.
Now we need to create a new renderer in our rendererDefinitions.xml file. Add this new renderer to the <rendererDefinitions> section:
<renderer type="mycompany.tutorial.instrumentRenderer">
  <control className="caplin.control.basic.TextControl" />
  <downstream>
    <transform className="mycompany.tutorial.InstrumentNameFormatter" />
  </downstream>
</renderer>
The last thing we need to do is apply this renderer to the Currency Pair column. Go back to the gridDefinitions.xml file and add the renderer to the relevant column:
<column id="instrument" fields="InstrumentName" displayName="Currency Pair" cellRenderer="mycompany.tutorial.instrumentRenderer"/>If you refresh the application you should now see that the Currency Pair column only displays currency pairs, without the "/FX/" prefix.
We won’t create a parser in this tutorial but the methodology is very similar. Parsers are usually applied "upstream" when the value is being read from the display in a human readable form and needs to be transformed before submitting it to the back end, for example.
Using your Renderer in Presenter Components
We defined our renderers at the bladeset level so that they can be used by any blade within the bladeset. So far we have only used our renderers in the grid. We can also use the same renderers in the tile.
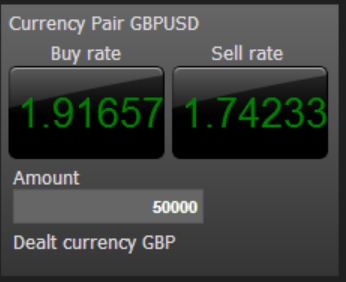
We can apply the renderer to the buy and sell buttons in the tile. You do this by adding a renderer to the data binding of the button elements in the tile’s HTML view.
Be careful with this. The way renderers work is by changing the value of the control, which it embeds inside the <button> element. The renderer is going to embed a text control (a span tag) inside the button element and is going to act on the value of the button element. Therefore we no longer must bind to the button’s text attribute, but to its value attribute.
Update CaplinTrader/apps/TutorialApp/tutorial-bladeset/blades/tile/resources/html/tile.html and change the <button> elements to the below:
<button data-bind="enable:sellRate.enabled, click:sellClicked, value:sellRate.value, renderer: 'mycompany.tutorial.ratesRenderer', text:sellRate.value"></button>
<button data-bind="enable:buyRate.enabled, click:buyClicked, value:buyRate.value, renderer: 'mycompany.tutorial.ratesRenderer', text:buyRate.value"></button>
Refresh the application and you will find that the rates in the buttons should now be flashing green when the value increases and red when it decreases. Note that there is a slight problem - the renderer we have applied includes the GridClickHandler, so when you click on the buttons it will pop up the alert instead of executing the trade by calling the method referred to in the data-bind attribute. We would probably fix this by creating a separate renderer just for the buttons, which includes the ClassFlashStyler but not the GridClickHandler.
Note that we have not applied a renderer with Formatters and Parsers to values in the tile which is constructed using Presenter. This is because the renderers alter the view by creating a control within the bound element.
This solution is not ideal for a Presenter component where the values in the presentation model need to correspond to those of the element to which they are bound, rather than to a control within that element. For this reason Formatters and Parsers can be added directly to a property in the presentation model. Take a look at how this is done in the Presenter Live Examples sections 2.1.2 and 2.1.6.
Review
Having completed this tutorial you should be familiar with Stylers, Parsers, Formatters and Handlers as renderer elements and you should be aware that you can either find these in the caplin.element library or create your own. You should also know how to configure renderers and use them in grids and Presenter components.
More information and tutorials about renderers can be found on the website.