Trading
Caplin Trader includes a JavaScript Trading library which includes all the classes required to implement your own trade types and wire them into your application.
Objectives
In this tutorial you will use the TradeService and TradeMessageService to create new trades and communicate trade messages with the server. You will complete the tile’s functionality by wiring up the buy and sell buttons to carry out an actual trade on the server when clicked. You need to use the Trading Integration Adapter which was developed as a part of the backend tutorials, and which executes trades on trade channel /PRIVATE/TRADE/FX..
As before, if you don’t have a working back end on your machine you can connect to the Liberator running on libtraining.caplin.com on port 18080.
Trade Model
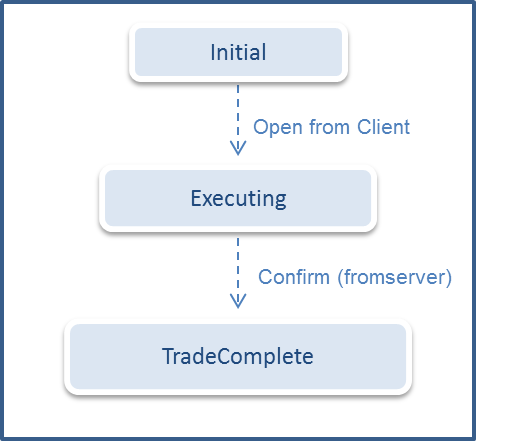
The Trade Model is a state machine used by the trading system to follow the progression of trade messages and the state of the trade. The Trade Model used in the client must be identical to the one that you used at the server, having the same states, transitions and events. Therefore we are using the simple ESP (Executable Streaming Price) trade model which was also used in the Trading Integration Adapter and which is ideal for a trade tile.
Take a look at the trade model in CaplinTrader/apps/TutorialApp/tutorial-bladeset/blades/tile/resources/xml/ESPTradeModel.xml:
Sometimes you have to make a decision whether to put new classes you create at the blade or bladeset level. If you think the class is likely to be used by more than one blade then it makes sense to put it at the bladeset level.
Trade Factory
The creation of trades is delegated to trade factories which choose which XML trade model to use and instantiate the trade object.
Take a look at ESPTradeFactory.js in CaplinTrader/apps/TutorialApp/tutorial-bladeset/blades/tile/src/mycompany/tutorial/tile/trading. It looks like quite a complicated class, but we can break it down.
-
The class implements two of the interfaces defined by the trading library, TradeFactory and TradeLegFactory. These interfaces define the methods createNewTrade() and createLeg() respectively, which we implement in this class.
-
The constructor of the class performs one job, which is to create something called a StateMachineFactory. It does this in four steps:
-
It uses the Service Registry to retrieve a service we haven’t used before called "br.xml-service". This returns a concatenated bundle of all the XML files in your application.
-
It pulls the first <tradeModel> XML element out of the bundle, which is our ESP trade model.
-
It creates a new instance of StateMachineFactory and sets it as a field of this class.
-
It tells the StateMachineFactory to instantiate itself using the trade model XML that we pulled out of the bundle.
-
-
The createNewTrade() method is responsible for creating and returning a new Trade object, specifically a
caplin.trading.trademodel.Trade. We won’t worry about when this method is called for now. -
The Trade class takes a number of constructor arguments including a state machine, a trade message service, and several String fields. You can see that the first part of the createNewTrade() method just instantiates these various constructor arguments and uses them to create the Trade object.
-
Note that the Trade requires an implementation of TradeMessageService through which it can communicate with the server. For now a stub is being used. We will talk about the TradeMessageService later on when we implement communication with the server.
-
Note also that a Trade also requires a trade leg factory. In this case the ESPTradeFactory class is acting as both the TradeFactory and also the TradeLegFactory, but we won’t be creating trade legs for this simple tile.
-
-
Afterwards it adds the trade parameters as fields on the trade. These will be the details of the specific trade the user wants to execute such as the currency pair, whether it is a Buy or a Sell trade, the amount etc.
Trade Service
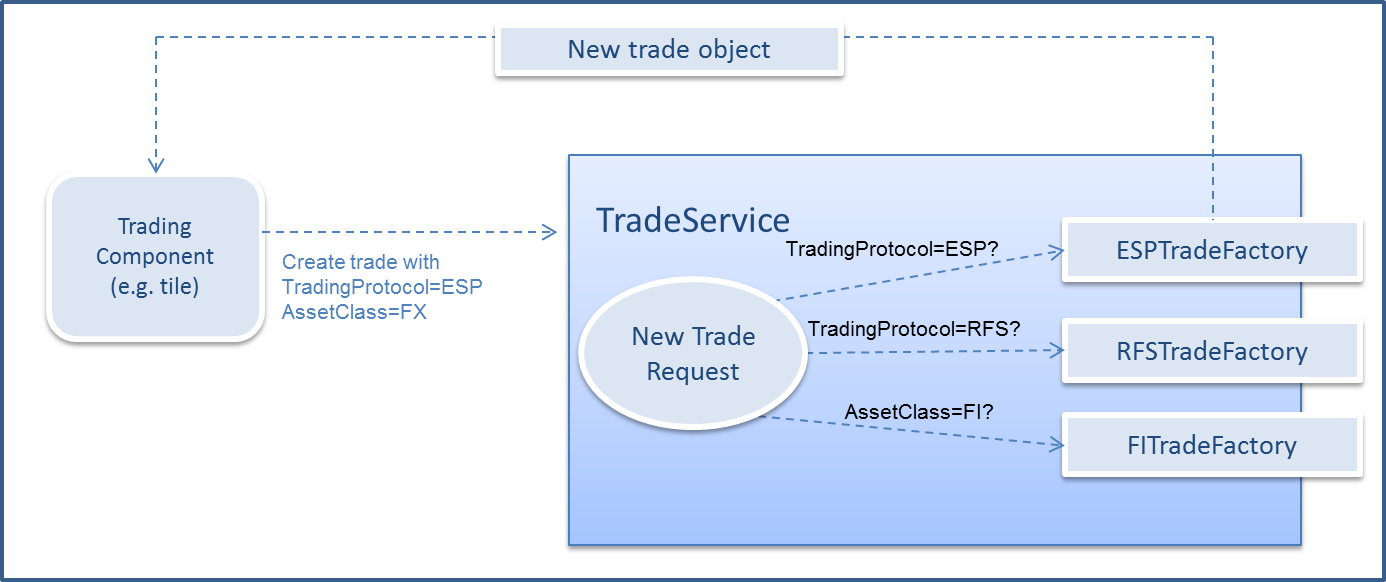
Components must call on the Trade Service to create trades. The Trade Service will have one or more Trade Factories to which it delegates trade creation, depending on what type of trade needs to be created.
The Trade Service uses the Factory Pattern - given the request parameters it determines which Trade Factory to invoke in order to create the trade. For example, if you ask the Trade Service to create a trade with a map of parameters and one of them is "TradeProtocol=ESP", the Trade Service might use parameter to determine that it should call the ESPTradeFactory.
This diagram shows the workflow:
Setting up the TradeService
The trading library defines a default implementation of TradeService. We need to get hold of this TradeService by pulling it out of the registry, and then register our ESPTradeFactory with it.
If you look at the ESPTradeFactory class again you will notice that it does not require any constructor arguments, so creating it is easy. We then just need to grab the TradeService and do the registration. As always, you can refer to the Available Services page to find out how to get the TradeService and what methods are available on it.
When we register a Trade Factory with the Trade Service we must provide two things - the Trade Factory itself and a set of field match criteria that define when it should be used. In this case we will say that if the user attempts to create a trade with the field "TradingProtocol=ESP", then the ESPTradeFactory should be used.
Open CaplinTrader/apps/TutorialApp/default-aspect/src/mycompany/App.js. Find the currently empty _createTradeFactory() method and implement it:
var ESPTradeFactory = require('mycompany/tutorial/tile/trading/ESPTradeFactory');

...

App.prototype._createTradeFactory = function() {
    var espTradeFactory = new ESPTradeFactory();
    var tradeService = ServiceRegistry.getService('caplin.trade-service');

    var matchCriteria = {
        TradingProtocol: 'ESP'
    };

    tradeService.registerTradeFactory(matchCriteria, espTradeFactory);
};
Using the TradeService to create a Trade
Your trade tile has been faking a trade so far. In this tutorial we’re going to change that. So open up TilePresentationModel.js and stop the buy and sell buttons from showing a confirmation message as soon as they are clicked - just comment them out for now.
Instead make them create a new trade as follows (retrieving values from the Presentation Model and passing them to the trade as trade parameters):
TilePresentationModel.prototype.buyClicked = function() {
    this._executeTrade('BUY');
};

TilePresentationModel.prototype.sellClicked = function() {
    this._executeTrade('SELL');
};

TilePresentationModel.prototype._executeTrade = function(buySell) {
    var tradeParameters = {
      'TradingProtocol': 'ESP',
      'Instrument': '/FX/' + this.currencyPair.getValue(),
      'BuySell': buySell,
      'Price': buySell === 'BUY' ? this.buyRate.value.getValue() : this.sellRate.value.getValue(),
      'DealtCurrency': this.dealtCurrency.getValue(),
      'BaseCurrency': this.currencyPair.getValue().substring(0,3),
      'TermCurrency': this.currencyPair.getValue().substring(3,6),
      'Amount': this.amount.value.getValue()
    };
    var tradeService = ServiceRegistry.getService('caplin.trade-service');
    var trade = tradeService.createNewTrade(tradeParameters);

    console.log('Created new ' + trade.getTradingProtocol() + ' trade in state ' + trade.getCurrentState().getName());
};
You can see that we are creating a map of fields for our trade, grabbing the Trade Service once again, and asking it to create a trade object for us. Because our field map contains "TradingProtocol=ESP", the Trade Service should use the ESPTradeFactory to create our trade and return it.
For now you can see no progression in the tile other than when you click the buy or sell button the confirmation message is no longer appearing. This is because all that the tile is doing for now is creating a new ESP trade on the client in its Initial state. We haven’t sent anything to the server. Sending trade messages is achieved using yet another service - the Trade Message Service.
Registering a Trade Message Service
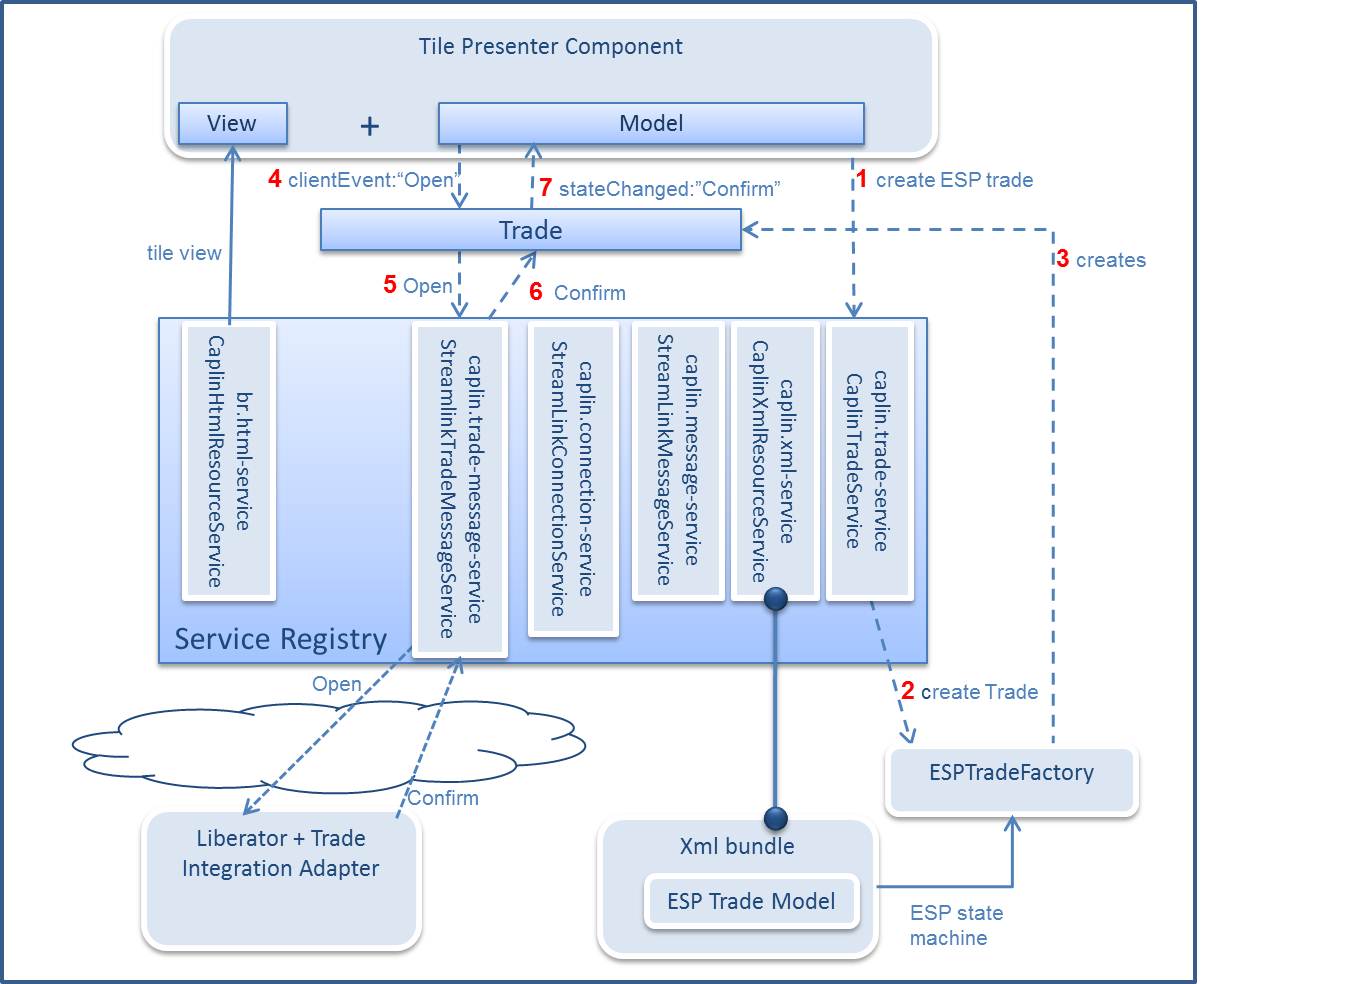
A TradeMessageService implementation is required to communicate with the server so that the tile can send and receive trade messages. No implementation of this service is defined by default, so we will have to do it in our application. Since you are using a StreamLink connection to the server, you will also use the StreamLinkTradeMessageService.
-
This class needs a reference to the Message Service which it uses to publish trade messages to the server and subscribe to incoming trade messages. We created the MessageService in the previous tutorial.
-
It also requires something called a TradeChannelMapper. You don’t need to worry about this for now, it’s out of scope for this tutorial and has already been implemented in App.js.
Go back to CaplinTrader/apps/TutorialApp/default-aspect/src/mycompany/App.js and find the currently empty _initialiseTradeMessageService() method.
First we create the two things StreamLinkTradeMessageService requires as constructor arguments, then we create the StreamLinkTradeMessageService itself, and finally we register the StreamLinkTradeMessageService with the Service Registry.
var StreamlinkTradeMessageService = require('caplin/trading/trademodel/StreamlinkTradeMessageService');

...

App.prototype._initialiseTradeMessageService = function() {
    var messageService = ServiceRegistry.getService('caplin.message-service');
    var tradeChannelMapper = this._getTradeChannelMapper('/PRIVATE/TRADE/FX');
    var tradeMessageService = new StreamlinkTradeMessageService(messageService, tradeChannelMapper);

    ServiceRegistry.registerService('caplin.trade-message-service', tradeMessageService);
};
Using the Trade Message Service
Go back to CaplinTrader/apps/TutorialApp/tutorial-bladeset/blades/tile/src/mycompany/tutorial/tile/trading/ESPTradeFactory.js. In the middle of the createNewTrade() method we created a TradeMessageServiceStub with does nothing:
this._tradeMessageService = new TradeMessageServiceStub();Now that we have registered a real Trade Message Service with the Service Registry, we can use it instead of the stub. Replace the line above with this one:
this._tradeMessageService = ServiceRegistry.getService('caplin.trade-message-service');Sending Trade Messages
You already wired up the tile to create a Trade object when you click the buy or sell button. However for the trade to progress beyond the initial state we must send out an "Open" event to the server. You will see in the trade model XML that the Open event is the first event that takes place for an ESP trade.
The trade will then transition to the "Executing" state and wait to receive a "Confirm" event from the server before it can progress to the final "TradeComplete" state.
Go back to CaplinTrader/apps/TutorialApp/tutorial-bladeset/blades/tile/src/mycompany/tutorial/tile/TilePresentationModel.js. Find the _executeTrade() method. At the bottom of that method we were previously just printing a line to the console. Leaving the existing content of the method intact, add a line at the end of the method to send an "Open" message to the server.
TilePresentationModel.prototype._executeTrade = function(buySell) {
    ...
    var tradeService = ServiceRegistry.getService('caplin.trade-service');
    var trade = tradeService.createNewTrade(tradeParameters);

    console.log('Created new ' + trade.getTradingProtocol()
        + ' trade in state ' + trade.getCurrentState().getName());

    trade.processClientEvent('Open', tradeParameters); (1)
};| 1 | Send an 'Open' message to the server |
If you like, you can now reload the application with the ?debug=finer URL parameter and click the buy and sell buttons. In the StreamLink log you will be able to decipher an Open message going out to the server when you click the buttons, and a Confirm message coming back from the server. We are not doing anything with the Confirm message yet. This is the last part we need to wire up in order to complete the trade cycle.
Receiving Trade Messages
As soon as the trade receives a "Confirm" event from the server, it will change to the "TradeComplete" state. In order to react (for example by showing the trade confirmation message), the tile must listen to state changes in the trade.
In order to receive trade messages from the server, the tile must register itself as a listener on the Trade object. This is exactly the same paradigm as you have seen a few times before:
-
Make the tile set itself (this) as a listener to the Trade.
-
Declare that the tile implements the expected listener interface.
-
Add implementations of the interface method(s) to do something useful when we receive the events.
Go back to the _executeTrade() method in TilePresentationModel.js. We will insert a single line in between creating the Trade and sending the Open message that registers the tile as a listener for server events.
TilePresentationModel.prototype._executeTrade = function(buySell) {
    ...
    var tradeService = ServiceRegistry.getService('caplin.trade-service');
    var trade = tradeService.createNewTrade(tradeParameters);
    trade.addStateChangedListener(this); (1)

    console.log('Created new ' + trade.getTradingProtocol()
        + ' trade in state ' + trade.getCurrentState().getName());

    trade.processClientEvent('Open', tradeParameters);
};| 1 | Register the tile as a listener for server events |
Now we have to declare that the tile is a listener for trade events. The relevant interface this time is caplin.trading.statemachine.StateChangedListener.You could of course find this out by looking at the API documentation for the addStateChangedListener() method of the Trade object.
Under our constructor let’s declare that our tile implements this new interface in addition to the two other interfaces and one abstract class that it already extends.
var StateChangedListener = require('caplin/trading/statemachine/StateChangedListener');
...

topiarist.extend(TilePresentationModel, PresentationModel);
topiarist.inherit(TilePresentationModel, SubscriptionListener);
topiarist.inherit(TilePresentationModel, ConnectionServiceListener);
topiarist.inherit(TilePresentationModel, StateChangedListener);(1)| 1 | Declare that the TilePresentationModel implements StateChangedListener |
The StateChangedListener interface only defines one method for us to implement, which is called stateChanged(). The trading library will call this method whenever we receive a trade event from the server, and it will give us some useful information like the name of the event, an object representing the state that the trade is now in, and a map of all the fields now on the trade.
What should you do when the state has changed? You will want to check whether the state is a final state (i.e. the "TradeComplete" state from the trade model XML), and if so, display the confirmation message using the trade data returned in the stateChanged() callback. Add this new method to the class:
TilePresentationModel.prototype.stateChanged = function(state, eventName, tradeData) {
var stateName = state.getName();
if (stateName === 'TradeComplete') {
// Pull the information we need from the trade object
var boughtSoldString = tradeData.get('BuySell');
var rateDealtAt = tradeData.get('Price');
// Compose the parameters for the internationalised confirmation message
var messageParams = {
currencypair: this.currencyPair.getValue(),
boughtsold: boughtSoldString === 'BUY' ? i18n('mycompany.tutorial.tile.confirmation.bought') : i18n('mycompany.tutorial.tile.confirmation.sold'),
amount: i18n.getTranslator().formatNumber(this.amount.value.getValue()),
dealt: this.dealtCurrency.getValue(),
rate: rateDealtAt
};
// Set the confirmation message
this.message.setValue(i18n.getTranslator().formatDate(new Date()) + ' ' + i18n('mycompany.tutorial.tile.confirmation', messageParams));
}
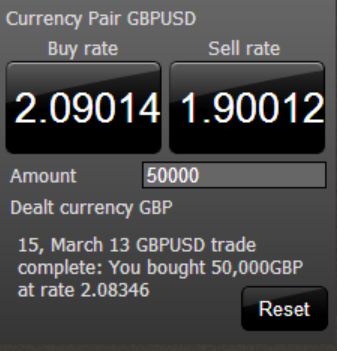
};Go back to the application. Whenever you click the buy or sell button on the tile you should see the appropriate confirmation message appear at the bottom. You can also examine the logs on the Trading Integration Adapter to see the progression of the trade.
Review
In this tutorial you have understood the purpose of the TradeService and TradeMessageService and how these can be used by your component to create a trade and communicate with the server. The same concepts can be used to implement any kind of trade using different trade factories.
More information about trading can be found on the website.