Verifier
Verifier is a testing framework built on top of Jasmine and jsTestDriver to enable you to easily write a comprehensive set of component or acceptance tests for the components which you build using Presenter.
Objectives
In this tutorial we’re going to be writing BDD-style (Behaviour Driven Development) acceptance tests for the trade tile built in the Presenter tutorial, using Verifier’s Given-When-Then syntax.
It is generally advisable to write two types of acceptance tests for new components:
-
The first thing you’ll want to ascertain is that the view is correctly bound to the model. We can do this via a set of binding tests.
-
Of course, you also want to test the component’s functionality and acceptance criteria via the model tests.
Test Infrastructure
Before running any tests you will need to point the test framework to the browser(s) on your machine so that these can be launched to run the tests. Open the file CaplinTrader/conf/test-runner.conf and uncomment the browsers you would like to enable. Of course in a real application you would want to run your automated tests in all of the browsers you support.
For each browser that you uncomment, double check that the path to the browser exe file is correct for your machine and change it if necessary. For example, if you have installed the 32-bit version of Chrome you may well need to change the "Program Files" part of the path to "Program Files (x86)".
Now that the browsers are correctly configured for your machine you can run some tests.
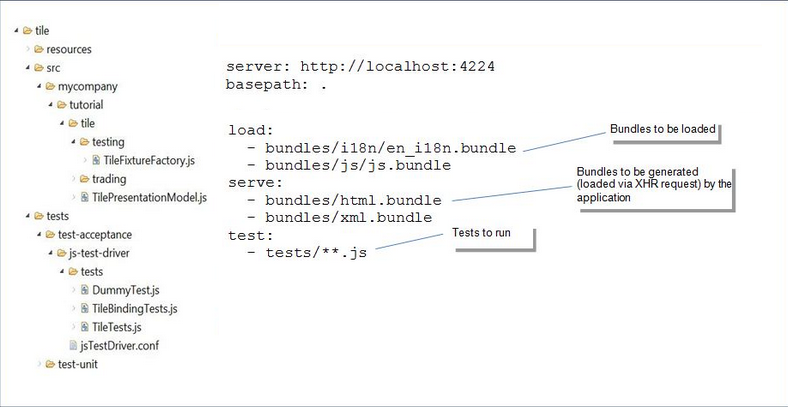
In the tests directory of your tile blade (CaplinTrader/apps/TutorialApp/tutorial-bladeset/blades/tile/tests) you will find a test-acceptance folder. This is where the acceptance tests and their configuration lives.
Take a look inside the jsTestDriver.conf file.
Test Execution
DummyTest.js contains the most simple acceptance test possible (written with Jasmine, not Verifier, syntax). It is the only test that is currently enabled in the tile, for demonstration. Tests in the other files are commented-out.
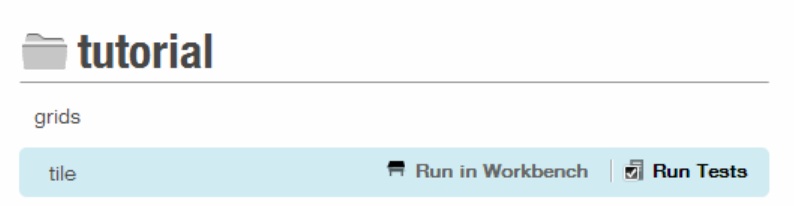
Running the Tests via the Dashboard
You can now run your tests in the browser of your choice via the dashboard. This will start a test server, open up a new tab and execute the tests using that server, and eventually give you a link to the results. After the results have been generated you can safely close the test server tab if it does not close automatically.
Running the Tests via the Command Line
To run acceptance tests, enter the command below:
brjs test ..\apps\TutorialApp\tutorial-bladeset\blades\tile ATs
To run unit tests, enter the command below:
brjs test ..\apps\TutorialApp\tutorial-bladeset\blades\tile UTs
To run both acceptance tests and unit tests, enter the command below:
brjs test ..\apps\TutorialApp\tutorial-bladeset\blades\tile ALL
To use a different browser, which you have enabled in your test-runner.conf file, enter the command below:
brjs test ..\apps\TutorialApp\tutorial-bladeset\blades\tile ALL -b ie
Debugging Tests
You will have noticed that when you do a one-off run of the tests, either from the dashboard or from the command line, BladeRunnerJS starts a test server which lives for the duration of the test run and then stops. This does not allow you much opportunity to debug during test runs. Also, having a new browser tab open and steal focus whenever you run tests can become annoying.
It is possible to start up a persistent test server which can sit in an open tab and will be used whenever you run the tests. This is the recommended way to test your blade as you develop it.
Try this yourself
-
Close any old test server tabs that are currently open.
-
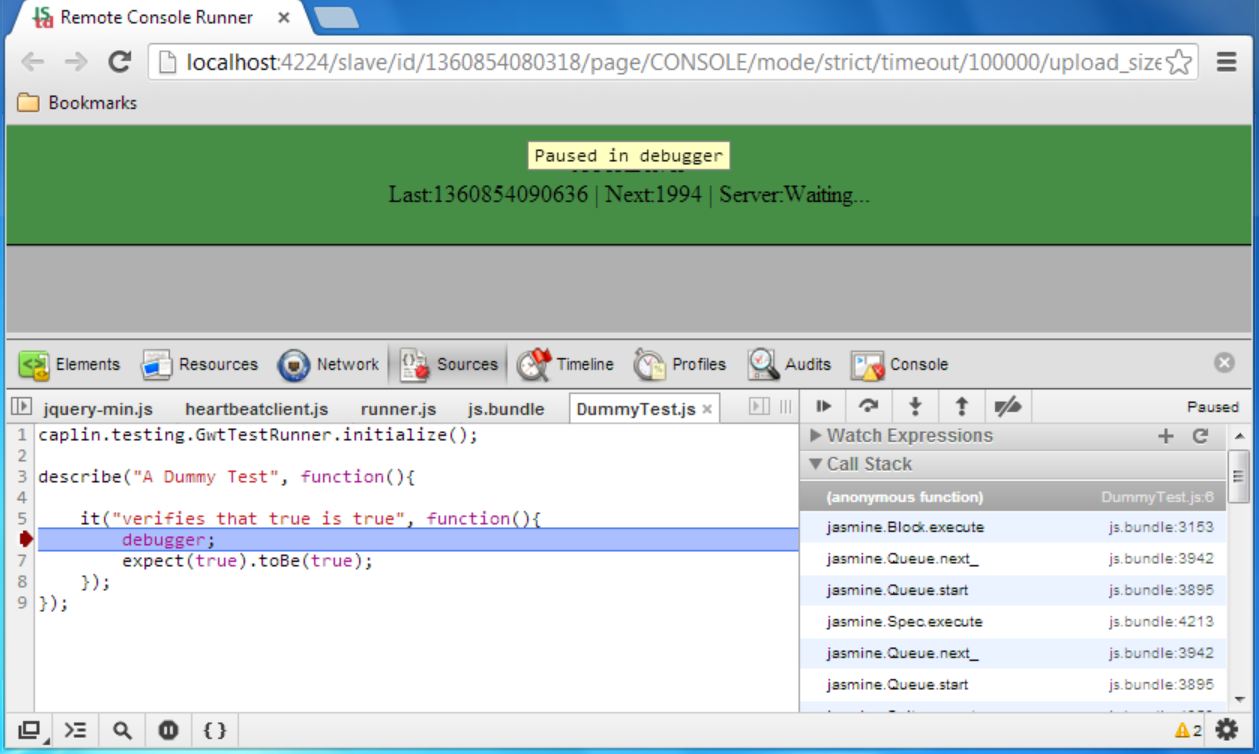
Add a debugger line to your DummyTest (CaplinTrader/apps/TutorialApp/tutorial-bladeset/blades/tile/tests/test-acceptance/js-test-driver/tests/DummyTest.js) to try this out. This line acts as a breakpoint - if you have the developer tools open in your browser, the browser will halt execution when it hits a debugger line.
it("verifies that true is true", function(){ debugger; expect(true).toBe(true); }); -
Now use the command line to launch a test server without running the tests . Navigate to the BladeRunnerJS SDK and run:
brjs test-server
To launch a test server without a browser, run:
brjs test-server -b
-
A new Chrome window or tab will appear with the test server. There should be a green JSTestDriver banner at the top. In this tab, open the developer tools by pressing F12.
-
Next, open a new command line window. This will probably be your third, because you are already running BladeRunnerJS itself and the test server. Navigate to the BladeRunnerJS SDK and run the test command:
brjs test ..\apps\TutorialApp\tutorial-bladeset\blades\tile ATs
-
When you execute this command BladeRunnerJS will detect that you already have a test server running and use this to run the tests. The test execution should hit your debugger and you can debug your tests just as you would any webapp. You can investigate the call stack, evaluate expressions, step through line by line etc. Hit the play button when you’re done to resume execution.
When you are done, delete the "debugger" line from your test, because we will be running the tests frequently throughout this tutorial and we don’t want to hit a breakpoint every time.
If you are a front end developer it’s a good idea to get used to the Chrome developer tools because they are invaluable for debugging.
| If all the command windows are annoying you, try installing a tabbed console application like ConEmu, or an equivalent for your operating system of choice. |
Writing Tests
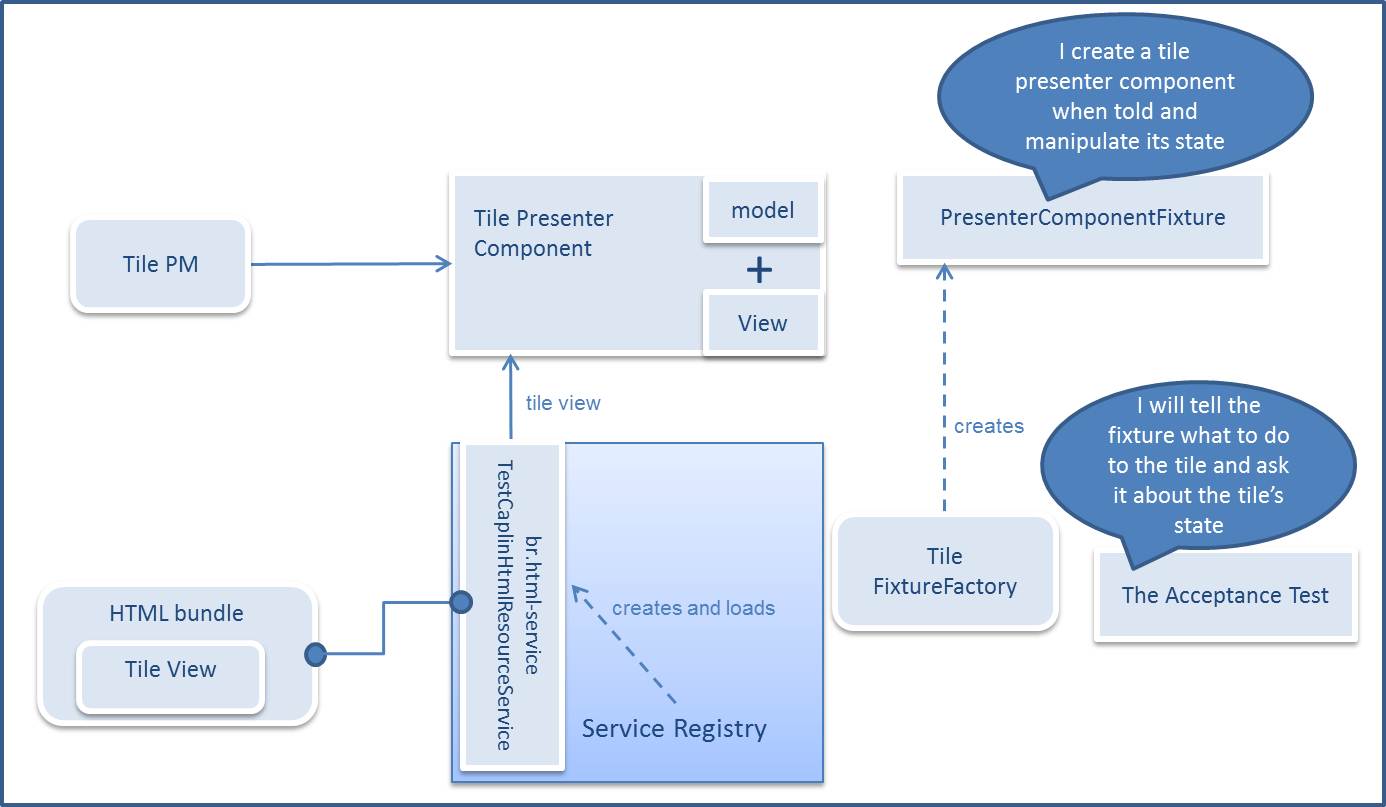
We are going to write tests for the tile component using given-when-then Verifier syntax. In order to be able to "get a handle" on the component and to refer to and manipulate specific parts of its view or model we will need a fixture.
In fact we will need a fixture for each subsystem used by a component-under-test e.g. one for the tile, one for the pricing subsystem, one for the trading subsystem, etc. (For now we’re using none of these sub-systems, it’s just the tile.)
The fixtures required are created by the test’s "Fixture Factory". Take a look inside CaplinTrader/apps/TutorialApp/tutorial-bladeset/blades/tile/src/mycompany/tutorial/tile/testing/TileFixtureFactory.js.
-
The class implements an interface called
caplin.testing.FixtureFactory. This interface has one method, "addFixtures()". This method is called by the test framework before the tests begin to allow you to register any fixtures that are required for the test run. -
In our implementation of this method, we are creating a fixture for our tile and registering it.
-
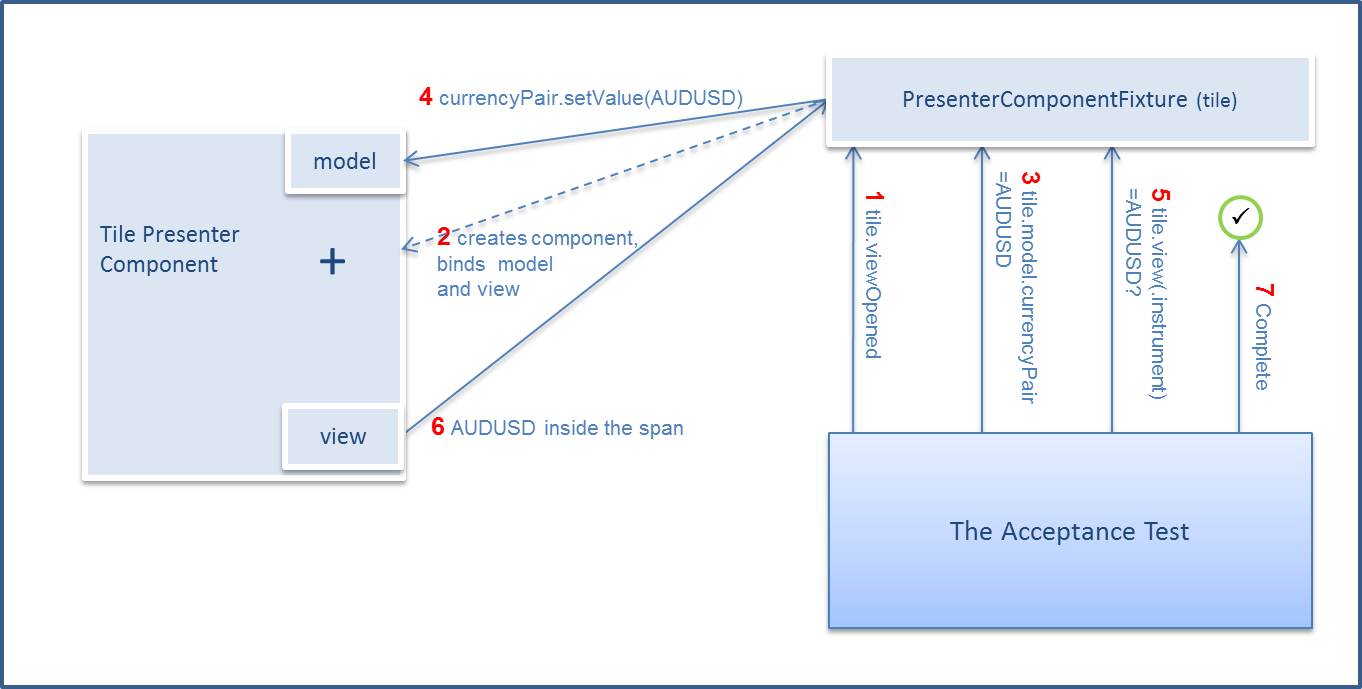
Since the tile is a Presenter Component we’re using a PresenterComponentFixture. When we want to test the tile’s interaction with a trading subsystem we’ll use a TradeMessageFixture etc. The scope id given to the tile component is "tile".
Here it is in a picture:
Binding Acceptance Tests
The purpose of a binding test is to check that the presentation model is correctly bound to the view and vice versa - for example, you would want to check that if you programatically change a value in your presentation model the view is updated. These tests should catch errors such as accidentally using the wrong data-bind syntax in your view, resulting in no binding.
The following is an example list of binding tests we could write for our tile:
-
The values in the view correspond to the property values in the presentation model
-
When the "buy" button is clicked, the buyClicked method is called; Same for the "sell" and "reset" buttons
-
When the amount value is changed in the view, the amount changes in the model
-
When the buyRate and sellRate are disabled in the model, the buttons are disabled in the view.
Test 1
| When changing our properties to use a caplin Field, to access its value we must add ".value" (this is not necessary when using caplin Properties, e.g. caplin.presenter.property.EditableProperty). So if you have problems accessing these values in js, html or tests, please update accordingly. |
Open up TileBindingTests.js. There is a test already written (but commented out) for the first test in the list above.
it("binds view and model properties", function(){
    given("tile.viewOpened = true");                                 //Create tile presenter component and bind view to model
        and("tile.model.currencyPair = 'AUDUSD'");                   //Set the state in the tile's presentation model
        and("tile.model.buyRate.value = 3.33");
    then("tile.view.(.tile .instrument span).text = 'AUDUSD'");      //Read & assert the state of the tile's view (JQuery selectors)
        and("tile.view.(.tile .buysell-buttons button:nth-child(2)).text = '3.33'");
});
Without worrying too much about what the test actually does for now, try uncommenting it and then run the tests again from your command line. You should find that it passes. If the test run seems to be taking a long time, check that you have remembered to delete the "debugger" line from your dummy test - it’s probably stuck on the breakpoint!
Although the syntax will probably be unfamiliar, you should be able to see roughly what the test is doing by reading it. These are the important points:
-
The first line of the test ("it") simply gives the test a name and defines the function that will be executed as a test.
-
The three "given" lines set up the tile in a certain state by setting values on the view model:
-
The first line ("tile.viewOpened = true") initialises the component.
-
The next two lines are programatically setting values in the presentation model.
-
Whenever you see a line in the test interact with "tile.model", it’s actually interacting with your TilePresentationModel.js class.
-
-
The two "then" lines are verifying that the values we set in the model have been correctly applied in the view, i.e the bindings are working:
-
Whenever you see a line in the test interact with "tile.view", it’s actually interacting with your tile.html file.
-
The part of the line in brackets is a CSS selector to find the HTML element we want to inspect. For example, the line "tile.view.(.tile .instrument span)" is looking for an element with the class "tile", then an element under it with the class "instrument", and then a span element under that. If you open up tile.html you will see which element this refers to - it’s the one bound to the currency pair.
-
The part of the line after the CSS selector, ".text = 'AUDUSD'", is the actual verification. It’s checking that the content of the span element identified by the CSS selector is 'AUDUSD', which should be the case because we set the value of the currencyPair attribute to this value in the presentation model.
-
The second line uses a more complicated CSS selector to find the buy button. If you look at your tile.html again you will see that there are no ID or class attributes on our buttons that would allow them to be easily identified, so we have to use the "nth-child" CSS selector to grab the second one. Note that this selector makes the test brittle, because any sort of re-ordering or addition of new child elements in your view will break the test. It’s reasonable for your QA to flag this up and ask you to add an ID or class to your view elements to allow them to be identified in a more reliable way.
-
Try changing the test to make it fail and see what happens when you re-run it. For example, try expecting a different currency pair in the view to the value you set in the presentation model.
As a mini-exercise, try extending the test so that it checks at least one more of the bindings. For each binding you want to test you will have to:
-
Identify an attribute in TilePresentationModel.js which is not currently being tested, such as the dealt currency.
-
Add a new "and" line to the "given" block which sets a known value on the attribute in the presentation model.
-
In tile.html, find the HTML element that is bound to this attribute. Add a new "and" line to the "then" block to select this element and check the content has been set to your known value.
You may need to practice your CSS selectors!
What is really happening in the background? This is how the test uses the Fixture to manipulate the tile and assert the state of the tile.
Test 2
Now let’s try the second test in our list of five, which is "When the "buy" button is clicked, the buyClicked method is called; Same for the "sell" and "reset" buttons".
This test is a bit different to the previous one because we are not setting some values in the presentation model and checking they have been reflected in the view, we are performing an action in the view and checking the right event has occurred in the presentation model. So this is testing the bindings in the opposite direction, from view → model as opposed to model → view.
-
The PresenterComponentFixture can count the number of invocations for each method in a component’s Presentation Model. These can be set and tracked via the "invocationCount" property.
-
You can also simulate a dom event such as a click on any element in the view of the Presenter component. The example below shows how the button is clicked. But "clicked" and "text" are not the only ways that an element in the view can be manipulated or read. Check out all the view handlers available in the dom.testing.viewhandler library. (You can also access the API docs from your Caplin Trader dashboard.)
Hint: if you get on to the stretch goals, you will be using the Enabled view handler to check whether the buy and sell buttons are enabled.
Try adding this test to your TileBindingTests.js. You will have to replace the semi-colon at the end of the existing test with a comma and paste this one underneath it.
it("triggers buyClicked when the buy button is clicked", function(){
    given("tile.viewOpened = true");
        and("tile.model.buyClicked.invocationCount = 0");
    when("tile.view.(.tile .buysell-buttons button:nth-child(2)).clicked => true");
    then("tile.model.buyClicked.invocationCount = 1");
});
Read through this test and make sure you understand it. Note that there is a new "when" section between the test setup and the verifications. Given-When-Then is a standard paradigm in BDD style tests.
In this case we are saying "Given that the buyClicked method in the presentation model has never been invoked, when I click on the buy button in the view then I expect the buyClicked method in the presentation model to have been invoked once".
Now copy and paste this test so that there are three tests in the file, change the name, and adapt it so that it checks that the click handler for the sell button works. You will have to change the CSS selector so that it finds and clicks the sell button instead of the buy button, and change the verification so that it checks the sellClicked method has been invoked.
Stretch Tasks
If you have time at the end of this tutorial and you want more practice at writing binding tests, have a go at Test 3 which should follow this sequence:
Given: tile is opened
And: amount in model is x
When: value in amount input field becomes y
Then: amount in model is y
You can also have a go at Test 4. This one needs no "when" clause. It uses the Enabled view handler in the same way we used Clicked view handler.
For now, you can move on to the Model Acceptance Tests.
Model Acceptance Tests
Now that we have finished with our binding tests, we want to test any business logic that exists in our presentation model. The following are a set of acceptance tests for the trade tile’s functionality:
-
Tile opens in correct initial state
-
Confirmation message has correct details when buy button is clicked; Same for sell button
-
Reset button resets the tile to the original state
-
Failure message is set to "Invalid amount" when amount is changed to a non-number
-
Failure message is empty when amount is changed back to a number
-
Buy and sell buttons are disabled when amount is changed to a non-number
-
Buy and sell buttons are enabled when amount is changed back to a number.
Test 1
Let’s try implementing the first test in the list. You will find the presentation model tests in the file CaplinTrader/apps/TutorialApp/tutorial-bladeset/blades/tile/tests/test-acceptance/js-test-driver/tests/TileTests.js.
Uncomment the test in TileTests.js. The first thing to notice is that instead of "tile.viewOpened", there is just "tile.opened". This means that the view will not be bound to the model when the Presenter component is created.
You should already have tested all of the "bound points" in the binding tests, so in the model tests we just need to test the behaviour of the presentation model and we don’t care about the view at all. This is important, because not initialising the view in your model tests makes the tests much faster to execute. You will notice that there are no lines in the test that interact with "tile.view", because that doesn’t exist unless we call "tile.viewOpened" - you will get an error if you try to access it.
The rest of the test is straightforward, it just reads the various properties in the presentation model and checks that they have the correct starting value.
Test 2
Now we can move on to the second test, which is "Confirmation message has correct details when buy button is clicked; Same for sell button"
Add the test below to the file. Notice in this test that we are using a "shortcut" by continuing from the state left off in a previous test. This saves us setting up the tile’s initial state.
it("displays correct message when buy is executed", function(){
    given("test.continuesFrom = 'starts tile in initial state'");
    when("tile.model.buyClicked.invoked => true");
    then("tile.model.message = '" + caplin.i18n.Translator.getTranslator().formatDate(new Date()) + " GBPUSD trade complete: You bought 50,000GBP at rate 2.22'");
});
Just as it is possible to count the number of times that a method is invoked in the presentation model, you can also invoke the method directly. The "when" line does this. Note the slightly unusal syntax for the operator, the general convention is that "⇒" denotes performing an action such as invoking a method, and "=" denotes verifying something.
Try adding a similar test for the sellClicked method.
Stretch Tasks
Decide if you want to practice model tests or binding tests. If you want to do more model tests, have a go at tests 3-7 in the list above. Make sure you access the correct properties inside the fields, and continue from a previous test where this is advantageous. There is no limit in the chain to how many tests can carry on from each other. You may need to refer to the documentation if you want to find out the correct Verifier syntax for performing actions or checking attributes.
Review
Having completed this exercise you should have a good understanding of how to run tests in Caplin Trader. You should also be able to distinguish between two types of acceptance tests and understand that a good approach to acceptance testing your Presenter component is to write a few binding tests and to write a good amount of "functional" acceptance tests to test the component’s behaviour using only the model.
More information and tutorials for Verifier can be found on the website. Background information on Jasmine tests can also be found here.