Extra Tutorial: Workbench Widgets and ATs
This tutorial fills in the workbench and testing gaps which we left when creating the trade tile in the previous tutorials.
Overview
We have been adding functionality directly to the application in order to quickly convey how the main product is implemented and how it interacts with the server which was implemented in earlier tutorials.
In reality you should be developing in the workbench using the stub services, and creating your acceptance tests, before wiring up the main application to the server at the end. (Remember that the only difference should be that the main application uses StreamLink services instead of stubs and creates a StreamLink connection object.)
The last time that we brought the workbench and tests up to date was after we introduced use of the MessageService in the tile. Also keep in mind that this is the lifecycle of the tile:
-
Tile is created
-
It waits for a connection to be established and for the User and Permission Services to be initialised
-
When a connection is established tile asks whether it has permission to view prices for its currency pair
-
When a permission update is received, tile subscribes for price updates
-
When a buy or sell button is clicked, tile asks whether it has permission to trade on its currency pair, then creates a trade and sends "Open" event
-
Tile waits for the "Confirm" event from the server before displaying the confirmation message.
Follow the steps in this tutorial to get the workbench and tests working. Refer to the API docs as you go along.
Fixing the Workbench
If you open the workbench at this point, you will find that it does not work because the Price Generator UI widget is expecting to find a subscription in the MessageServiceStub . There is none as the permission update has not been received, so the subscription has not been made.
Follow the steps below:
-
The ConnectionServiceStub and PermissionServiceStub are the default implementations for the dev scenario. To simulate the connection and permission updates coming from these services, after creating the tile in TileWorkbenchApplication.js
-
Update the status on the Connection service to simulate the connection becoming available
-
Update the PermissionService to allow viewing and trading on /FX/GBPUSD
-
(Refer to the stubs' API docs)
-
Provide a string to deserialize that contains the Tile’s currency.
-
-
At this point your workbench will work until you press a buy or sell button, then it expects to find a TradeFactory inside the TradeService. Create an ESPTradeFactory instance and register it with the TradeService (just like you did in the main application).
-
Set trading status to available on the TradeMesageServiceStub:
ServiceRegistry.getService('caplin.trade-message-service').receiveTradeChannelStatusChange(true);(In the main application, the StreamlinkTradeMessageService is notified by the server connection when the trading changes. In the case of the workbench we need to set the status ourselves on the TradeMessageServiceStub which is the default dev scenario TradeMessageService.)
-
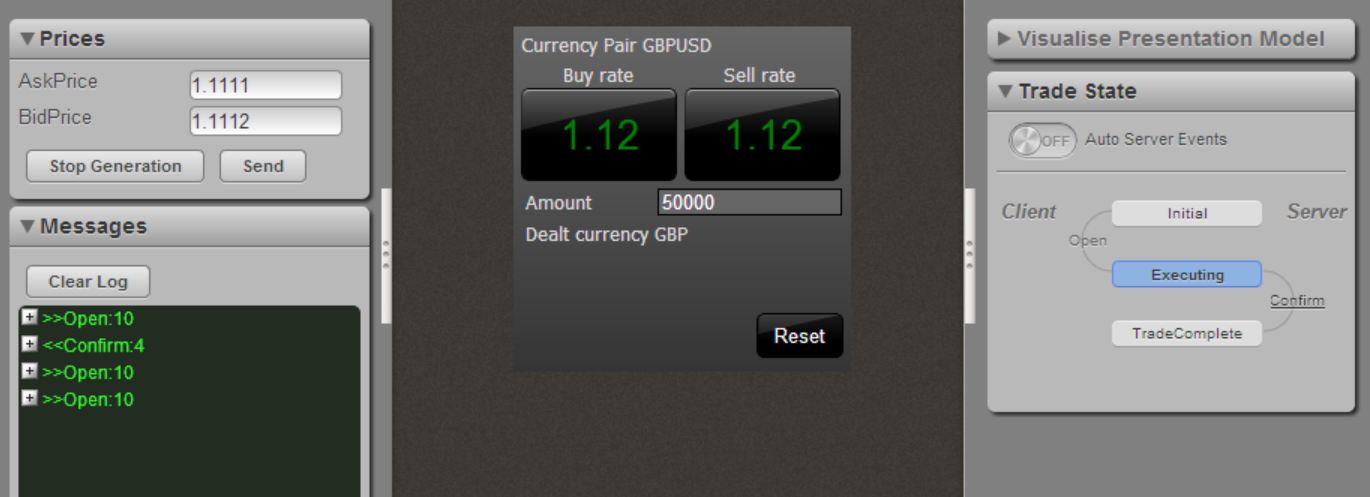
You should now notice that when you click a button in the workbench you can see the "Open" event being sent from the tile in the Messages Log widget by the left hand side. Of course, lacking an actual server, the trade does not receive a trade event confirming the trade’s completion.
-
A workbench widget called the StateModelVisualiser can be used to display the trade’s state machine and also simulate server-sent events via the workbench.
-
Insert the widget in tile/workbench/index.html:
var StateModelVisualiser = require('caplin/trading/workbench/ui/StateModelVisualiser'); ... function initialize() { ... var tradeFactory = application.getESPTradeFactory(); workbench.addToRightWing(createStateViewer(tradeFactory), 'Trade State'); ... } function createStateViewer(tradeFactory) { var stateMonitor = tradeFactory.getStateMonitor(); stateMonitor.setStateOrder(['Executing', 'TradeComplete']); var tradeMessageService = ServiceRegistry.getService('caplin.trading.trademodel.TradeMessageService'); var stateViewer = new StateModelVisualiser(stateMonitor, tradeMessageService); stateViewer.setServerDataForTransition('Confirm', { Price: 9.99, Amount: 10000, BuySell: 'BUY', DealtCurrency: 'GBP' }); return stateViewer; }; -
You’ll need to attach a state monitor to the state machine of each trade. The StateModelVisualiser uses this to track the progression of the trade. Add the following to the ESPTradeFactory:
var StateMachineMonitor = require('caplin/trading/workbench/model/StateMachineMonitor');

ESPTradeFactory.prototype.createNewTrade = function(tradeParameters) {
    ...
    var stateMachine = this._stateMachineFactory.getStateMachine(tradingProtocol);

    if (this._stateMonitor) {
      this._stateMonitor.setStateMachine(stateMachine);
    }
    ...
};

ESPTradeFactory.prototype.getStateMonitor = function() {
    if (!this._stateMonitor) {
      this._stateMonitor = new StateMachineMonitor(this._stateMachineFactory.m_mModels["ESP"]);
    }

    return this._stateMonitor;
};
-
-
The workbench should now have the new widget on the right hand side of the screen. Once you press a buy or sell button, the state machine goes to the "Executing" state and you can click either of the 3 server events to simulate it and to see the tile’s reaction in each case.
Try this yourself
See the diagrams in the Message Service tutorial which detail how the workbench is wired up. Draw up a similar diagram to show the complete sequence of events which enables the tile to perform in the workbench.
Fixing the Acceptance Tests
When you try to run the acceptance tests for your tile you should find that some tests fail because a message service subscription has not been made and because there is no trade factory to create new trades when the executeBuy/Sell methods are invoked from the test.
Follow the steps below:
-
In the addFixtures method inside your TileFixtureFactory, create a ConnectionServiceFixture, PermissionServiceFixture and TradeMessageFixture to have a handle on the connection, permissioning and trading sub-systems. You need to give them a unique scope id each, which you then use in the tests.
-
Create a setUp method in the FixtureFactory. This method will be called before each test. Here use methods setConnectionServiceStub and setTradeMessageServiceStub on the Connection and TradeMessage Fixtures respectively to assign the service stubs to their respective fixtures. Note that this needs to be done in the setUp method since all the services are reinitialised after each test. Therefore, we need to assign the new services to the constant fixtures before each new test starts.
-
Also, in the setUp method of the FixtureFactory, create an instance of the ESPTradeFactory and register it with the TradeService.
-
One of the test errors you’ll notice is that the tile’s message is not as expected after the buy and sell buttons are clicked:
-
Firstly you must use the PermissionServiceFixture to allow the trading for the tile’s currency pair before invoking the executeBuy/Sell method from the test.
-
Also before you invoke the executeBuy/Sell button, you must use the TradeMessageFixture to enable the trading status.
-
Of course, now the tile is also waiting for a server response before it shows a confirmation message. Use the TradeMessageFixture in the test to simulate a "Confirm" trade message after the "Open" event is sent by the tile. You also need to set the enable the trading status before starting the test. (Check out the TradeMessageFixture API doc to become familiar with the properties which you need to use.)
-
-
Another test error you’ll notice is that with the price updates, which we’re simulating using the DataSubscriptionFixture + MessageServiceStub. Remember that, due to the changes we’ve made since, the tile does not subscribe for /FX/GBPUSD price updates until a connection is available and it knows that it is allowed to view the prices for the currency pair. The problem with this test is that the tile is not subscribing, therefore the MessageServiceStub finds no subscriber to whom to propagate the messages. See the API for the PermisionServiceFixture to set the permission status before sending a price update.
-
Create the following tests to test the use of the Permission API:
-
Message is shown when the user is not allowed to view the currency pair prices
-
Message is shown when the user is not allowed to trade on the tile’s currency pair and tries to trade
-
Try this yourself
Again, try to create a visualisation of the system under test.