Message Service
The Message Service is a service you can use to subscribe to any data which can be pushed from the server. In this tutorial we will be subscribing to price updates for the GBPUSD currency pair.
Objectives
This is a tutorial in which you will:
-
Use the MessageService to request prices for a currency pair from the backend
-
Display the received prices in the buy/sell buttons in the trade tile which you developed earlier
-
Use the ConnectionService to monitor the status of your connection and adapt your application accordingly
-
Test the price updates using the workbench and Verifier acceptance tests
For this tutorial you need to connect to the back end developed in the "Caplin Platform and Integration Suite" tutorials - this will stream prices from the Pricing Integration Adapter. If you have not followed these tutorials you can make a connection to rttp://libtraining.caplin.com:18080 instead of rttp://localhost:18080.
StreamLink Connection
In order to connect to a streaming server we first need to determine which connection service will be used. The SDK does not define the default implementation for the caplin.connection-service. Since we are connecting to a Caplin back end we are going to use the StreamLink library, and therefore the StreamLinkConnectionService.
In theory it is possible to create and use a different kind of connection service in order to connect your Caplin front end to a non-Caplin back end.
Open your app’s main class, CaplinTrader/apps/TutorialApp/default-aspect/src/mycompany/App.js. There is a method in this class called _initialiseStreamLink(), which is currently empty. Find this method, and in the body of it we are going to do three things:
-
Create a StreamLink object. This will probably be familiar from the StreamLink interactive documentation that you looked at earlier in the course. Be sure to change the liberator_urls property if you want to connect to libtraining.caplin.com rather than your own local back end.
-
Create a new StreamLinkConnectionService, passing in your StreamLink object. This is a wrapper that implements the ConnectionService interface using the underlying StreamLink object.
-
Register the StreamLinkConnectionService with the service registry under the name "caplin.connection-service".
require('sljs');
var StreamLinkConnectionService = require('caplin/sljsadapter/providers/StreamLinkConnectionService');

...

App.prototype._initialiseStreamLink = function() {
    var streamlink = caplin.streamlink.StreamLinkFactory.create({
        username: 'demouser',
        password: 'demopass',
        liberator_urls:"rttp://localhost:18080"
    });

    var connectionService = new StreamLinkConnectionService(streamlink);

    ServiceRegistry.registerService('caplin.connection-service', connectionService);
};
Try this yourself
Still within your App.js main class you will find two other unimplemented methods, startStreamLinkConnection()_ and stopStreamLinkConnection()._ We should implement these methods next. Starting with the first one, we will retrieve our connection service from the registry and call "connect()" on it. Note that we are using the counterpart to the "ServiceRegistry.registerService()" method, which is "ServiceRegistry.getService()".
App.prototype._startStreamLinkConnection = function() {
    var connectionService = ServiceRegistry.getService('caplin.connection-service');
    connectionService.connect();
};
Notice that at this point we are interacting only with the ConnectionService interface and we don’t know that the underlying implementation is using StreamLink. This is good, because it means that if you swap out your ConnectionService later on with a different implementation, this code does not need to change at all.
How do you know which methods are available for you to call on the ConnectionService interface? Remember that most of our API documentation is either online or in the process of moving online. Try entering "caplin available services" in Google and you will find this page. On that page you will see that the "caplin.connection-service" alias is listed alongside the caplin.services.ConnectionService interface. Click on that interface and you will see all of the methods available, including "connect()" which we have just used.
Now try implementing the _stopStreamLinkConnection() method. It is almost the same, except you want to call "disconnect()" on the connection service that you retrieve from the registry.
Load your application in the browser. Be aware that the code we have added is in App.js, which is the main application, not the workbench - so to see this work you must launch the full application rather than the tile workbench. We will get to the workbench later.
When you load your app, a connection will be made to your local Liberator with username "demouser". You will not be able to see anything happening on the screen, however you can see the StreamLink logs in a separate window by adding the parameter debug=finer to your URL bar - for example:
http://localhost:7070/TutorialApp/?debug=finer
StreamLink will detect this URL parameter and pop up a separate window with its own log. The first time you do this your browser’s pop-up blocker will block it. You need to tell your pop-up blocker to allow pop-ups from this URL, and refresh the page. Then you will see the StreamLink log, which should show that you are successfully logged in:
- INFO   : Using Connection Type: WebSocketConnection
- INFO   : Connection state changed to: CONNECTING ws://localhost:18080
- FINER  : < 01 0AIFfiwo0pmhoubhSlO_6V host=unknown version=2.1 server=unknown time=1373275492 timezone=0000
- INFO   : Connection state changed to: CONNECTED ws://localhost:18080
- INFO   : Connection state changed to: RETRIEVINGCREDENTIALS ws://localhost:18080
- FINE   : Received credentials: Credentials [username=demouser, password=demopass]
- INFO   : Connection state changed to: CREDENTIALSRETRIEVED ws://localhost:18080
- FINER  : > 0AIFfiwo0pmhoubhSlO_6V+LOGIN+0+SLJS%2F+RTTP%2F2.1+demouser+demopass+HttpRequestLineLength%3D%2CHttpBodyLength%3D%2CMergedCommands%3D%2CHeartbeatInterval%3D10000
- FINER  : < 1b LOGIN+OK HttpRequestLineLength=960,HttpBodyLength=65536,MergedCommands=1
- INFO   : Connection state changed to: LOGGEDIN ws://localhost:18080
If you are running your back end locally, you can also see whether your login was successful by opening the Liberator’s session log. Obviously you will not have access to this file if you are connecting to libtraining.caplin.com.
Message Service
In order to subscribe to data from Liberator (in our case we want our tile to subscribe to prices associated with the GBPUSD currency pair) you need to use a MessageService. Since you are making a StreamLink connection to the server, the message service implementation we want to use must be the StreamLinkMessageService.
Since the StreamLinkMessageService class does not require any constructor arguments we don’t have to create it in code like we did for the StreamLinkConnectionService. Instead we can simply register it via configuration.
To register the StreamLinkMessageService as the MessageService to be used in our application, add this line to CaplinTrader/apps/TutorialApp/default-aspect/resources/aliases.xml:
<alias name="caplin.message-service" class="caplin.sljsadapter.providers.StreamLinkMessageService"/>Subscribing to Prices using the Message Service
Your application is now set up to allow subscriptions to be made via StreamLink. You want the tile to subscribe to prices for its currency pair when it is created and receive the updates.
You now need to change the tile (specifically, the tile presentation model) to:
-
Subscribe to streaming prices for whichever currency pair it represents.
-
Do something useful with the price updates when they arrive, like render them on the buttons.
Starting with the first point, we want to update our constructor so that it retrieves the MessageService from the registry and uses it to subscribe to streaming prices from the back end. Add these two lines to the end of the constructor - don’t replace the constructor completely, leave the existing content and just append the two new lines.
var ServiceRegistry = require('caplin/core/ServiceRegistry');

function TilePresentationModel() {
    ...
    var messageService = ServiceRegistry.getService('caplin.message-service');
    this.subscription = messageService.subscribe('/FX/' + this.currencyPair.getValue(), this);
};
This is a good start, but not enough. Observe that the MessageService.subscribe() method takes two arguments. The first is the subject we want to subscribe to, such as "/FX/GBPUSD". The second is some kind of listener which the message service will call back on with the data when it arrives. We are attempting to pass this as the listener, i.e the TilePresentationModel itself. But the TilePresentationModel does not implement the expected interface for subscription listeners, so the message service will not be able to use it.
Remember that you can always refer to the online API documentation. Let’s have a look at the subscribe() method of the MessageService interface so that we can see exactly what it’s expecting. You will see that it expects the second argument to be a class that implements the SubscriptionListener interface. So this is the interface that our TilePresentationModel must implement.
The interface consists of three methods: onDataUpdate(), onError() and onStatusUpdate(). Let’s add basic implementations of all of them to our class, plus the all-important line underneath the constructor that declares that TilePresentationModel implements the SubscriptionListener interface. Don’t forget the require statement at the top.
var SubscriptionListener = require('caplin/services/messaging/SubscriptionListener');(1)

function TilePresentationModel() {
    ...
    var messageService = ServiceRegistry.getService("caplin.message-service");
    this.subscription = messageService.subscribe("/FX/"+this.currencyPair.getValue(), this);
};

topiarist.extend(TilePresentationModel, PresentationModel);
topiarist.inherit(TilePresentationModel, SubscriptionListener);(2)

TilePresentationModel.prototype.onDataUpdate = function(sSubject, mData) {
    console.log('Data update: ' + JSON.stringify(mData));
};(3)

TilePresentationModel.prototype.onError = function(sSubject, sErrorType) {
    console.log('Subscription error: ' + sErrorType);
};(4)

TilePresentationModel.prototype.onStatusUpdate = function(sSubject, sStatus) {
    console.log('Status update: ' + sStatus);
};(5)| 1 | Require caplin/services/messaging/SubscriptionListener |
| 2 | Declare that TilePresentationModel implements SubscriptionListener |
| 3 | Implementation of SubscriptionListener.onDataUpdate |
| 4 | Implementation of SubscriptionListener.onError |
| 5 | Implementation of SubscriptionListener.onStatusUpdate |
Refresh the application. Again, if you have your StreamLink log window open, you should be able to decipher new pricing messages coming in at regular intervals. If you open the Console tab of the developer tools (F12) you will also see the data updates and status callbacks being printed to the console, because that’s what we chose to do in our three new callback methods.
<timestamp> - FINE: In - RecordType1DataEvent [subject=/FX/GBPUSD, fields=[InstrumentName=GBP/USD,BidPrice=1.60128,AskPrice=1.7614,BidPriceId=GBP/USD_TIER1_S_08:18:18.914_18,AskPriceId=GBP/USD_TIER1_S_08:18:18.917_21,BidGFA=1000000.0,AskGFA=1000000.0], image=false, timeReceived=1363335498930]
Now let’s finish this off by making the tile actually useful. When we receive the data updates we should render them on the buy and sell buttons rather than just print them to the console where nobody can see them.
Try this yourself
We want to change the tile so that:
-
Initially it does not show any prices.
-
When a data update is received it displays the prices in the "Buy" and "Sell" buttons.
Start by updating the tile so that when it first loads it shows no prices rather than the hard-coded 1.11/2.22 that you see at the moment. You will find these hard-coded values in the constructor of TilePresentationModel, they are the initial values of the this.buyRate and this.sellRate fields. Replace those numbers with the string "- -". Refresh the page if you like, and you should see dashes in the buy and sell buttons.
Now we will modify our onDataUpdate() callback method to display the latest prices on the buttons. Observe that when your callback method is invoked by the message service you are passed two arguments, the subject of the data update and something called "mData", which is a map (actually just a JavaScript object) of fields. The fields are just key/value pairs.
If you look at the StreamLink log or the console for a typical data update you will see that the entries in the data map we are interested in are called BidPrice and AskPrice. So you can make the following change to your method:
TilePresentationModel.prototype.onDataUpdate = function(sSubject, mData) {
    var askPrice = mData.AskPrice;
    if (askPrice != undefined){
        this.buyRate.value.setValue(askPrice);
    }

    var bidPrice = mData.BidPrice;
    if (bidPrice != undefined){
        this.sellRate.value.setValue(bidPrice);
    }
};
Be sure to get this the right way round - remember that as a user you always buy at the bank’s ask price and sell at the bank’s bid price!
You also want to start the tile off with dashes in the input box, so update the initial values of the presentation model
var Field =  require('br/presenter/node/Field');
...
function TilePresentationModel() {
    ...
    this.sellRate = new Field("--");
    this.buyRate = new Field("--");
    ...
}
Now that we are using presenter Fields, the elements in tile.html should be updated to use sellRate.value, for example:
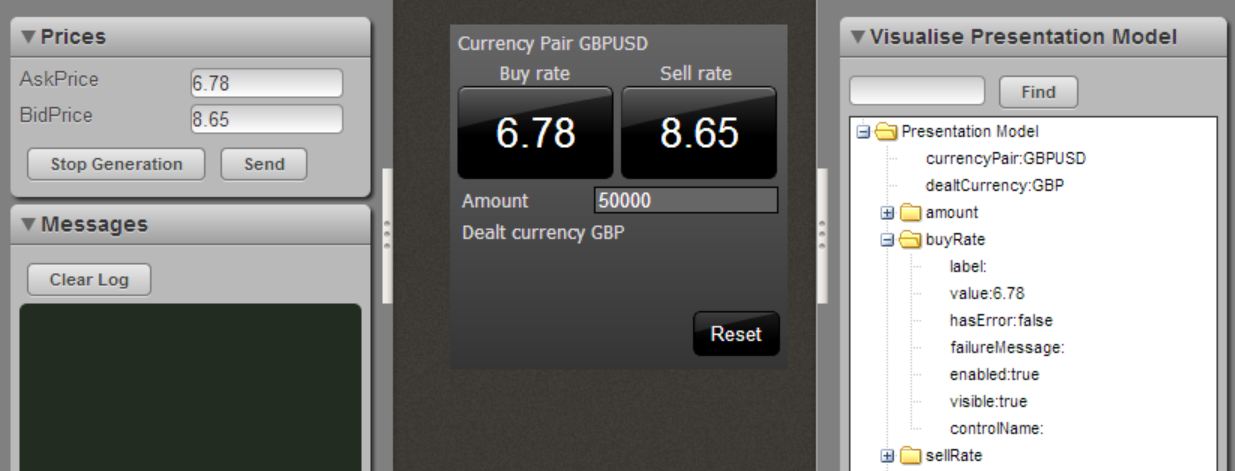
<button data-bind="text:buyRate.value, click:buyClicked"></button>You should now be able to see the streamed, updating prices inside your tile:

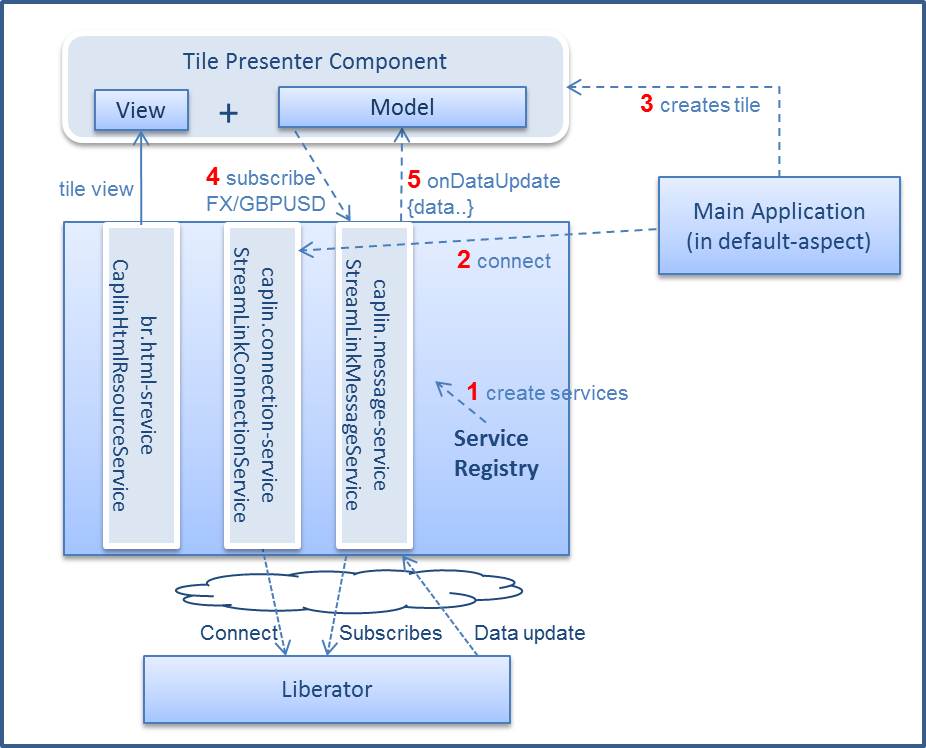
Here’s an illustration of what we just did:
Data Subscription Stubs
It is only the actual application which should connect to a real back end. However, you need to be able to use and test the tile (or any other component) via the workbench and acceptance tests. Recall that the whole point of the workbench is that allows you to develop and play with your components in isolation without needing a connection to any back end.
The Caplin libraries supply stubs of all the Caplin services so that these can be used to simulate the connection and communication with a back end. The MessageServiceStub is one of these.
The Workbench
Our application is using the StreamLinkMessageService as the MessageService implementation.
The tile’s workbench application will not connect to the server, but here we must also have a way of simulating the receipt of prices via the workbench. For this we need a different MessageService implementation. The default MessageService implementation for workbenches and acceptance tests (dev scenarios) is the MessageServiceStub. (You will find this defined in aliasDefinitions.xml, in the services library.) When you open the workbench the tile’s subscription for /FX/GBPUSD will now be received by the stub.
We need a way to generate price updates for /FX/GBPUSD and to propagate these to the MessageService so that it can relay them to the subscribed tile – i.e. we need a way to simulate the server’s behaviour. This is where we use a workbench widget which allows the user to control when price updates are sent and their values.
Uncomment the following line in your workbench index.html file:
oWorkbench.addToLeftWing(new MessageEditor(), "Message Service Data Editor");This line creates a UI widget to enable you to control the price data being generated.
Your workbench should now have a Price Generator by the left hand side and you can either:
-
Type in specific values for the prices and press Send.
-
Or press "Auto Generate" to start a stream of automatic updates.
This tool allows you to experiment with how your tile would behave if, for example, the server sent a price with many digits after the decimal point (does it overflow the edge of the button?) or if the server sent a price which is non-numeric. Does it handle these cases gracefully?
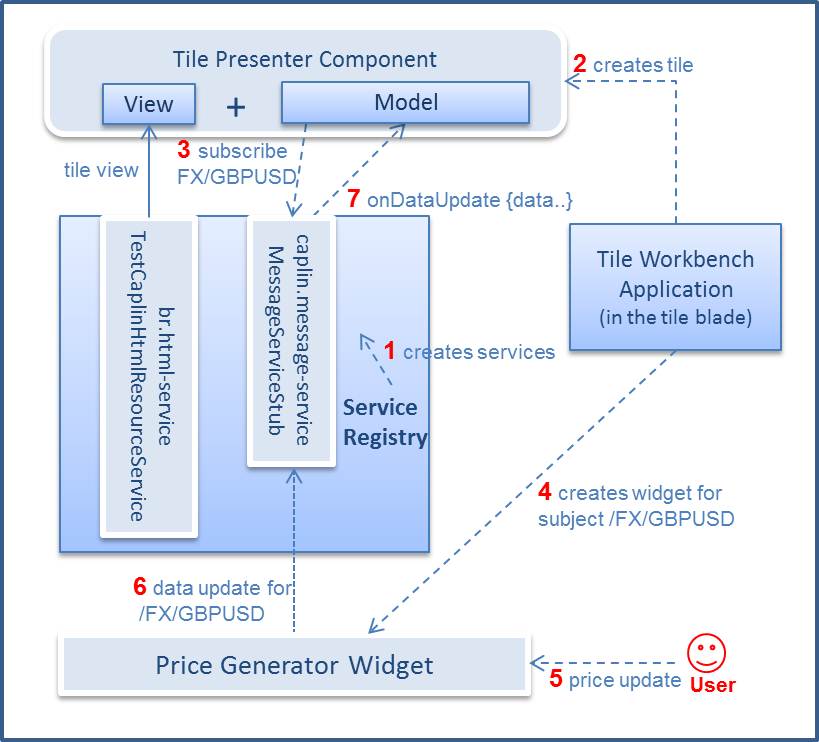
Another depiction of how it’s all wired up, this time for the workbench application:
The Acceptance Tests
If you run your tests now there will be some obvious failures: the initial value of the buy and sell rates in the tile have changed to --. Update these now so that they pass.
This is a standard part of your development cycle - if you change some code in the application, you usually need to update some tests. This is a good thing - if it was possible to make significant changes to your application and all the tests still pass, it shows that your application does not have good enough test coverage. This is dangerous, it means that someone could accidentally break the application without realising.
Fix your tests so that they match up to the new initial state and all of them are successful.
We now want to add a new acceptance test (in TileTests.js) which tests that when a price update is received from the pricing sub-system, the prices in the buy and sell buttons are updated accordingly.
In order to get a handle on the pricing sub-system we need to add a further fixture. The DataSubscriptionFixture can be used by the test to send data updates to subscribers via the MessageService. Here, again, the MessageService used will be the default for the dev scenario i.e. the MessageServiceStub.
Open up CaplinTrader/apps/TutorialApp/tutorial-bladeset/blades/tile/src/mycompany/tutorial/tile/testing/TileFixtureFactory.js. Recall that the job of this class is to register fixtures that allow the class to be tested. We are already registering a PresenterComponentFixture which is used for testing Presenter Components like our tile.
Add a pricing fixture to the addFixtures() method, as illustrated in the code sample below. Don’t forget the require statement.
var DataSubscriptionFixture = require('caplin/testing/DataSubscriptionFixture');(1)

...

TileFixtureFactory.prototype.addFixtures = function(testRunner) {
    //Add Presenter Component Fixture for tile
    this._componentFixture = new PresenterComponentFixture(
            'mycompany.tutorial.tile.tile-template',
            'mycompany.tutorial.tile.TilePresentationModel');
    testRunner.addFixture('tile', this._componentFixture); // tile.*

    //Add a pricing fixture for testing the price update stream (2)
    this._dataSubscriptionFixture = new DataSubscriptionFixture();
    this._dataSubscriptionFixture.addNamedValueMap('PRICE_UPDATE_1', {AskPrice: '1.11', BidPrice: '2.22'});
    this._dataSubscriptionFixture.addNamedValueMap('PRICE_UPDATE_2', {AskPrice: '3.33', BidPrice: '4.44'});
    testRunner.addFixture('pricing', this._dataSubscriptionFixture); // pricing.*
};| 1 | Require caplin/testing/DataSubscriptionFixture |
| 2 | New pricing fixture |
The first line simply creates a new DataSubscriptionFixture. The next two lines define a couple of named price updates messages which we can use in our tests later on. The last line registers the fixture under the name "pricing", so that we can refer to it in our tests. This last line is very similar to the PresenterComponentFixture above, which registers itself under the name "tile" - this allows us to refer to things like "tile.model" and "tile.view" in our tests, as we have seen in the previous tutorial.
Now we can add a test. Switch back to TileTests.js and add this test, which will check that price updates are displayed in the buy and sell buttons:
it("updates buy and sell buttons when price update received", function(){
    given("test.continuesFrom = 'starts tile in initial state'");
    when("pricing.dataUpdateReceived => '/FX/GBPUSD|PRICE_UPDATE_2'");
    then("tile.model.buyRate.value = '3.33'");
        and("tile.model.sellRate.value = '4.44'");
});
The line to pay attention to is this one:
when("pricing.dataUpdateReceived => '/FX/GBPUSD|PRICE_UPDATE_2'");
This line uses a method of the DataSubscriptionFixture to send a price update. The value is split into two parts via the pipe character:
-
The first part is the subject to send the price update on.
-
The second part is the name of the price update we want to send, in this case "PRICE_UPDATE_2". Refer back to the TileFixtureFactory if you want to remind yourself which fields this message contains.
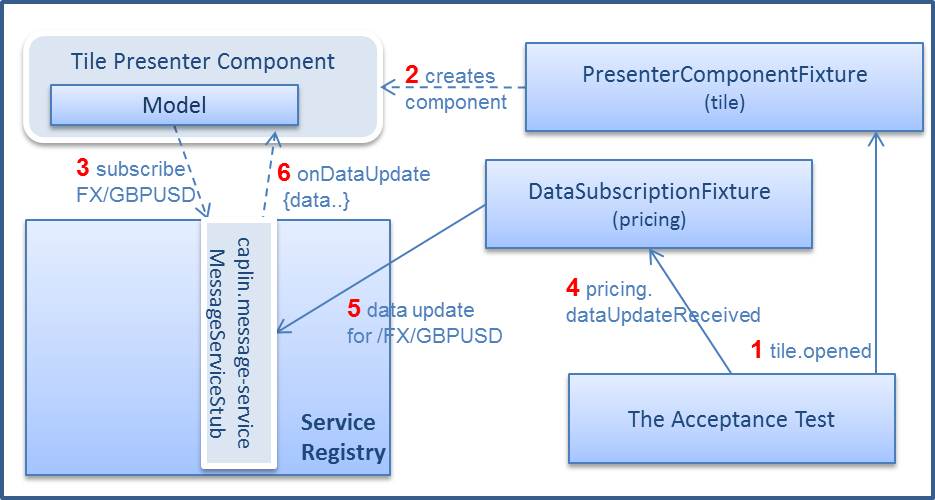
This is how it is wired up:
Stretch Goal - Connection Service
When you are connecting to a server to receive data, something that you would commonly want to do is to make changes in the components when the connection goes down. The ConnectionService provides any component with the ability to "listen" to the connection status.
You can do this on the tile by adding the following to the constructor of TilePresentationModel.js
this.connectionService = ServiceRegistry.getService('caplin.connection-service');
this.connectionService.addStatusChangedListener(this, true);
Once again we are attempting to pass this as a listener, so our class must implement the expected listener interface. The correct interface this time is ConnectionServiceListener interface, which contains three methods, including one called onConnectionUnavailable(). Try this yourself - add the snippets of code below to the correct places in your class. Refer back to when you made your class implement SubscriptionListener for hints.
var ConnectionServiceListener = require('caplin/services/ConnectionServiceListener');
...

topiarist.inherit(TilePresentationModel, ConnectionServiceListener);

TilePresentationModel.prototype.onConnectionUnavailable = function(sStatus, sReason) {
    this.buyRate.value.setValue('--');
    this.sellRate.value.setValue('--');
};
If you stop login to the application now and stop Liberator (you will only be able to do this if you are running against a local back end, not libtraining.caplin.com), the values on the buttons should go back to dashes.
Review
Having completed this tutorial you should understand how to:
-
Connect to Liberator using the StreamLink connection service
-
Register services via code and by configuration
-
Use the MessageService to subscribe to data for a specific subject
-
Use a data generator widget to push data into your tile on the workbench
-
Use a MessageServiceStub in acceptance tests to replace the real server connection
-
Use the ConnectionService to listen to connection events.
To go into more depth with the StreamLink (JavaScript) API you can use the interactive examples hosted on Liberator by navigating to http://localhost:18080/docs/sljs/interactive after you have started Liberator.
More information about subscribing to prices can be found in this tutorial.