Installing BladeRunner
This page tells you how to install BladeRunner and create a new app, and explains some of the other points that you should bear in mind when doing so.
Supported Operating Systems
-
Windows XP, 7
-
Linux
-
Mac
Pre-Requisites
-
Java 6 SE or above
-
Latest Chrome, Firefox, Internet Explorer 9 or above. You can develop apps for older browsers, but you will need a modern browser to run the BladeRunner Dashboard.
Installation Process
The process of installing BladeRunner is a very simple one. In a nutshell, you unpack the zip file it comes in, start BladeRunner from a command-line window, and that’s it! You can then access the BladeRunner dashboard from a browser. There are a few more details that we’ll go through below, but fundamentally, it is that easy.
1. Extract BladeRunner
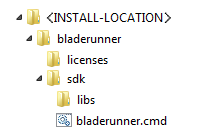
BladeRunner comes in a zip file. The first thing you need to do is to extract the contents of the zip to the directory where you want to install the application. Ideally, this should be the location where you’ll be checking BladeRunner into your source version control system. Once you’ve unzipped it, you should find the following directory structure, with the BladeRunner program file in the sdk folder:
2. Start BladeRunner Dashboard
Once you’ve unpacked the files, navigate to the sdk directory inside your bladerunner folder, and open a command-line window in that directory.
From your command prompt, run the bladerunner program file, with the start parameter. I.e:
bladerunner start
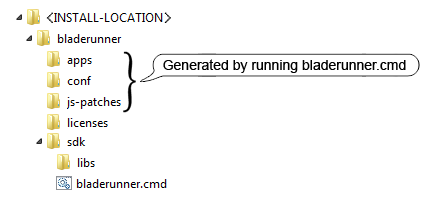
When it first runs, BladeRunner will generate all the necessary files and folders, so that your directory structure will look like this:
You should now be able to access the BladeRunner dashboard via a suitable browser, at localhost:7070.
BladeRunner Dashboard Overview
The BladeRunner Dashboard is a web application that aims to help users to manage their applications via a GUI. You can use it to perform actions including:
-
Creating a new application, bladeset or blade
-
Importing an existing motif as a new application
-
Importing blades (or entire bladesets) from one application into another
-
Viewing workbench pages for individual blades
-
Launching your applications
-
Running tests and viewing the results
Create a New Application via the Command-line
Although you can create a new application via the Dashboard, you can also do so very easily from a command-line interface, by executing the create-app command from inside the sdk directory like so:
bladerunner create-app <app-name> <app-namespace>
For instance, the following command creates a new application folder called myexample within the apps folder. The myexample application will have a namespace value of example.
bladerunner create-app myexample example
Points to Bear in Mind
Restrictions on Application Namespaces
At the moment, BladeRunner doesn’t support 'deep' namespace values for the application namespace. You couldn’t, for instance, give an application a namespace of com.myapp.
All application namespace values must be in lower-case alphabetical characters, and you are not allowed to use reserved JavaScript keywords (e.g. default) as application namespaces.
Source Control - Avoid Checking in Generated Files!
The folders listed in the table below, and their contents, are generated by BladeRunner as you use it, and should not be checked into your source control system. You should use your source control system’s ignore facility, to ensure that they don’t get checked-in accidentally.
| Generated folder | Location | Comment | ||
|---|---|---|---|---|
bundles |
test-unit/js-test-driver/bundles test-acceptance/js-test-driver/bundles |
When a Verifier test is run that involves the Caplin bundlers, a .bundle file is generated for each resource type, (e.g. js-test-driver/bundles/js/js.bundle) and stored here. These files are created/overwritten on each test run. |
||
test-results |
bladerunner/test-results |
The XML output from each of Verifier’s test runs is stored here, and then converted into an HTML index report. |
||
webcentric-db |
bladerunner/webcentric-db |
This is location where your application h2 database info is persisted (if it uses a Webcentric database)
|