Work with menus (pre- Trader 3.6.3)
| In Caplin Trader versions before 3.6.3, you set up set up multi-layered drop-down menus for your application using Webcentric’s XML configuration. This method is shown in the following tutorial. For Caplin Trader version 3.6.3 onwards, there is more flexible approach to creating menus using the Caplin menu API. For more on this, see Work with menus (Trader 3.6.3 onwards). |
Webcentric Menus
| Have a look at the Webcentric Worked Example if you need to brush up on the basics. |
Besides providing Panels, Terraces, Stacks and so on, as layout components, Webcentric also allows you to configure multi-layered menus for your application as well.
If you’ve got the FxTrader application up and running, you should be able to see its main menu bar, in the top left-hand corner of the layout. In this short tutorial we’ll modify this menu to help you get comfortable with the concepts, and enable you to create your own application menu.
The diagram below illustrates how a menu is configured using Webcentric XML. Each root menu item (i.e; the ones in the menu bar itself) is a <MenuButton> tag, which sits inside a <MenuBar> element. Each <MenuButton> has a menu_id attribute, which links it to the options below it in the menu structure.
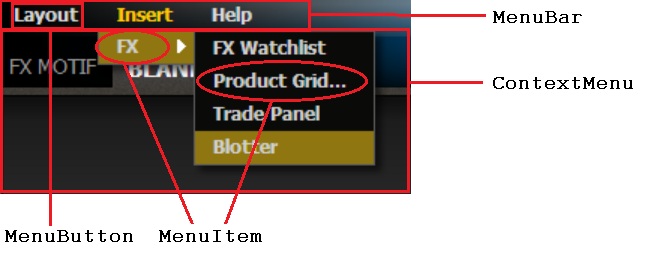
All the menu options below the root menu items are represented by <MenuItem> tags, all of which are housed inside a <MenuItems> element, which itself belongs in the <ContextMenu> element. All <MenuItem> tags that are part of the menu of a particular <MenuButton> will have a context attribute that matches the id attribute of the <MenuButton> they belong to. The lower-level hierarchy of menus and sub-menus is achieves by nesting <MenuItem> tags, one within another.
For example:
Within the <MenuBar>, you might have this tag:
<MenuButton menu_id="options" />Any Menu Items within the <ContextMenu> element whose context attribute is also "options" will be placed in a menu under that menu button. The nested structure of the <MenuItem> tags determines the position of each item in the menu’s hierarchy.
<MenuItem context="options">
  <MenuItem context="options"></MenuItem>
</MenuItem>
Let’s put this into practice. We’ll create a new root level menu item and nest a multi-level sub-menu within its context.
Add a Root Menu Item to the Menu Bar
To get started, create a new root-level <MenuButton> called "New Menu" alongside the existing ones as follows:
default-aspect\webcentric\themes\noir\layout-themes\noir.xml
<MenuBar handle_height="24" align="top">
  ...
  <MenuButton menu_id="new_menu" caption="New Menu"/>
</MenuBar>
After resetting the Webcentric database and reloading the application, you should see the "New Menu" button, sitting on the right hand side of the Menu Bar, like this:
Add a Menu Item in the Context of the New Root Menu Item
This root-level item has a menu_id of "new_menu", and therefore all its sub-menu items must have this as their context. Create a new menu item within the <ContextMenu> element, as follows:
default-aspect\webcentric\layout\application.xml
<ContextMenu ...>
  ...
  <MenuItems>
    <MenuItem menu_id="level1" label="Level 1 Menu Item" context="new_menu">
    </MenuItem>
    ...
  </MenuItems>
</ContextMenu>
Reset the database again, and the menu should now have a single menu item, as shown below:

Create a Sub-Menu Beneath the First Menu Item
To create sub-menu items at lower levels, just nest them under this first level item, as shown in the code sample below. As you can see, you can make a menu item trigger a component by adding one inside the <MenuItem> tag.
default-aspect\webcentric\layout\application.xml
<MenuItem menu_id="level1" label="Level 1 Menu Item" context="new_menu">
  <MenuItem menu_id="level2.1" label="Level 2 Item 1" context="new_menu">
    <addComponent>
      <Panel caption="Panel 1" decorators="basicDecorator"/>
    </addComponent>
  </MenuItem>
  <MenuItem menu_id="level2.2" label="Level 2 Item 2" context="new_menu">
    <addComponent>
      <Panel caption="Panel 2" decorators="basicDecorator"/>
    </addComponent>
  </MenuItem>
</MenuItem>
The resulting menu has an additional level containing two leaf menu items which will open up a panel when clicked.

As you can see, creating and configuring menus in Webcentric enables you to create menu items is remarkably simple. This quick tutorial should have given you everything you need to set up your own application menu, with menu items that perform any of the Webcentric, actions such as opening dialogs, executing pieces of JavaScript code, and so on.
For more information about actions available in Webcentric, see the architectural overview and Webcentric XML reference section.