Adding a grid to a Webcentric layout
When you have defined a grid, you can use Webcentric to add it into a layout.
Defining a grid
All grids must be defined in a file named gridDefinitions.xml. This file should be created and placed inside your application here: <bladeset>\<blade>\resources\xml\gridDefinitions.xml.
Each grid is identified by the id attribute in its <grid> tag. The namespace of a grid id must conform to the application directory in use, for e.g. <top-level-namespace>.<bladeset>.<blade>.GridName, where top-level-namespace is representative of the application name, and GridName is the name of a defined grid.
The Grid XML configuration reference page provides further information on defining grids and grid elements.
Preparation
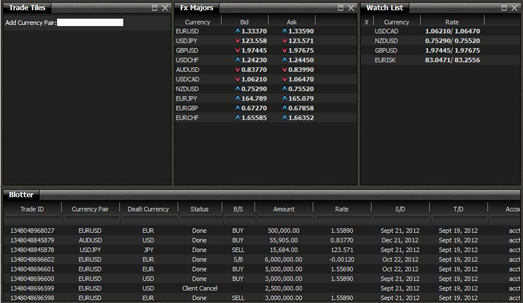
Let’s start on the basis that we already have an existing Webcentric layout with three panels displayed side-by-side in a <Terrace> element, and that the terrace itself is displayed above another panel, as part of a <Tower>, as shown here:
The layout is illustrated conceptually below:
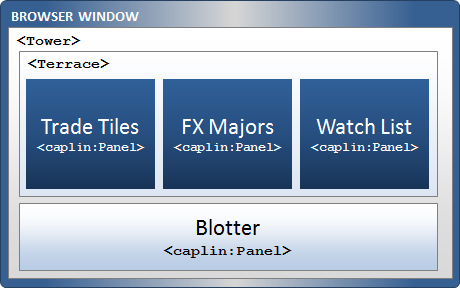
What we are going to do is add a new panel to the terrace, so that we will end up with four panels side-by-side, with our new one on the right.
Adding a grid into a layout
To start with, we are going to insert a new Webcentric Panel into our current layout to contain our grid by including a panel with our grid component. Layouts are defined inside the <appname>_layout.xml file inside _webcentric\layout\layouts_. Note, we will also be using a ‘basicDecorator’ for this implementation, see here for more information on available decorators and their uses.
For the purpose of this example, let’s assume that we have an "FX Minors" grid defined in our gridDefinitions.xml file, with an id of "novox.fxtrader.grid.fxMinor". So the first thing we do, is to create a new panel for it:
<caplin:Panel caption="Fx Minors" decorators="basicDecorator">
  <state>
    <caplin.grid-component baseGrid="novox.fxtrader.grid.fxMinor" />
  </state>
</caplin:Panel>
You can change the grid id namespace within this configuration to any id of a defined grid you want to use, so long as the namespace of the id matches the format: <top-level-namespace>.<bladeset>.<blade>.GridName
e.g. "caplinx.fxtrader.grid.blotterGrid"
Now, we will include the panel inside a terrace:
<Tower splitters="true">
<FrameItems>
<!-- The Terrace is nested in the Tower element, with its own panels inside it -->
<Terrace splitters="true">
<FrameItems>
<caplin:Panel caption="Trade Tiles" decorators="basicDecorator">
<state>
<compositeComponent refId="emptyTileLayout"/>
</state>
</caplin:Panel>
<caplin:Panel caption="Fx Majors" decorators="basicDecorator">
<state>
<caplin.grid-component baseGrid="novox.fxtrader.grid.fxMajor"/>
</state>
</caplin:Panel>
<caplin:Panel caption="Watch List" decorators="basicDecorator">
<state>
<caplin.grid-component baseGrid="novox.fxtrader.grid.fxWatchlist" />
</state>
</caplin:Panel>
<!-- We insert our new panel with Fx Minors grid inside our terrace element -->
<caplin:Panel caption="Fx Minors" decorators="basicDecorator">
<state>
<caplin.grid-component baseGrid="novox.fxtrader.grid.fxMinor"/>
</state>
</caplin:Panel>
</FrameItems>
</Terrace>
<caplin:Panel caption="Blotter" decorators="basicDecorator" height="200">
<state>
<caplin.grid-component baseGrid="novox.fxtrader.blotter.blotterGrid" />
</state>
</caplin:Panel>
</FrameItems>
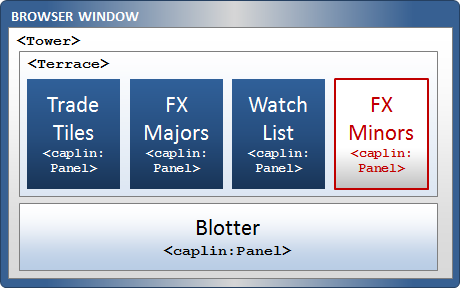
</Tower>Our new panel will be added to the layout, like so:
Resetting Webcentric Database
The new layout is ready to go now, but it won’t be displayed until Webcentric’s database has been reset, so that’s the next thing we have to do. To do this, open a command line window, and run: brjs reset-db <appname>
This will automatically recreate all the required database files.
Start Application
Finally, we will restart BladeRunnerJS. As BladeRunnerJS doesn’t run in the background, what this actually means is that you go to the command line window that you used to start BladeRunnerJS, kill the process, and then start it up again. If we then restart our application, we’ll see our panel containing our new grid inside the terrace: