Installing Liberator
This page tells you how to install an instance of Liberator, using the Caplin Deployment Framework. Usually, this will be done as part of a wider process, and if you’ve already installed Transformer, then you’ll have already completed some of the steps described. That said, we’re going to treat installing Liberator as if it were a stand-alone task, and won’t take anything for granted.
In the following steps you’ll be using the dfw command of the Deployment Framework. Before entering any dfw command as ./dfw <command-name>, make sure your current (working) directory is set to the Deployment Framework’s topmost directory. For a list of dfw commands, click here.
|
- Download and install Cygwin
- Extract the Caplin Deployment Framework
- Set up the Liberator licence
- Set up HTTPS files
- Set up Caplin KeyMaster files
- Copy the Liberator install file to the kits directory
- Deploy Liberator
- Check and merge Liberator configuration overrides
- Check versions and blade status
- Obtain port numbers
- Start the Liberator
- Check the Liberator is running correctly
- Activate the DemoDataSource blade
- Check the Liberator can see the DemoDatasource
- More things you can do
Download and install Cygwin
The Caplin Deployment Framework is operated from a command line, using Bash commands. If you’re running it on Windows therefore, you’ll need to download a Bash-compatible command line interface; we recommend Cygwin. Any time we refer to the command line in this tutorial, if you are using the Windows version of Liberator, you can assume that we mean Cygwin.
It can be a bit tricky to install Cygwin so it has the correct packages needed to run the Deployment Framework. If you’ve never done it before, here are some detailed instructions.
You must install the following minimum set of Cygwin packages:
-
unzip (from Archive)
-
zip (from Archive)
-
vim (from Editors)
-
vim-common (from Editors)
-
ncurses (from Utils)
Extract the Caplin Deployment Framework
If you haven’t done so already, download the Caplin Deployment Framework, and extract it to the desired directory. For details of how to do this, see Installing the Deployment Framework.
It’s quite likely that by the time you install Liberator, you’ll already have the Deployment Framework installed. If so, make sure Liberator is not running before you go any further.
To stop all components in the Deployment Framework:
-
Navigate to the Deployment Framework’s topmost directory.
-
Enter the command:
./dfw stop
Set up the Liberator licence
If you don’t have a licence for your Liberator, you can still install and run it, but then the Liberator will run under a temporary evaluation licence and will shut down automatically after 30 minutes. You should replace this temporary license as soon as possible with an authorised license supplied by Caplin Systems.
Copy your licence file (license-rttpd.conf) to the Deployment Framework’s licence directory: <Framework-root>/global_config/licenses
| You only need to copy licenses to the server machines on which the licensed Liberators run. |
Set up HTTPS files
You can ignore this step if you only want to set up a trial Liberator installation that only communicates with clients using HTTP.
You’ll usually want your client application’s interactions with Liberator to be highly secure, so unless you’re just setting up a trial installation, you’ll need to use HTTPS rather than HTTP. To do this, you have to set some security files: a .pem file containing the security certificate information, a .pwd file and a .key file containing the private key of the certificate.
-
Create the .pem, .pwd and .key files. To use these files in the Caplin Platform Deployment Framework, you must name them as: rttpd_https.pem, rttpd_https.pwd, and rttpd_https.key
-
Copy the .key, .pem and .pwd files to the Deployment Framework’s <Framework-root>global_config/ssl directory on the server machine(s) where the Liberator runs.
| If you don’t generate your own key files, the example HTTPS files in the Liberator kit are automatically copied to global_config/ssl when you deploy the Liberator kit. For maximum security, replace these temporary key files with proper user-generated ones as soon as possible. |
Set up Caplin KeyMaster files
You can ignore this step if you only want to set up a trial Liberator installation that doesn’t need client connections to Liberator to be authenticated through a single sign-on system.
In a production set up you mostly likely will want your client connections to Liberator to be authenticated through a single sign-on system. It you’re using Caplin Keymaster to do this, you need to set up the relevant encryption key files. The Caplin Platform Deployment Framework comes with a default public key file for KeyMaster. However we recommend that you create your own encryption key pair for KeyMaster as described in the KeyMaster Administration Guide.
Once you’ve created the key pair:
-
Rename your public key file to keymaster_public.der
-
Copy this file to the <Framework-root>/global_config/ssl directory of the Caplin Platform Deployment Framework on the server machine(s) where the Liberator runs.
Copy the Liberator install file to the kits directory
Find the appropriate Liberator installation file, which will be a file called Liberator-<VERSION_DETAILS>.type, where
-
.type is .tar.gz if the Liberator is to be installed on a Linux machine,
-
.type is .zip if the Liberator is to be installed on a Windows machine.
Copy the file into the kits directory of the Deployment Framework.
Deploy Liberator
Enter the command: ./dfw deploy
This unpacks Liberator and sets up any active built-in blades. It also automatically moves the installation file into the Deployment Framework’s kits/archive/ directory.
Check and merge Liberator configuration overrides
If you’re installing a new version of Liberator to replace an already installed version, you’ll most likely have modified and added to the configuration for the existing version. You should normally put such modifications in the Deployment Framework’s overrides directory for the Liberator: <Framework-root>/global_config/overrides/Liberator
When you deploy the new Liberator kit, the ./dfw deploy command doesn’t remove or modify any existing configuration overrides. However, it will warn you if the new kit contains configuration overrides that clash with your existing overrides, and details the clashes.
If there are clashes, you should compare the configuration overrides in the new Liberator kit against the existing Liberator overrides as defined in <Framework-root>/global_config/overrides/Liberator, and merge any differences.
| The release note for Liberator will detail any changes to configuration overrides in the kit. |
Check versions and blade status
Enter the command: ./dfw versions
This displays the Deployment Framework version, the versions of the deployment components, and the status of the built-in blades:
Deployment Framework           6.0.4-267113

   Core components                Version
   -----------------------------------------------------------
   Liberator                      6.0.4-262963

   Deployed blades                Version            State
   -----------------------------------------------------------

   Built-in blades                                   State
   -----------------------------------------------------------
   BlotterExport                                     Inactive
   DemoDataSource                                    Inactive
   DirectConnection                                  Active
   HTTP                                              Active
   HTTPS                                             Inactive
   JavaOpenPermissioning                             Inactive
   LiberatorJMX                                      Inactive
   LiberatorWebsite                                  Active
   MinimalLiberatorWebsite                           Inactive
   OpenPermissioning                                 Active
   ServerIdentification                              Active
   TransformerJMX                                    Inactive
Obtain port numbers
Find out the Liberator’s port numbers, using the command ./dfw info
For example:
./dfw info
Blade information

The Liberator direct port is 14001 on host localhost

The Liberator HTTP port is 18080 on host localhost

The Liberator home web page is available on HTTP port 18080 on host localhost
Make a note of the HTTP port number (you’ll need it later).
Start the Liberator
Now you can run Liberator.
-
If you haven’t got a Transformer installed, or you’ve got one and want to start it too, enter the command:
./dfw start -
If you have got a Transformer installed, but don’t want it to be included in this simple test, enter the command:
./dfw start Liberator
| If you didn’t previously install an authorised license supplied by Caplin Systems, the Liberator will run under a temporary evaluation licence and will shut down automatically after 30 minutes. |
Enter the command: ./dfw status
You should see that the Liberator is now running.
Check the Liberator is running correctly
-
Start a Web browser and navigate to http://<URL_of_liberator_server>:<liberator_port>, where liberator_port is the Liberator’s HTTP port number that you noted in Obtain port numbers.
If you installed the Deployment Framework and Liberator on your Windows PC, the Liberator URL is localhost, so you can navigate to http://localhost:<liberator_port> The Liberator’s home page should be displayed in your browser:

-
Select View Status.
-
At the Liberator login prompt, type User Name
adminand Passwordadmin
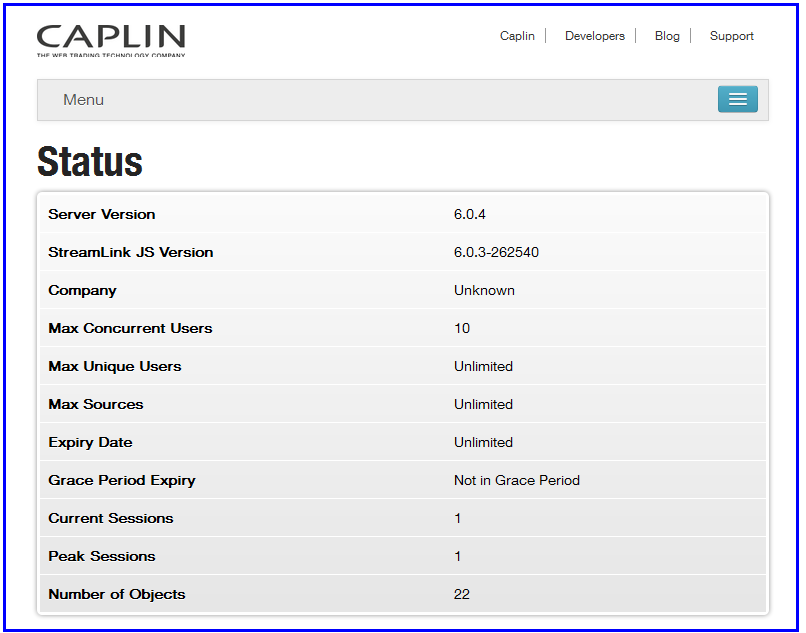
The Liberator’s status page is now displayed in your browser. Here’s an example, shown in three parts for convenience.
The first part of the page shows the overall status of the Liberator, including software versions and licence information.
The second part shows the Liberator’s configured data services and the DataSource applications that it’s connected to:
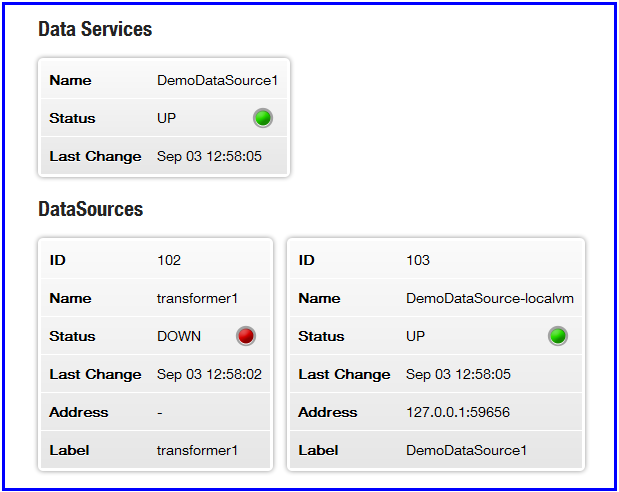
If you haven’t installed and started a Transformer, the DataSource called transformer1 will be shown as DOWN.
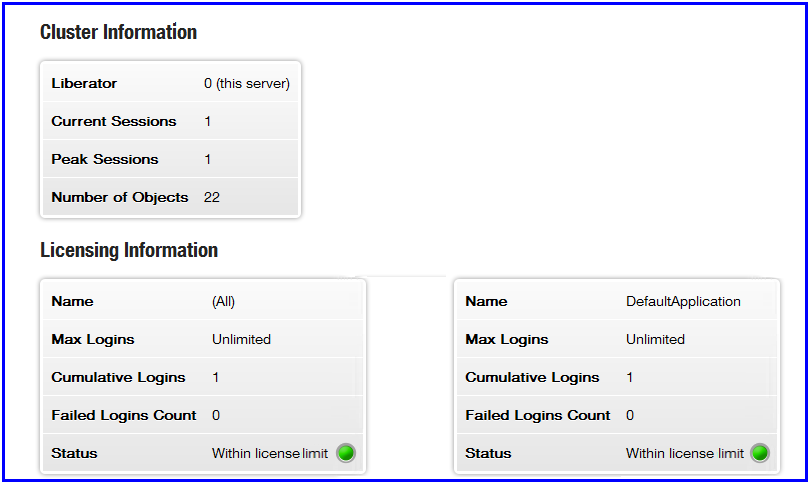
The third part of the page shows information about the Liberator cluster (a cluster of one in this case), and the state of the licences that the Liberator controls.
Activate the DemoDataSource blade
The Liberator installation kit includes a demonstration Integration Adapter called DemoDataSource. This Adapter connects to the Liberator and sends it some dummy price data, so that you can see whether the Liberator has started up correctly. The Adapter is defined as a Platform blade in the Deployment Framwork; this blade defines the configuration that allows the Adapter to run correctly and be recognised by the Liberator.
Here’s how to activate the blade and get the DemoDataSource running:
-
Enter the command:
./dfw activate DemoDataSource -
Now enter the command:
./dfw versionsThis displays a list of blade states, and you’ll see that the DemoDataSource blade is now active.
Deployment Framework           6.0.4-267113

   ...

   Built-in blades                                   State
   -----------------------------------------------------------
   ...
   DemoDataSource                                    Active
   ...
-
Restart the Deployment Framework:
./dfw start
Or if you previously installed Transformer but don’t want to start it up, enter:
./dfw start Liberator DemoDataSource
This shuts down the Liberator, starts it up again, and starts up the DemoDataSource.
Check the Liberator can see the DemoDatasource
Refresh the Liberator status page in your browser.
The data service and DataSource parts should now show look like this:

You’ll see that the DemoDataSource appears as a DataSource with status UP, meaning that it’s running and Liberator is able to communicate with it. The Liberator’s configured with a data service called DemoDataSource1, whose data is supplied by the DemoDataSource Integration Adapter, and this data service should also be shown as UP.
More things you can do
This is just a quick example of how to install Liberator using the Caplin Deployment Framework. In reality, Liberator isn’t much use by itself, so you’ll probably want to install and configure various other components as well, such as, Transformer, Integration Adapters / Platform blades (via the Caplin Integration Suite) and the Caplin Management Console.
Before doing that, here are some more things you might find useful:
Viewing real-time updates using Liberator Explorer
Now you’ve got Liberator running, you can use Liberator Explorer to watch it sending your browser data updates from the DemoDataSource in real time.
-
Navigate back to the Liberator home page and select View Diagnostics.
-
Navigate to Liberator Explorer by selecting the link shown.
-
In the Liberator Explorer’s Directory tree (top left hand side of the page) expand the tree and navigate to EXAMPLES/BROADCAST/ABC (double click on the ABC node).
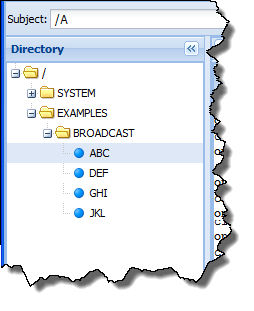
In the top right hand window you’ll see a tab called /EXAMPLES/BROADCAST/ABC. This shows the fields of the subject /EXAMPLES/BROADCAST/ABC being updated in real time; these updates are being supplied by the DemoDataSource.

Trying live examples: the StreamLink JS Tutorial
Liberator comes with a StreamLink JS tutorial that has live examples. To try it out, select Examples on the Liberator web site’s drop-down menu, or navigate to the home page and select See Examples.
Stopping Liberator (and the DemoDataSource)
-
To stop the Liberator and the DemoDataSource, and any other installed Platform components such as Transformer, enter the command:
./dfw stop -
To stop just the Liberator, leaving any other Platform components running, such as Transformer and the DemoDataSource, enter the command:
./dfw stop Liberator
Adding your own licence file
At this point you may wish to replace the evaluation licence with your own development licence file (as supplied by Caplin). You can do this by replacing the Liberator licence file (license-rttpd.conf) in the global_config/licenses folder in the Deployment Framework. You’ll then need to restart the Liberator.
See also: