Deploying core Caplin Platform components
The Deployment Framework enables you to deploy and run Caplin Platform components via an easy-to-use command-line interface.
Caplin Platform components include:
-
Caplin Liberator (streaming server)
-
Caplin Transformer (data transformation engine)
-
Integration adapters (integration layer between the Caplin Platform and your backend trading system)
Download the presentations for this course.
Objectives
In this tutorial you are going to take a leap into the Caplin Platform. By the end of this tutorial, you will know how to:
Install the Deployment Framework
To install the Deployment Framework (DFW), follow the steps below:
-
Download or copy the Deployment Framework ZIP file to your home directory.
-
In a Bash shell, run one of the commands below to extract the Deployment Framework ZIP file:
Linux/macOS$ unzip -qoa DeploymentFramework-<version>.zipCygwin$ CYGWIN=winsymlinks unzip -qoa DeploymentFramework-<version>.zipGit Bash$ MSYS=winsymlinks unzip -qoa DeploymentFramework-<version>.zip
The environment variables CYGWIN=winsymlinks and MSYS=winsymlinks above are not required if you previously added them to the ~/.bashrc file during the installation of Cygwin or Git Bash. See Setting up the development environment.
Always extract the Deployment Framework using the unzip command in a Bash shell. Using a different command or application may result in the incorrect handing of line-endings and symlinks.
Understanding the Deployment Framework’s file structure
The Deployment Framework’s directory structure looks like this:
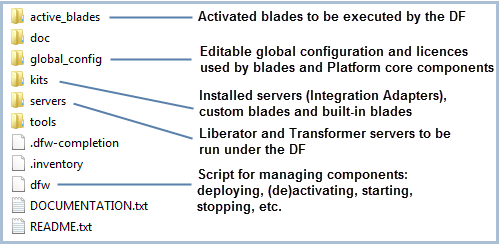
The Deployment Framework’s command line tool, dfw, is in the root of the Deployment Framework’s directory structure. Always run the dfw tool from this directory using the format: ./dfw command
Install Liberator
Liberator is one of two core components of the Caplin Platform. Its role is to stream data from the Caplin Platform to client applications.
To install Liberator, follow the steps below:
-
Download the Liberator installation archive appropriate for your operating system to the
kitsdirectory of your Deployment Framework. Do not extract the archive.Do not extract the Liberator installation archive. The Deployment Framework will do this for you. -
In a Bash shell, run the following command from the Deployment Framework’s root directory:
$ ./dfw deploy
The command should produce similar output to that shown below:
Deploying Liberator kit Liberator-7.1.31-142175-37823e35-x86_64-pc-linux-EL6-gnu.tar.gz
Kit will be saved in kits/archive.
Kit successfully unpacked.
Not copying license from Liberator kit. Ensure the current license is the same version as the kit
just deployed.

Liberator kit has deployed a new blade: BlotterExport
Liberator kit has deployed a new blade: DemoDataSourceLatency
Liberator kit has deployed a new blade: DirectConnection
Liberator kit has deployed a new blade: DirectSSLConnection
Liberator kit has deployed a new blade: HTTP
Liberator kit has deployed a new blade: HTTPS
Liberator kit has deployed a new blade: JavaOpenPermissioning
Liberator kit has deployed a new blade: LiberatorDemoDataSource
Liberator kit has deployed a new blade: LiberatorDemoDataSourceDiscovery
Liberator kit has deployed a new blade: LiberatorDiscovery
Liberator kit has deployed a new blade: LiberatorJMX
Liberator kit has deployed a new blade: LiberatorSockmon
Liberator kit has deployed a new blade: LiberatorWebsite
Liberator kit has deployed a new blade: MinimalLiberatorWebsite
Liberator kit has deployed a new blade: OpenPermissioning
Liberator kit has deployed a new blade: ServerIdentification
Liberator kit has deployed a new blade: TokenPermissioning

Activating a minimal set of blades to allow Liberator to be started.

Activating DirectConnection
Activating HTTP
Activating LiberatorWebsite
Activating OpenPermissioning
Activating ServerIdentification

Blades ok

The configuration has been updated. The new configuration will not be active
until the Framework is restarted.


1 kit(s) deployed

Blades ok
Install the Liberator licence file
Liberator is supplied with an evaluation licence file that only allows Liberator to run for 30 minutes, after which it will automatically shut down. Your instructor may have given you a replacement licence file without the 30 minute limitation that you can use for the duration of this course.
To replace the evaluation licence file with your training licence, follow the steps below:
-
Navigate to the Deployment Framework’s
global_config/licencesdirectory -
Rename the evaluation licence file,
license-rttpd.conf, tolicense-rttpd.conf.bk -
Copy the new licence to this directory
Start Liberator
To start Liberator, run the command below from the Deployment Framework’s root directory:
$ ./dfw start
This command starts all components deployed to the Deployment Framework. At this stage, Liberator is the only deployed component.
| If you are following this tutorial on Microsoft Windows, you may be prompted to make a Windows Firewall exception for Liberator. Add the exception if prompted. |
To test if Liberator has started correctly, use your web browser to open Liberator’s built-in webpage at http://localhost:18080. The Liberator home page contains some handy resources for working with Liberator, some of which we’ll cover in later tutorials.
Configure Liberator
In this part of the tutorial you will learn how to alter Liberator’s configuration. First you will change the logging level, and later you will change the HTTP port number.
Any configuration changes for the backend components should always be made in the global_config directory (and not inside the kits or servers directories). It is important to note that the global_config directory is the only editable part of the framework. This directory contains an overrides directory where you can override any component’s default configuration.
Configure Liberator’s log level
First, let’s have a look at Liberator’s logs:
-
If you have not started Liberator yet, go back to the previous section and start Liberator.
-
Navigate to the Deployment Framework’s
servers/Liberator/vardirectory and open the fileevent-rttpd.log
On reading the log file, you will notice that each log line has a log level, like INFO or NOTIFY. The log levels available (starting with the most critical) are: CRITICAL, ERROR, NOTIFY, WARN, INFO, and DEBUG. By default, Liberator’s logging level is set to INFO. (Notice that event-rttpd.conf has no DEBUG logs.) In this tutorial you are going to change the logging level to DEBUG so that more detailed log messages are recorded in the log file.
Follow the steps below to change Liberator’s logging level:
-
From the Deployment Framework’s root directory, run the command below to stop all running components:
$ ./dfw stop
Always stop all running components before making any change to the configuration of Caplin Platform components -
In the file
global_config/overrides/servers/Liberator/etc/rttpd.conf, change thelog-leveloption toDEBUG:Changing Liberator’s logging level# # Add any user defined Liberator configuration here. # # Note that since the override files are include last so they will be loaded last # This means that any configuration options configured here will override any # previous configuration of the same options. # # # # Logging configuration. # log-level DEBUG # # HTTP overrides # http-access-control-header * # # Set runtime user if required. # #if "${OS}" != "win32" # runtime-user user #endif -
From the Deployment Framework’s root directory, run the command below to clear all log files:
$ ./dfw clean
This command also stops all running Caplin Platform components. -
From the Deployment Framework’s root directory, run the command below to restart all components:
$ ./dfw start
From the Deployment Framework 6.0.4, you can stop all running components, clear all log files, and restart components with one command: ./dfw cleanstart -
Reopen the file
servers/Liberator/var/event-rttpd.log. This should now contain DEBUG messages, which were not included before:
Note that setting the log level to DEBUG can produce very large log files and is not suitable for production use. Revert the log level to INFO after having tried it out.
Configure Liberator’s HTTP port number
Another common customisation is to change a port number.
The global_config directory contains two files, environment-defaults.conf and environment.conf. The Deployment Framework reads the contents of both of these files when it starts up.
The difference is that customers are instructed to never make any changes to environment-defaults.conf, because it will be replaced every time they take a new release of the Deployment Framework. Any configuration customisations that customers want to make should be placed in environment.conf instead. This file is used to override the default configuration, and is not touched by the upgrade process.
So, when you want to change the value of a configuration option in environment-defaults.conf, the correct procedure is to copy and paste it into the file environment.conf and change the value, rather than edit it in place.
To change the value of Liberator’s HTTP port, follow the steps below:
-
Run the command below to stop all running components:
$ ./dfw stop
Always stop all running components before making any change to the configuration of Caplin Platform components -
Take a look at the file
active_blades/HTTP/liberator/etc/rttpd.confand find the default definition for the Liberator’s HTTP port macro:define LIBERATOR${THIS_LEG}_HTTPPORT ${THIS_LEG}8080Notice that following the macro definitions for the HTTP port and interface is an
include-filedirective that, via the filebootstrap.conf, imports the directives in the fileglobal_config/environment.conf. In the next step, you will override the default macro definition for Liberator’s HTTP port macro by adding your own directive to the fileglobal_config/environment.conf. -
Copy the macro definition from the file
active_blades/HTTP/liberator/etc/rttpd.confand paste it at the end of the fileglobal_config/environment.conf. You may want to do this with a GUI text editor if you are not a Vim expert. -
Edit the pasted line. Change the last digit of the port number to an '8':
define LIBERATOR${THIS_LEG}_HTTPPORT ${THIS_LEG}8088 -
Run the command below to restart the Deployment Framework:
$ ./dfw start
-
Using a web browser, try to open the Liberator home page at http://localhost:18080 and at http://localhost:18088.
Notice that the Liberator home page is no longer accessible at http://localhost:18080 (you may need to clear your browser cache to see it disappear) but is now available at http://localhost:18088
The tutorials in this course expect Liberator’s HTTP port to be 18080. To revert the Liberator HTTP port to 18080, follow the steps below:
-
Run the command below to stop all running components:
$ ./dfw stop
-
Edit the file
global_config/environment.conf. Edit or remove the line below:define LIBERATOR${THIS_LEG}_HTTPPORT ${THIS_LEG}8088 -
Run the command below to restart the Deployment Framework:
$ ./dfw start
-
Using a web browser, confirm that you can open the Liberator home page at http://localhost:18080
Install Transformer
Transformer is the second core Caplin Platform component. It is a real-time data transformation engine that manages modules that manipulate the data being transferred to and from connected data sources (integration adapters).
To install Transformer, follow the steps below:
-
Download the Transformer installation archive appropriate for your operating system to the
kitsdirectory of your Deployment Framework. Do not extract the archive.Do not extract the Transformer installation archive. The Deployment Framework will do this for you. -
In a Bash shell, run the following command from the Deployment Framework’s root directory:
$ ./dfw deploy
The command should produce similar output to that shown below:
Deploying Transformer-7.0.1-307702-x86_64-pc-linux-EL6-gnu.tar.gz
Kit will be saved in kits/archive.
Kit successfully unpacked.
Deploying evaluation license from Transformer kit

Transformer kit has deployed a new blade: PersistenceService
Transformer kit has deployed a new blade: PersistenceServiceClient
Transformer kit has deployed a new blade: TransformerDemoDataSource
Transformer kit has deployed a new blade: TransformerJMX
Transformer kit has deployed a new blade: TransformerToLiberatorConnection
Transformer kit has deployed a new blade: TransformerToLiberatorSSLConnection

Activating the peer connection blade.

Activating TransformerToLiberatorConnection

Blades ok

The configuration has been updated. The new configuration will not be active
until the Framework is restarted.

1 kit(s) deployed

Blades ok
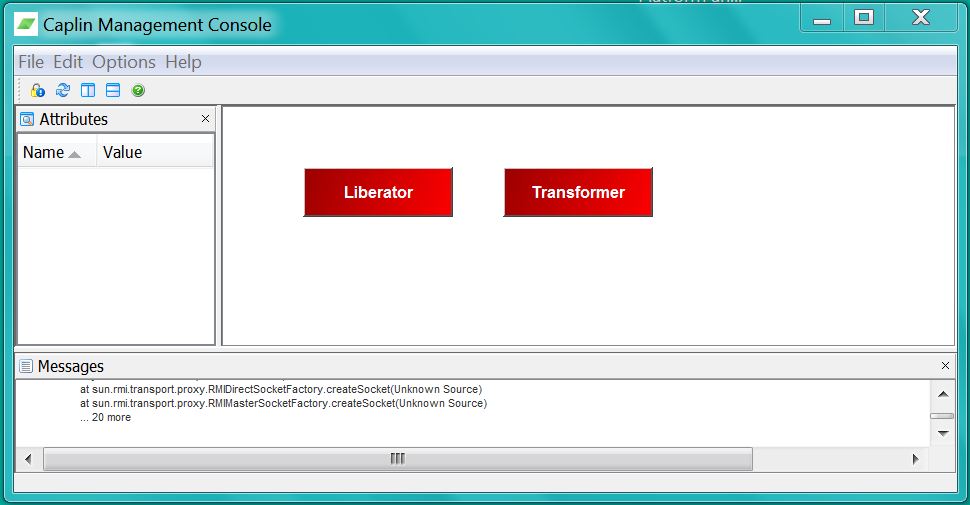
Monitor components via the Caplin Management Console
You can monitor the components running in the Deployment Framework by using an application called the Caplin Management Console (CMC). This provides a visualisation of the running components and how they connect to each other, and also allows you to monitor the JMX objects exposed by each component.
All of the Caplin Platform components expose information about how they are running using Java Management Extensions (JMX). For example, the embedded JVM in Liberator uses JMX to expose information such as how many users are currently connected; the current throughput in terms of bytes read and written per second; CPU and memory usage; and other information useful for monitoring.
The CMC is a Java application that connects to the components in the Caplin Platform using the JMX interface and provides a GUI for displaying and interacting with the information published by the components. It is useful for administrators of the Caplin Platform for both passive monitoring and also performing actions, such as ejecting users from Liberator and changing the log level of running components without restarting them.
Before connecting the CMC to Liberator and Transformer, you need to activate the LiberatorJMX and TransformerJMX blades. These are configuration blades that contain the necessary snippets of configuration to turn on the JMX publishing feature of Liberator and Transformer.
Enable JMX for Liberator and Transformer
Follow the steps below to enable JMX on Liberator and Transformer:
-
Open a Bash shell and change directory to the root of your Deployment Framework
-
Run the command below to stop all running Caplin Platform components:
$ ./dfw stop
-
Run the command below to activate the LiberatorJMX configuration blade:
$ ./dfw activate LiberatorJMX
-
Run the command below to activate the TransformerJMX configuration blade:
$ ./dfw activate TransformerJMX
-
Run the command below to start all Caplin Platform components:
$ ./dfw start
Installing and using the CMC
Follow the steps below to install and run the Caplin Management Console (CMC):
-
Download the CaplinManagementConsole-version.zip file to the Deployment Framework’s kits directory
-
Open a Bash shell and change directory to the root of your Deployment Framework
-
Run the command below to stop all running Caplin Platform components:
$ ./dfw stop
-
Run the command below to deploy the CMC:
$ ./dfw deploy
-
Run the command below to generate a CMC configuration file:
$ ./dfw mon
-
Run the command below to start the CMC:
$ ./dfw cmc
The CMC will start up in the Overview screen. Liberator and Transformer will appear in the centre of the CMC panel. (Blue means that the component is up and running. Red means that the component has not started.)
-
Position your windows so that you can see both your Bash shell and the CMC
-
Run the command below to start all Caplin Platform components, and watch the status of Liberator and Transformer change in the CMC.
$ ./dfw start
When the CMC is running you will notice that the Deployment Framework takes a lot longer to shut down when you run ./dfw stop. From this point on, remember to close the CMC before you stop the Deployment Framework.
|
Review
You should now have a good idea of how to deploy and run Caplin Platform components using the Deployment Framework. You should also be aware that you can monitor your network of components using the CMC application, and also that you can change components' default configurations in the Deployment Framework’s global_config directory. In the subsequent tutorials you are going to be creating and deploying more Caplin Platform components, so the tasks covered in this tutorial are ones that you will be repeating several times.
You may find the following developer resources useful:
-
Deployment Framework pages
-
The Deployment Framework command utility (dfw) - lists and explains all the
dfwcommands -
Datasource pages
-
Liberator pages