Monitoring custom MBeans with the CMC
Liberator and Transformer expose several MBeans by default such as Users, Peers and Objects. Integration Adapters, by default, expose only the default MBeans of the Java DataSource API. To expose values and operations specific to your adapter, you need to add new MBeans to your implementation. This is what we will do in this tutorial, and also add a custom view to the CMC to enable you to monitor and manage the adapter via a custom interface.
Download the presentations for this course.
Adding MBeans to your Adapter
We start by adding a very simple MBean to the PricingAdapter application. The MBean will provide the access to the following data and functionality:
-
expose the status of the adapter’s connection to the mock server and a list of the subscriptions that have been made.
-
expose an operation that toggles the adapter’s connection with the mock server.
Follow the steps below:
-
Download the MBean interface ServerConnectionMBean and its implementation ServerConnection. Add them to your PricingAdapter.
public interface ServerConnectionMBean {
    boolean getConnected();
    void setConnected( boolean connected );
    void connect();
    void disconnect();

    void setSubscriptions(String subscriptions);
    String getSubscriptions();
}
The
getConnected()andsetConnected()methods manipulate a boolean value which reflects the connection status. Similarly,setSubscriptions()andgetSubscriptions()methods set and return the list of subscriptions as aString. Theconnectanddisconnectmethods start and stop the connection to the mock server. Take some time to look at how this is achieved in the implementation. -
It is necessary to register this MBean on the MBean server of the application. Create a new instance of the MBean and pass it to the PricingAdapter:
public static void main( String[] args ) throws Exception { DataSource dataSource = DataSourceFactory.createDataSource(args); ServerConnection serverConnection = new ServerConnection(); ObjectName name = new ObjectName("PricingAdapter.server.custom:type=ServerConnectionMBean"); dataSource.getMBeanServer().registerMBean(serverConnection, name); new PricingAdapter(dataSource, serverConnection); dataSource.start(); } -
Change the
PricingAdapterPricingProviderto:-
call
setMessenger()on theServerConnectionwhen theFXPricingMessengeris created -
call
addSubscription()when a new request is received for an instrument -
call
removeSubscription()when an instrument is discarded -
call
setConnected(true/false)upononConnect()andonDisconnect()callbacks from the messenger.
-
-
When you re-run the PricingAdapter, you will now notice the new MBean in the Explorer tab of your PricingAdapter’s detailed view in the CMC:

When you make a subscription the value in subscriptions will change.
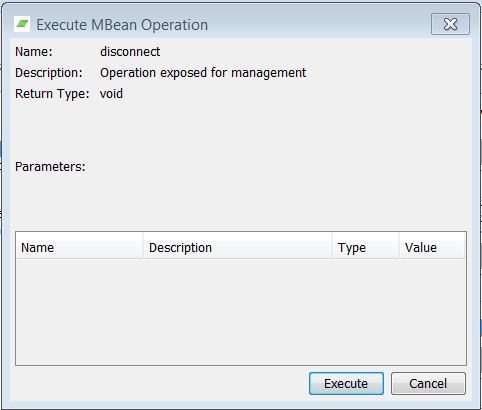
Notice that you can already control the adapter’s connection to the mock server by double-clicking on the "connect" or "disconnect" operations and then clicking the Execute button:
Modifying the CMC View Configuration
The configuration defining how your CMC overview screen appears and the tabs in the components' detail screens is stored in xml configuration files in directory tools\CMC\conf.
The configuration files are grouped as consoles and views. A console defines which views are visible for a component. For example, Liberator’s detailed screen has views Overview, Licenses, DataServices, … The views' functionality is defined by creating a Java Swing JPanel component that implements the com.caplin.view.View interface.
Follow the steps below:
-
Open the file
console_javadatasrc.conf. Add a new view:<View Id="server"/>. -
Now you need to create a new file which corresponds to this view. Name this
view_server.xml. -
The next step will be to develop the view’s implementation. For now simply copy the configuration from another view (such as
view_datasource_overview.xml) and change the Name and Long Description to "Server Connection". You should now see a new tab called "Server Connection" in the PricingAdapter’s detailed view.
Creating a View Implementation
The functionality of the com.caplin.view.View is defined by creating a Java Swing JPanel component that implements the CMC’s com.caplin.view.View interface.
Follow the steps below:
-
Download extension.jar which to the
tools\CMCdirectory. This file contains the custom view’s implementation. (All custom views must be packaged in a file calledextension.jar) -
You can now replace the view in
view-server.xml:<Class>com.mycompany.ServerConnectionView</Class> -
When you relaunch the CMC the Server Connection tab will use this custom view allowing you to see and change the connection status and monitor the subscriptions made to the mock server:
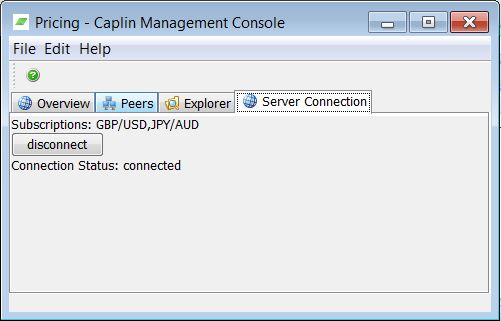
The Server Connection’s custom view (below) creates two labels and a button. The init() method is called by the CMC console. At this point the view can use the console’s JMX connection to retrieve the ServerConnection MBean and its attributes and to invoke its operations. The view polls to keep these values up to date.
import com.caplin.console.Console;
import com.caplin.view.View;

public class ServerConnectionView extends JPanel implements View {

  private Console console;
  private MBeanServerConnection jmxConnection;
  private ObjectName mbean;
  private JLabel connectedLabel;
  private JButton connectButton;
  private JLabel subscriptionsLabel;
  ActionListener viewReloader;

  public ServerConnectionView() {
    setLayout(new BoxLayout(this, BoxLayout.Y_AXIS));

    subscriptionsLabel = new JLabel("Subscriptions: ...waiting");
    add(subscriptionsLabel);

    connectButton = new JButton("...waiting");
    connectButton.setEnabled(false);
    add(connectButton);

    connectedLabel = new JLabel("Connection Status: ...waiting");
    add(connectedLabel);

    viewReloader = new ViewUpdater();
  }

  ...

  @Override
  public void init(Console console, Properties properties) {
    this.console = console;

    this.jmxConnection = console.getJMXConnection();
    try {
        this.mbean =
          new ObjectName("PricingAdapter.server.custom:type=ServerConnectionMBean");
        new Timer(2000, viewReloader).start();
    } catch (MalformedObjectNameException e) {
        e.printStackTrace();
    }
  }

  ...

  class ViewUpdater implements ActionListener {
    @Override
    public void actionPerformed(ActionEvent evt) {
      Object connectedAttribute;
      Object subscriptionsAttribute;

      try {
        subscriptionsAttribute =
          jmxConnection.getAttribute(mbean, "Subscriptions");
        subscriptionsLabel.setText("Subscriptions: "
          + subscriptionsAttribute.toString());

        connectedAttribute = jmxConnection.getAttribute(mbean, "Connected");
        boolean connected = (boolean)connectedAttribute;

        connectButton.setEnabled(true);
        if (connected) {
          connectButton.setText("disconnect");
          connectedLabel.setText("Connection Status: connected");
        } else {
            connectButton.setText("connect");
            connectedLabel.setText("Connection Status: disconnected");
        }
        connectButton.addActionListener(new ActionListener()
        {
          public void actionPerformed( ActionEvent a )
          {
            connectButton.setEnabled(false);
            try {
              Object rtn =
                jmxConnection.invoke(mbean, a.getActionCommand(), null, null);
            } catch (InstanceNotFoundException | MBeanException
                | ReflectionException | IOException e) {
              e.printStackTrace();
            }
          }
        });
      } catch (Exception e) {
          e.printStackTrace();
      }
    }

  }
}
Configuring Read-Only Users
So far you have been using the credentials admin/admin to monitor the Caplin Platform via the CMC. You can add further configuration to allow more users to be able to monitor and manage via the CMC or another JMX client. If you are using Caplin Platform 6.1 components or later, you can also provide different monitoring and management permissions for different users.
Try this yourself
-
Read the guide to Configuring DataSource Monitoring.
-
Create two new monitoring users: user1/pass1 and user2/pass2.
-
Configure permissions so that user1 is able to use the CMC to connect and disconnect the PricingAdapter from the mock server, but user2 can only connect them.