Developing a Java adapter with Docker on macOS and Windows
This page provides a walkthrough of developing a Java adapter using a Caplin template Gradle project (the Pricing Template from Caplin Project Templates on GitHub) and a local Caplin Platform stack running in Docker.
| Liberator and Transformer are supplied exclusively as Linux deployment kits from Liberator 7.1.30 and Transformer 7.1.18 onwards. Caplin continue to support Liberator and Transformer on Windows and macOS for local development deployments, but via Linux Docker containers rather than as native Windows and macOS applications. |
Requirements
To follow this walkthrough, you require:
-
Docker Desktop on Windows or macOS, or Docker CE on Linux
-
JetBrain’s IntelliJ CE
-
Credentials to a Docker registry hosting the Platform Core image
-
Network access to GitHub and a GitHub account with SSH cloning configured
Extend Platform Core for software development
Caplin’s Platform Core image is a distribution of Caplin Platform components packaged as a Docker image. The components in the image are distributed with their default configuration, and they require your customisation before deployment to a production or development environment.
In this section we’ll create an extension of Caplin’s Platform Core image customised for a local development deployment. We’ll call the new image platform-core-dev, and we’ll use it later to create the container to host the backend for our adapter project.
Follow the steps below:
-
Create a new directory for your image project and copy in your development licenses for Liberator and Transformer:
-
Login to Caplin’s Docker registry or your organisation’s local mirror:
docker login docker-release.caplin.com
-
In the
platform-core-devdirectory, create a new file calledDockerfilecontaining the following content:Dockerfile# syntax=docker/dockerfile:1 FROM docker-release.caplin.com/platform/core:7.1.30 # Configure Liberator permissioning for software development RUN set -ex \ && /app/DeploymentFramework/dfw deactivate PermissioningService \ && /app/DeploymentFramework/dfw activate OpenPermissioning # Activate Transformer's Persistence Service (file-based storage by default) RUN set -ex \ && /app/DeploymentFramework/dfw activate PersistenceService PersistenceServiceClient # Copy developer licenses COPY license-rttpd.conf /app/DeploymentFramework/global_config/licenses/ COPY license-transformer.conf /app/DeploymentFramework/global_config/licenses/ # Platform Core <= 7.1.30: install unzip manually USER root RUN yum install -y unzip USER platform # Change working directory from '/app' to '/app/DeploymentFramework' WORKDIR /app/DeploymentFramework -
Open a terminal in the
platform-core-devdirectory, and run the following command:docker build -t platform-core-dev:1.0.0 .
Start a new container for development
Run a new platform-core-dev container to host a backend for this adapter project:
docker run --name platform-core-dev-pricing -p 18080:18080 -p 18081:18081 -p 15001:15001 -p 15002:15002 -i -t platform-core-dev:1.0.0
Keep the container terminal window open for the duration of your development session.
|
This container is reusable. Later, after you exit the container, you can resume development by restarting the container: docker start -i platform-core-dev-pricing |
Create a pricing adapter project
Follow the steps below:
-
In a suitable parent directory, clone Caplin’s Project Templates project from GitHub:
$ mkdir -p ~/projects $ cd ~/projects $ git clone git@github.com:caplin/project-templates.git -
Copy the
pricing-templatedirectory to a new project directory for your adapter:cp ~/projects/project-templates/pricing-template ~/projects/pricing-adapter
-
If you want Gradle to download Caplin dependencies from Caplin’s software repository, add your Caplin credentials to
~/.gradle/gradle.properties:~/.gradle/gradle.propertiescaplinNexusUser=username caplinNexusSecret=password
-
If you want Gradle to download Caplin dependencies from a mirror of Caplin’s software repository, reconfigure the highlighted section of
~/projects/pricing-adapter/build.gradle:~/projects/pricing-adapter/build.gradlerepositories { mavenCentral() maven { credentials { username "$caplinNexusUser" password "$caplinNexusSecret" } url "https://repository.caplin.com" } } -
If you want Gradle to source Caplin dependencies from the project’s
libdirectory, make the following changes to~/projects/pricing-adapter/build.gradle:~/projects/pricing-adapter/build.gradlerepositories { mavenCentral() // maven { (1) // credentials { // username "$caplinNexusUser" // password "$caplinNexusSecret" // } // url "https://repository.caplin.com" // } } dependencies { implementation fileTree(dir: 'lib', include: '*.jar') (2) implementation group: 'com.github.fge', name: 'json-patch', version: '1.9' implementation(group: 'com.caplin.platform.integration.java', name: 'datasource', version: '7.1.+') implementation group: 'com.fasterxml.jackson.core', name: 'jackson-databind', version: '2.12.1' }1 Comment out the Caplin repository configuration 2 Uncomment the implementation filetreeconfigurationAdd the file
datasource-java-version-jar-with-dependencies.jarto the project’slibdirectory. -
Create a local working directory for the adapter:
Local terminal: ~/projects/pricing-adapter./gradlew setupWorkingDirectory
-
Create a deployment kit containing only the adapter’s configuration:
Local terminal: ~/projects/pricing-adapter./gradlew assemble -PconfigOnly
-
Copy the config-only deployment kit to the platform-core-dev container:
Local terminal: ~/projects/pricing-adapterdocker cp build/distributions/PricingAdapter-0.0.0.zip platform-core-dev:/app/DeploymentFramework/kits
-
Deploy the config-only kit in the platform-core-dev container:
Container terminal$ cd /app/DeploymentFramework $ ./dfw stop $ ./dfw deploy $ ./dfw start
Open the pricing-adapter project in your IDE
Open the pricing-adapter project in your IDE. Any IDE with Gradle support will do. For this example we will use JetBrains IntelliJ CE.
Follow the steps below:
-
Start IntelliJ CE
-
Click File > Open and select the directory
~/projects/pricing-adapter. Click OK. -
Click Run > Edit configurations
-
Click the Add new configuration icon (+) and click Application.
-
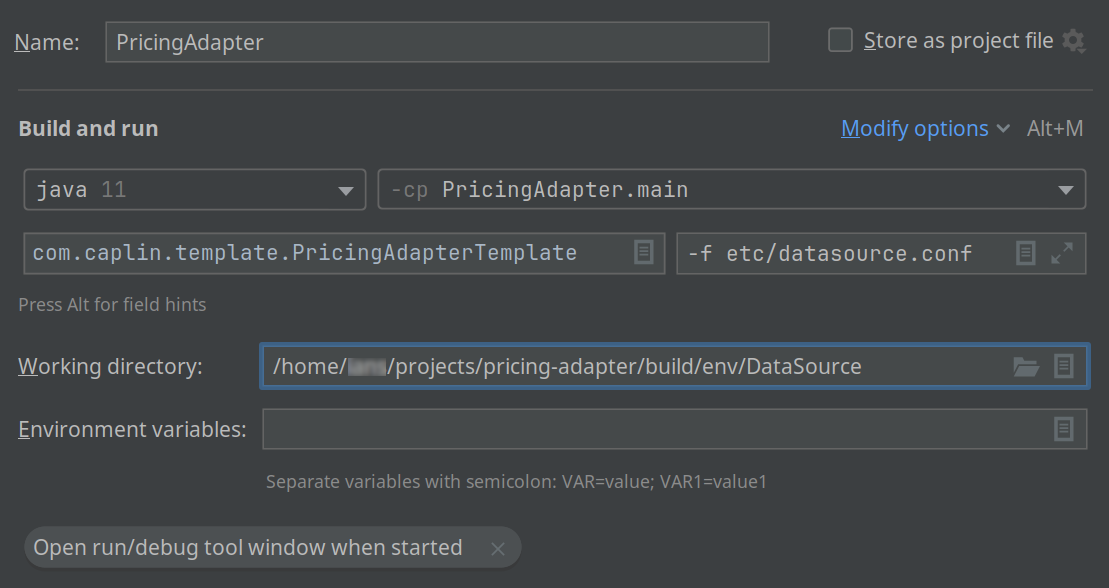
Set the following values:
-
Name:
PricingAdapter -
Build and run:
-
Module: Java 11
-
Classpath (-cp):
PricingAdapter.main -
Main class:
com.caplin.template.PricingAdapterTemplate -
Program arguments:
-f etc/datasource.conf
-
-
Working directory:
~/projects/pricing-adapter/build/env/DataSource
-
-
Click OK
Run and test the adapter
Follow the steps below:
-
In IntelliJ, click Run > Run 'PricingAdapter'
-
In a web browser, navigate to the container’s Liberator Explorer: http://localhost:18080/diagnostics/. When prompted, authenticate with default credentials "admin/admin"
-
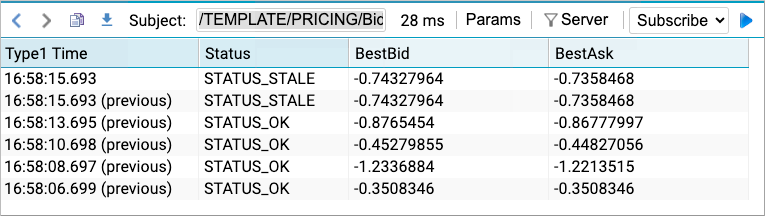
In Liberator Explorer’s Subject field, type
/TEMPLATE/PRICING/Bidand press Enter.You will see regular updates from the adapter:
-
When finished, click the stop icon ( ) in IntelliJ’s Run Panel to terminate the adapter.
Build an adapter deployment kit
When you have completed development and you want to distribute your adapter as a kit, run the command below:
./gradlew assemble
Your adapter’s deployment kit is written to build/distributions. You can deploy this kit to any Deployment Framework by copying it to the framework’s kits directory and running the dfw CLI command ./dfw deploy.
See also: