Writing a pricing adapter (1)
Integration adapters provide the Caplin Platform with data from a bank’s backend systems. In this tutorial, you will create an integration adapter that provides FX pricing data.
This tutorial assumes that you have already set up the development environment described in Setting up the Development Environment.
Objectives
Over the next two tutorials, you will create an adapter that provides FX pricing data to the Caplin Platform. By the end of this tutorial, the adapter will connect to Liberator but not provide any data. In the next tutorial, you will add code to supply FX prices to Liberator.
At the end of this tutorial, you will know how to perform the following tasks:
-
Create an adapter project from a Caplin training project
-
Import the adapter project into your IDE
-
Run the adapter in your IDE
-
Export and deploy your adapter
-
Enable JMX for the adapter.
Download the presentations for this course.
Download Caplin’s training project
The Caplin training project contains a set of example Gradle projects to help you build integration adapters.
Follow the steps below to download the project:
-
Open a Bash terminal
-
Create a directory under your home directory to store your training projects:
$ mkdir ~/caplin-training
-
Download the latest version of the training project using this link and copy the project into your newly created
caplin-trainingdirectory.To download the project from the terminal$ cd ~/caplin-training $ wget https://www.caplin.com/developer/tutorial-resources/platform/CaplinTrainingBackendProject.zip
-
Extract the ZIP:
$ unzip CaplinTrainingBackendProject.zip
Create a Pricing Adapter project
Create a new adapter project based on the Pricing Adapter example.
Follow the steps below:
-
Copy the
PricingAdapterdirectory to yourcaplin-trainingdirectory:$ cp -r ~/caplin-training/CaplinTrainingBackendProject-version/PricingAdapter ~/caplin-training/PricingAdapter
Install project dependencies
Choose one of the methods below to resolve project dependencies:
Local libraries
Requires Jar files supplied by your trainer or downloaded from Caplin Downloads by your Caplin account holder.
Copy the following dependency Jar files to your project’s PricingAdapter lib directory:
-
Java DataSource API:
datasource-java-version-jar-with-dependencies.jar
Caplin software repository
Requires network access to Maven Central, network access to https://repository.caplin.com, and a Caplin customer account.
In the file ~/.gradle/gradle.properties, declare the following properties and assign them your Caplin username and password:
caplinUsername=username
caplinPassword=password
In the project’s build.gradle file, modify the repositories { … } block so that it lists the project’s PricingAdapter lib directory, Maven Central, and Caplin’s software repository:
repositories {
    flatDir {
        dirs 'lib'
    }
    mavenCentral()
    maven {
        credentials {
            username "$caplinUsername"
            password "$caplinPassword"
        }
        url "https://repository.caplin.com"
    }
}
Import the adapter project into your IDE
Follow the instructions for your IDE below.
IntelliJ
To import your project into IntelliJ, follow the steps below:
-
Click File > New > Project from existing sources
-
Select the project’s Gradle build file:
~/caplin-training/PricingAdapter/build.gradle
Eclipse
To import your project into Eclipse, follow the steps below:
-
In Eclipse, click File > Import. The Import dialog opens.
-
From the Import dialog, click Existing Gradle Project. The Import Gradle Project dialog opens.
-
Under Project location, deselect Use default location
-
In the Location field, select your pricing adapter’s project directory.
If you are using Cygwin, your project directory is C:/cygwin64/home/username/caplin-training/PricingAdapter -
Click Finish
Run the adapter from within your IDE
Integration adapters are designed to be deployed and run in the context of a Deployment Framework (DFW), not an IDE. To run your adapter within an IDE requires some extra steps, but this will save you time and allow you to use your IDE’s debugging tools.
| The instructions for running an adapter within an IDE differ depending on whether your adapter runs against components in a local DFW or a remote DFW. This course uses the local DFW that you installed in the previous tutorial. For instructions on how to run your adapter against a remote DFW, see the README.md file in the Pricing Adapter example. |
To run your adapter in your IDE, perform the following steps:
1. Export your adapter’s configuration in a config-only blade
A config-only blade contains all of your adapter’s files except for its binary files.
| Blades that contain only configuration files have other uses in the Caplin Platform. Liberator and Transformer use configuration blades for convenient activation and deactivation of built-in features. |
Follow the steps below:
-
Open a Bash shell
-
From the root directory of your project, run the command below to export your adapter’s configuration as a configuration blade:
If using a Linux machine first run this command to gain access to the the file:$ chmod +x ./gradlew
Then run this command to export the adapter’s configuration:$ ./gradlew assemble -PconfigOnly
The new configuration blade is created under your project’s
build/distributionsdirectory.
2. Deploy the config-only blade to your DFW
Deploying the config-only blade creates your adapter’s directory structure in the DFW, and deploys configuration files required by the adapter, Liberator, and Transformer. The configuration files provide the adapter with details of the component it should connect to, and provide Liberator and Transformer with details of the data served by the adapter.
To deploy your adapter’s configuration to your Deployment Framework (DFW), follow the steps below:
-
From the root directory of your DFW, run the command below to stop all running Platform components:
$ ./dfw stop
-
Copy the blade
~/caplin-training/PricingAdapter/build/distributions/PricingAdapter-version.zipto your DFW’skitsdirectory:$ cp ~/caplin-training/PricingAdapter/build/distributions/PricingAdapter-version.zip ~/DeploymentFramework-version/kits
-
From the root directory of your DFW, run the command below to deploy your blade:
$ ./dfw deploy
-
From the root directory of your DFW, run the command below to start all Platform components:
$ ./dfw start
| Any time you change the configuration of your adapter during development, you must re-export and re-deploy a config-only blade. |
3. Create a 'Run Configuration' in your IDE
Follow the instructions for your IDE below.
IntelliJ
To create a run configuration in IntelliJ, follow the steps below:
-
Click Run > Edit Configurations
-
Click Add new run configuration, and click Application from the context menu.
-
Set Name to 'Pricing Adapter'
-
Set JDK or JRE to your OpenJDK (Java 8 or Java 11)
-
Set Classpath to the classpath of the module below:
backendTraining.PricingAdapter.main
-
Set Main class to the text below:
com.caplin.PricingAdapter
-
Set Program arguments to the text below:
-f etc/datasource.conf
-
Set Working directory to the adapter’s
DataSourcedirectory in your Deployment Framework:Linux, macOSdeployment_framework_root/active_blades/PricingAdapter/DataSource
Windowsdeployment_framework_root\kits\PricingAdapter\PricingAdapter-0.0.0\DataSource
-
Set Environment variables to the text below:
CONFIG_BASE=deployment_framework_root/global_config/
The value of CONFIG_BASE must end in a trailing forward-slash ( /) -
Click OK to close the dialog.
To run the Pricing Adapter, click Run > Run 'Pricing Adapter'.
Eclipse
To run your adapter in Eclipse for the first time, follow the steps below:
-
In Eclipse, click Run > Run Configurations. The Run Configurations dialog appears.
-
From the list of configuration types, right-click Java Application and select New
-
In the Name box, type 'PricingAdapter'.
-
In the Project box, select the PricingAdapter project.
-
In the Main class box, select
com.caplin.pricing.PricingAdapter -
Click the Arguments tab
-
In the Working directory box, select Other, click File System, and select the path to your adapter’s
DataSourcedirectory in your Deployment Framework.Linux, macOSdeployment_framework_root/active_blades/PricingAdapter/DataSource
Windowsdeployment_framework_root\kits\PricingAdapter\PricingAdapter-0.0.0\DataSource
-
Under the Environment tab, click New, and create a new environment variable
CONFIG_BASEand assign it the value below:deployment_framework_root/global_config/
The value of CONFIG_BASE must end in a trailing forward-slash ( /). -
Under the Common tab, in Display in favorites menu, select Run.
-
Click Run
To run your adapter on subsequent occasions, click Run > Run, or press Ctrl-F11.
Monitor your adapter in the CMC during development
To monitor your adapter in the Caplin Management Console (CMC), enable your adapter’s JMX interface and then manually add the details of your adapter to the CMC.
You manually supply your adapter’s details to the CMC in this instance because you have not deployed a full blade to your DFW and the ./dfw mon command will not detect your adapter.
|
If you have not already installed the CMC, follow the instructions in the tutorial Deployment Framework and Caplin Platform.
To enable JMX for your adapter, follow the steps below:
-
Stop your adapter if it is running.
-
In the file
blade/DataSource/etc/datasource.conf, append the following lines to the end of the file:define PricingAdapter${THIS_LEG}_JMX_RMI_REGISTRY_PORT ${THIS_LEG}1005 rmi-registry-port ${PricingAdapter${THIS_LEG}_JMX_RMI_REGISTRY_PORT} define PricingAdapter${THIS_LEG}_JMX_RMI_CLIENT_PORT ${THIS_LEG}1006 rmi-client-port ${PricingAdapter${THIS_LEG}_JMX_RMI_CLIENT_PORT} -
Re-deploy your adapter’s configuration to your Deployment Framework. See Export your adapter’s configuration as a config-only only blade and Deploy the config only blade to your DFW above.
Every time you change your adapter’s configuration during development, you must re-export and re-deploy the configuration to your Deployment Framework. -
From the root of your Deployment Framework, run the command below to regenerate the configuration file for the CMC:
$ ./dfw mon
-
Start your adapter
To add the details of your adapter to the CMC, follow the steps below:
-
Start the CMC
$ ./dfw cmc
-
Right-click in the CMC overview screen, and in the context menu click Add new datasource.
-
In the DataSource Properties dialog, enter the following details for the adapter:
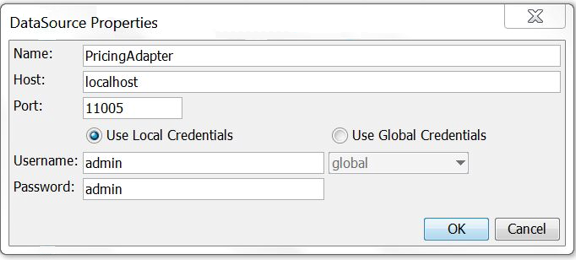
-
Click OK. A new box will appear in the CMC representing your integration adapter. The colour of the box is blue when your adapter is up and red when it is down. You can try stopping and starting your adapter in your IDE, and watch the box go from blue to red to blue in the CMC.
Run the adapter in a Deployment Framework
To run your adapter in a Deployment Framework, export you project as a Caplin Platform Blade and deploy the blade to your Deployment Framework.
Follow the steps below:
-
Stop the adapter in your IDE.
-
From the root directory of your DFW, run the command below to stop all running Platform components:
$ ./dfw stop
-
From the root of your Pricing Adapter project, run the command below to export your project as a full Caplin Platform Blade (binaries and configuration):
$ ./gradlew assemble
-
Copy the exported blade
~/caplin-training/PricingAdapter/build/distributions/PricingAdapter-version.zipto your DFW’skitsdirectory. Do not extract the archive.$ cp ~/caplin-training/build/distribution/PricingAdapter-version.zip ~/DeploymentFramework-version/kits
-
From the root directory of your DFW, run the command below to deploy your blade:
$ ./dfw deploy
Answer Yes when prompted to replace the previous blade. You can also suppress this prompt in future by running
./dfw deploy -f.You will see a warning informing you that the Deployment Framework does not know on which host the new blade should run.
-
Run
./dfw hostsand you will see that Liberator and Transformer are configured to run on localhost, but there is no entry for your blade.$ ./dfw hosts Core components Primary Secondary ------------------------------------------------------------- Liberator localhost localhost Transformer localhost localhost Blades Primary Secondary ------------------------------------------------------------- LiberatorDemoDataSource localhost localhost TransformerDemoDataSource localhost localhost -
Run the command below to specify 'localhost' as the server on which the PricingAdapter blade should run:
$ ./dfw hosts PricingAdapter localhost localhost
On any particular server, the DFW only starts components with a primary or secondary server that matches the server’s hostname or the special hostname 'localhost'. The hostname 'localhost' acts as a wildcard host in this context. Specifying 'localhost' as a component’s primary or secondary server ensures that the component starts on any server on which it is deployed. The level of control the
./dfw hostscommand gives you over where a component runs allows you to deploy all components to a single server and then duplicate that DFW to all servers in your environment. This greatly simplifies configuration. -
Run
./dfw hostsagain, and you will see that the PricingAdapter blade is now configured to run on localhost. -
Run
./dfw monto refresh the configuration for the deployed PricingAdapter blade. -
Run
./dfw start. This time you will see the message "Starting PricingAdapter" in addition to the usual "Starting Liberator" and "Starting Transformer". -
Run
./dfw cmcto relaunch the CMC. You should see that the PricingAdapter is blue, indicating that it is running inside the Deployment Framework.
You can start and stop components in the Deployment Framework by name. Try running ./dfw start PricingAdapter and ./dfw stop PricingAdapter and see what happens.
|
Reverting to running the blade from your IDE
Now that you understand how to deploy a complete integration adapter blade, it’s time to revert back to running from your IDE so that you can continue development in the forthcoming tutorials.
Follow the steps below:
-
Close the CMC
-
In the root directory of your DFW, run the command below to stop all running Caplin Platform components:
$ ./dfw stop
-
In the root directory of your DFW, run the command below to specify the fictitious hostname 'nosuchhost' as the PricingAdapter blade’s primary and secondary server:
$ ./dfw hosts PricingAdapter nosuchhost nosuchhost
You can use any fictitious hostname to stop the DFW from running the PricingAdapter binaries. The hostname 'nosuchhost' was an arbitrary choice. -
Run the command below to start all components in the Deployment Framework:
$ ./dfw start
Notice that the PricingAdapter is no longer listed among the components started by the DFW. If you check the DFW log (
$DEPLOYMENT_FRAMEWORK_ROOT/active_blades/PricingAdapter/DataSource/var/framework.log) you will find an entry explaining that the PricingAdapter component was not started because it is not configured to run on this host. -
Run the command below to re-launch the CMC:
$ ./dfw cmc
Notice that the PricingAdapter is red, indicating that it is not running.
-
Start the Pricing Adapter in your IDE. It should turn blue in the CMC, indicating that it has started and connected to Transformer successfully.
Review
Having completed this tutorial you should now be familiar with the following tasks:
-
How to use the Caplin training project and your IDE to develop integration adapters
-
How to export integration adapter blades and deploy them to the Deployment Framework.
In the next tutorial we will be focusing on the specific implementation of a Pricing Integration Adapter and looking at the blade we’ve just created in more detail. We will also create more integration adapters in subsequent tutorials.