Example deployment to Kubernetes
This page provides instructions for deploying a Discovery-enabled Caplin Platform stack to a Kubernetes cluster.
Overview
This example uses the private Caplin Platform Kubernetes Demo project hosted on GitHub (https://github.com/caplin/caplin-platform-kubernetes-demo). To arrange access this project, please contact your Caplin account manager.
The project packages an example deployment as a Helm Chart and includes a Docker Compose file for building two Docker images referenced in the chart.
The diagram below shows the objects created when the chart is installed to Kubernetes with a release name of demo in the namespace caplin-cloud:
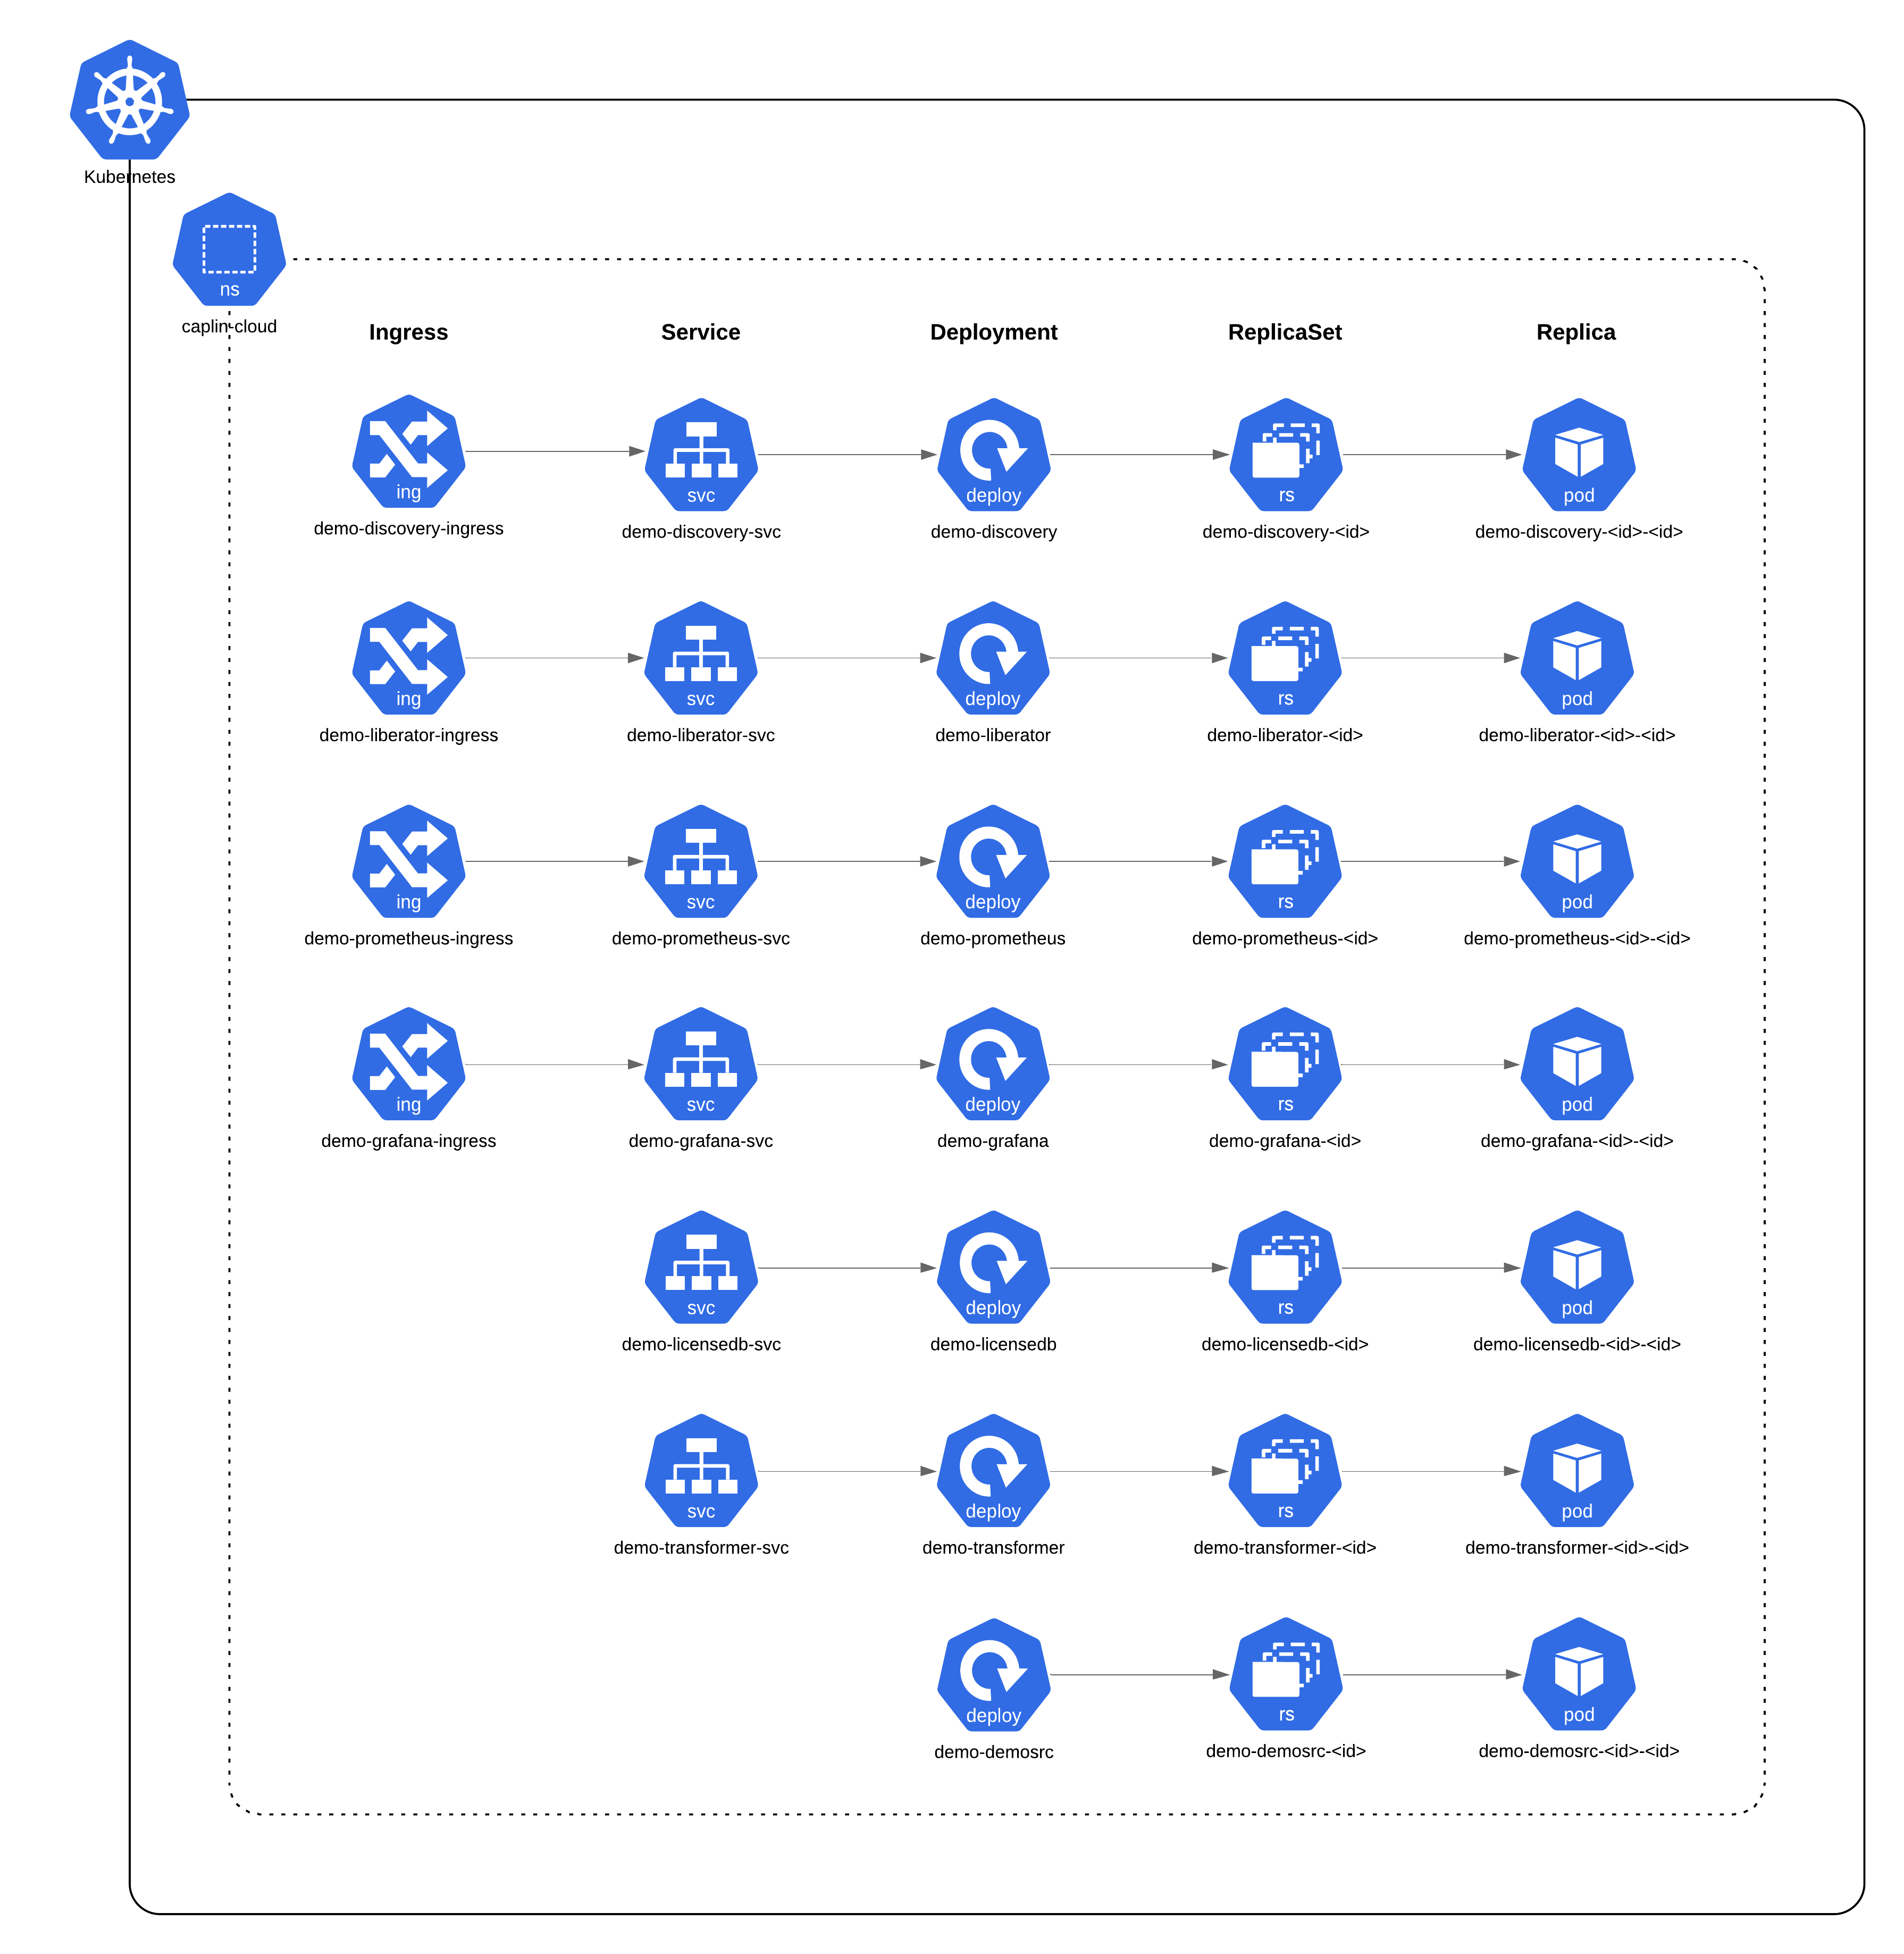
The Service objects are headless with defined selectors. For each Service, the endpoints controller configures DNS to return records pointing to the pods backing the Service.
The Helm chart defines Ingress objects with HTTP endpoints. For production deployments, we recommend you define HTTPS Ingress endpoints.
Requirements
This example has the following requirements.
Servers:
-
Kubernetes 1.20+ cluster, with an Ingress controller that supports the Websocket protocol. This project has been tested with the nginx Ingress Controller.
-
Docker registry (for example, an Artifactory Docker registry)
Locally installed software:
-
Linux (tested on CentOS 7)
-
kubectl 1.20+ (see Install and setup kubectl), configured to administer your Kubernetes cluster
-
Helm 3.2+ (see Installing Helm)
-
Docker (see Get Docker)
-
Docker Compose (see Install Docker compose)
Caplin licences:
-
Discovery (contact your Caplin account manager for a demo licence)
Caplin installation kits:
-
Discovery 7.1.3+
-
Liberator 7.1.25+
-
Transformer 7.1.14+
-
Deployment Framework 7.1.3+
Caplin installation kits are available from Caplin Developer Downloads (login required).
Preparation
Follow the steps below:
-
Clone or download the Caplin Platform Kubernetes Demo project from GitHub: https://github.com/caplin/caplin-platform-kubernetes-demo
-
Copy the Liberator, Transformer, and Deployment Framework installation kits to the
resources/kits/deploymentdirectory: -
Copy the Discovery installation kit to the
resources/kits/discoverydirectory: -
In the project’s Docker Compose environment file (
.env), set the fully-qualified names of the Discovery and Deployment Docker images. Image name format:<registry_hostname>/<image_name>:<image_tag>.Example# Docker Images DISCOVERY_DOCKER_IMAGE=docker.example.com/discovery:1.0.0 DEPLOYMENT_DOCKER_IMAGE=docker.example.com/deployment:1.0.0 -
In the project’s Helm chart
chart/values.yamlfile, set the fully-qualified names of the Discovery and Deployment Docker images, and the Ingress DNS subdomain:ExampleDISCOVERY_DOCKER_IMAGE: docker.example.com/discovery:1.0.0 DEPLOYMENT_DOCKER_IMAGE: docker.example.com/deployment:1.0.0 KUBERNETES_INGRESS_URL: k8s.example.com- DISCOVERY_DOCKER_IMAGE
-
Set to the same value as
DISCOVERY_DOCKER_IMAGEin the.envfile.
Image name format:<registry>/<image_name>:<image_tag> - DEPLOYMENT_DOCKER_IMAGE
-
Set to the same value as
DEPLOYMENT_DOCKER_IMAGEin the.envfile.
Image name format:<registry>/<image_name>:<image_tag> - KUBERNETES_INGRESS_URL
-
Set to the DNS subdomain used in URLs to Ingress objects on your Kubernetes cluster. As an example, for a Kubernetes cluster in which Ingress objects are accessed using URLs of the form http://ingress_name.mycluster.example.com/…, set this YAML key to
mycluster.example.com.
Building the Docker images
To build and publish the images required by the Helm Chart, follow the steps below:
-
Copy your Caplin Discovery licence to
resources/configs/discovery/license.txt: -
Login to your private Docker registry:
$ docker login registry_host
-
From the root directory of the project, run the Docker Compose
buildcommand to build the Docker images:$ docker-compose build
-
From the root directory of the project, run the Docker Compose
pushcommand to push the built images to your private Docker registry:$ docker-compose push
Installing the Helm Chart to your Kubernetes cluster
You can install the chart using your own choice of release name and namespace. This example installs the chart using the release name demo under the namespace caplin-cloud.
The namespace must exist in your Kubernetes cluster before you can use it. For more information, see Create new namespaces in the Kubernetes documentation.
Follow the steps below:
-
Perform a dry-run installation to check for possible issues:
$ helm install demo --namespace caplin-cloud --debug --dry-run ./cloud-chart
-
If the dry-run completed successfully, install the chart:
$ helm install demo --namespace caplin-cloud ./cloud-chart
For more information on installing Helm Charts, see documentation for the Helm install command.
To list all the objects installed by the Helm Chart, run the command below:
$ kubectl get ing,svc,deploy,rs,pods --namespace caplin-cloud
Viewing the Discovery web interface
In a web browser, open the following URL:
http://release_name-discovery.subdomain/
Where release_name is the name you assigned the Chart on installation (demo in this example), and subdomain is the value of the KUBERNETES_INGRESS_URL environment variable that you defined in the file cloud-chart/values.yaml.
Subscribing to test data
The diagnostic utility Liberator Explorer is available in this example deployment and provides you with a convenient interface to subscribe to test data published by the TransformerDemoDataSource blade.
| The LiberatorWebsite blade, which includes Liberator Explorer, is not supported in production environments. |
Follow the steps below:
-
In a web browser, open the following URL:
http://release_name-liberator.subdomain
Where release_name is the name you assigned the Chart on installation (
demoin this example), and subdomain is the value of theKUBERNETES_INGRESS_URLenvironment variable that you defined in the filecloud-chart/values.yaml. -
Click Diagnostics, then click Liberator Explorer.
-
Authenticate with the following credentials:
-
Username: admin
-
Password: admin
-
-
In Liberator Explorer’s Subject field, type the following subject:
/EXAMPLES/PRICING/TYPE1/AAPL
-
Click Go
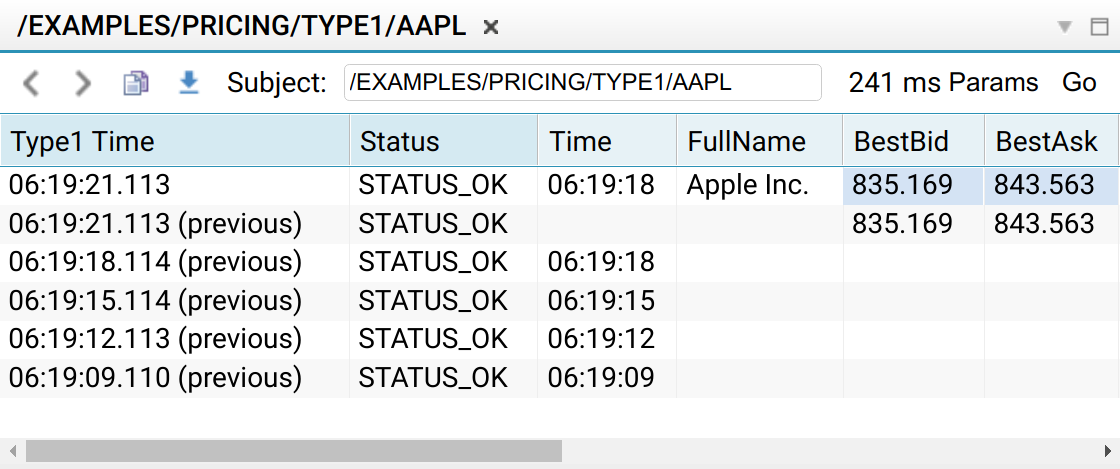 Subscribing to test data in Liberator Explorer
For a full list of subjects published by the TransformerDemoDataSource blade, see the documentation for the LiberatorDemoDataSource blade, which publishes the same subjects as TransformerDemoDataSource.
Monitoring a deployment
The example includes a Prometheus server and Grafana dashboard:
-
Prometheus:
http://release_name-prometheus.subdomain -
Grafana:
http://release_name-grafana.subdomain
Where release_name is the name you assigned the Chart on installation (demo in this example), and subdomain is the value of the KUBERNETES_INGRESS_URL environment variable that you defined in the file chart/values.yaml.
For descriptions of the metrics published by Liberator and Transformer, see the following web pages:
Scaling Deployments
All pods in this example are managed by Deployment workload controllers.
By default, the Deployments begin with one replica (pod) each. To change the number of replicas in a Deployment, run the appropriate command below:
$ kubectl scale deployment demo-liberator --namespace caplin-cloud --replicas num_replicas
$ kubectl scale deployment demo-transformer --namespace caplin-cloud --replicas num_replicas
$ kubectl scale deployment demo-discovery --namespace caplin-cloud --replicas num_replicas
$ kubectl scale deployment demo-demosrc --namespace caplin-cloud --replicas num_replicas
Where num_replicas is an integer 1..n
Opening a shell session in a pod
To list pods in this example, run the command below:
$ kubectl get pods --namespace caplin-cloud
To open a shell session in a pod, run the command below:
$ kubectl --namespace caplin-cloud exec -it pod_name bash
Uninstalling the Helm Chart
To uninstall the chart from Kubernetes, run the script below:
$ helm delete demo --namespace caplin-cloud