Section 1 - Using an FX Tile
User interface
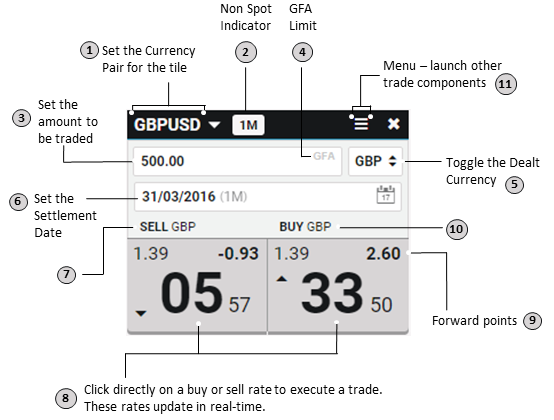
Let’s take a quick look at an FX trade tile:
-
This is the selected Currency Pair for the FX tile, you can edit the pair by clicking directly on it. A currency pair represents the symbols of two different currencies. The format of the currency pair is BaseCurrency:QuoteCurrency e.g. GBPUSD - where GBP as the Base Currency is the symbol for British Pounds and USD as the Quote Currency is the symbol for US Dollars. The base currency always represents one unit, whereas the Quote Currency is what this one unit is equal to in the other currency. If for example the exchange rate for GBPUSD = 1.6, this would mean that 1.00 unit of the base currency (GBP) can be traded in exchange for 1.6 units of the quote currency (USD).
-
The Non Spot Indicator is used to display the fact that a tile has been setup in a configuration other than Spot. In the event that a Forward Tenor has been set (such as 1M), the Tenor will be displayed. If a broken date, then the term "BR" will be shown, to indicate a broken date. Finally, if the tile is not for a Deliverable, but for a Non Deliverable Forward, then "NDF" will be displayed. See Section 5 - NDF Tiles for more information on Non Deliverable Forwards.
-
Enter the amount to be traded using this field. There are options to use shortcut notations such as 1M = 1,000,000, 1K = 1,000 etc. Only numerical figures and shortcut notations are valid inputs for this field.
-
This is the Good for Amount (GFA) Limit - good for amount means that any trade amount entered into the field is valid up to a specified upper limit. In the case of FX tile example above, the GFA limit is set to 1M or 1,000,000 units. Exceeding the GFA limit may prevent you from trading any further using the tile.
-
This toggle button on the tile is used to control the Dealt Currency of the trade. The Dealt Currency is the currency that the trader intends to trade in exchange for another currency. In the FX tile example the selected amount is 500 and the Dealt Currency is GBP, meaning the user intends to trade using £500 GBP or its equivalent in USD. Clicking the Dealt Currency button will switch to the Quote Currency, instead trading $500 USD or its equivalent in GBP.
Switching the Dealt Currency only affects the currency that you intend to trade with. If for example you are trading across GBPUSD and have specified 1000 units in USD as your Dealt Currency, you can buy or sell based on the purchasing power of 1000 USD or its equivalent purchasing power in the GBP currency.
-
This field represents the settlement date of the trade set up on the tile. You can enter a date manually by either setting a specific date (06/01/2013) or a standard Tenor (1M). There is also a date picker for managing settlement dates and Tenors. When creating a tile by default the settlement date is set to a SPOT date. When setting up a Forward trade, the date picker can used to view a list of available Tenor dates (1 Month, 2 Weeks).
-
This is the label for the selling rate button, where a currency is bought from you at a SELL rate. The rate displayed underneath this label describes the number of units that you can purchase in return for every unit you have specified in your trade amount. Clicking on the SELL button means you intend to sell units in a given currency, in exchange for buying units in another currency using the exchange rate displayed.
-
Streaming rates that update in real time, these show the exchange rate between the quote currency and the base currency. Highlighted on the display are the most important digits that fluctuate the most at any given time. These digits are known as Pips, and are normally the numbers that a user focuses in on when looking at rates. They are typically used as the negotiating price for trades.
-
This indicates the forward points of the FX trade that the tile is currently set up for. In this example the set up is a Spot trade as the Settlement Date field is configured to a Spot date. An estimation for how much a spot rate will change over a given time period is calculated by using the current interest rates for the two countries associated with the currency pair. These points are an amount that will be added to the Spot rate to give the All-in or outright rate.
-
This is the label for the buying rate button, where a currency is being sold to you at a BUY rate. The rate displayed underneath this label describes the number of units that you can purchase in return for every unit you have specified in your trade amount. Clicking on the BUY button means you intend to buy units in a given currency, in exchange for selling units in another currency using the exchange rate displayed.
-
The menu icon used for launching other FX trading components and tools. You can use the menu to switch the trade type and as well as the tile configuration from one-way pricing to two-way pricing – where rates for either buy or sell are displayed on the tile.
Setting up an FX Tile
Setting up either a Spot or Forward trade on a tile requires that you specify the following:
-
A Currency Pair to trade currencies across e.g. GBPUSD, EURUSD, etc.
-
A trade amount e.g. 50,000
-
A Dealt Currency - this specifies the currency that you intend to trade with e.g. USD (on GBPUSD)
-
A Settlement Date for the trade e.g. Spot, TODAY, TOMORROW, 1 Month from Spot etc.
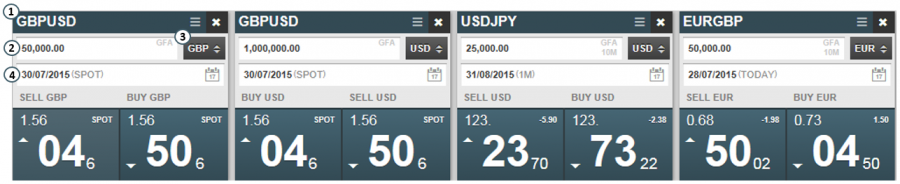
These FX Tiles above simultaneously display streaming exchange rates for two directions of trade - the buying and selling of two currencies.
Clicking on the settlement date field on a tile will launch a calendar tool that can be used to quickly set up a forward trade. The calendar displays standard forward dates (Tenors). Non-standard forward dates can also be selected for trade using the calendar, these are known as broken dates, and do not follow set periods depicted by Tenors i.e. one month, one week etc.
Selecting a Tenor or broken date:
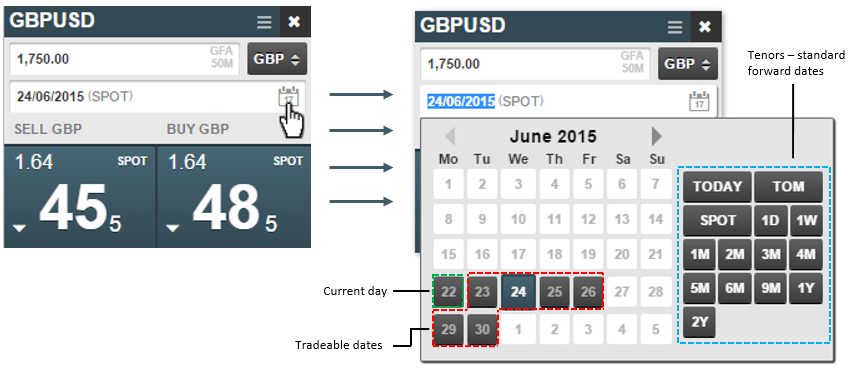
The settlement date field also accepts strings and shortcut notations when entering Forward dates, for example:
-
For settlement on same day you can enter 'today' into the field
-
For settlement on next business day, you can enter 'tom'
-
For settlement that is one week from Spot date, you can enter '1W'
Executing a trade using an FX Tile
Spot trade
Here we will set up a basic Spot trade on an FX tile and execute to see what happens. In this trade example we will trade currencies on the GBPUSD currency pair using a tile that displays two pricing rates, one for Buy and another for Sell. We will want to trade 1,750 GBP for it’s equivalent in USD using the current selling rate displayed on the tile. In other words, we will sell an amount in British Pounds and buy the equivalent amount in US Dollars using the rate displayed under SELL GBP.

Looking at the SELL GBP rate in the previous screen capture, for every 1.00 GBP that is sold 1.64485 USD can be bought. And therefore £1,750GBP was sold to buy $2,877.96 USD. The trade is submitted immediately at the given rate, although the transaction is finalised at a later date.
As a user clicks on a streaming rate to execute a trade, a trade message is sent to the server-side systems for processing. This message will contain all user submitted details at the time of execution. The trade message is created as soon as the execution button is clicked.
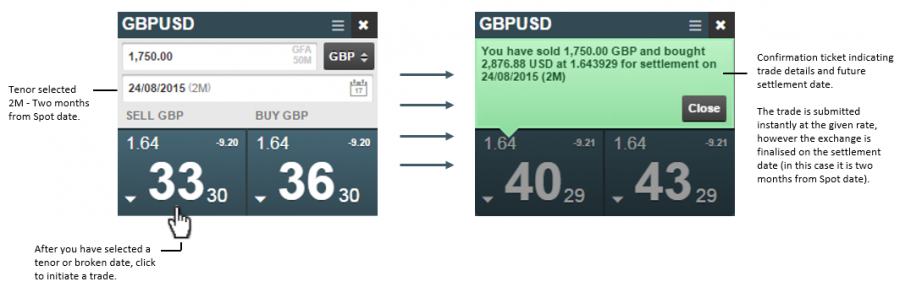
Forward trade
By selecting either a Tenor or a broken date using the Settlement date field, you can execute a forward trade for settlement on a forward date. In this example we will want to sell 1,750 GBP in exchange to buy it’s equivalent in USD. We will also want this exchange to take place two months in the future, therefore selecting a Tenor of 2M i.e. two months from Spot date:
FX Tiles Documentation: