Writing a permissioning adapter
A permissioning integration adapter sits between a backend permissioning server and the Caplin Platform. Liberator’s Permissioning Auth Module (PAM) subscribes to subjects from permissioning adapters to vet any data or trade requests made by client applications. Permission information can be updated dynamically on the server and the adapter must propagate these updates to the Auth module immediately.
Permission data on the Caplin components is classified as follows:
-
Can be ALLOW or DENY permissions
-
Can be defined for a user or group of users
-
Can apply to a specific action (e.g. VIEW or TRADE)
-
Can apply to a specific product or group of products (e.g. /FX/GBPUSD or /FX/*)
-
Related permissions can be grouped under a single namespace (e.g. FX-TRADING)
Download the presentations for this course.
Objectives
In this tutorial you will create a permissioning integration adapter that defines a number of users. Each of the users will have a different set of permissions – starting with the admin user who has permission to request anything, and leading on to other users who have specifically organised permissions for subscribing to certain sets of data and being able to trade on others.
You will also create groups of users so that multiple users can share the same permissions (which are associated with the group).
Deploy Caplin’s Permissioning Auth Module (PAM)
Caplin’s Permissioning Auth Module (PAM) is packaged as the Caplin Permissioning Service, available as a separate download to Liberator.
The Caplin Permissioning Service requires a Liberator licensed with the javaauth option. This option is not included in Liberator’s evaluation licence. Your tutor will supply you with a licence that includes this option.
|
The default auth module for Liberator is openauth, packaged in the OpenPermissioning blade. The openauth module accepts all connections and is non-configurable. It is not used in production systems.
To complete this tutorial, you will deactivate the OpenPermissioning blade and deploy the PermissioningService blade.
The Permissioning Auth Module does not accept unauthenticated connections and the default level of authorisation is deny. After enabling the PermissioningService blade, all requests will be rejected by Liberator until you supply permissioning configuration to the PAM via a permissioning adapter.
Follow the steps below to deploy the Permissioning Service:
-
Download
CPB_PermissioningService-<version>.zipto the Deployment Framework’skitsdirectory. Do not extract the archive. -
Run the command below to deploy the PermissioningService blade:
$ ./dfw deploy
You will see a warning telling you that it’s not valid to have both the OpenPermissioning and PermissioningService blades active at the same time.
-
Run the command below to deactivate the OpenPemissioning blade:
$ ./dfw deactivate OpenPermissioning
-
Restart the Deployment Framework
$ ./dfw start
-
Try logging in to Liberator Explorer (un:admin/pw:admin, as before). You will notice from the "Log" panel that the login fails. This is because we have yet to define the admin user and grant it permissions.
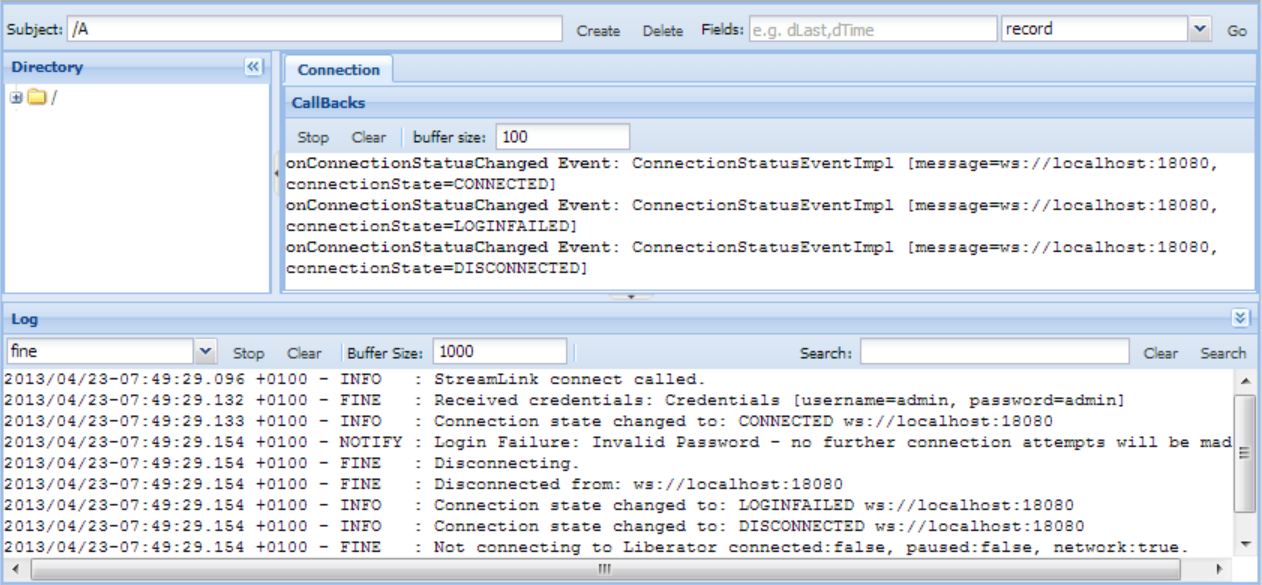
The Liberator status page too does not work.
Download Caplin’s training project
See Download Caplin’s training project in the Writing a pricing adapter (1) tutorial.
Create a Permissioning Adapter project
Create a new adapter project based on the Permissioning Adapter example.
Follow the steps below:
-
Copy the
PermissioningAdapterdirectory to yourcaplin-trainingdirectory:$ cp -r ~/caplin-training/CaplinTrainingBackendProject-version/PermissioningAdapter ~/caplin-training/PermissioningAdapter
Project dependencies
Choose one of the methods below to resolve project dependencies:
Local libraries
Requires Jar files supplied by your trainer or downloaded from Caplin Downloads by your Caplin account holder.
Copy the following dependency Jar files to your project’s lib directory:
-
Java DataSource API:
datasource-java-version-jar-with-dependencies.jar -
Java Permissioning API:
permissioning-datasource-version.jar
Caplin software repository
Requires network access to Maven Central, network access to https://repository.caplin.com, and a Caplin customer account.
In the file ~/.gradle/gradle.properties, declare the following properties and assign them your Caplin username and password:
caplinUsername=username
caplinPassword=password
In the project’s build.gradle file, modify the repositories { … } block so that it lists the project’s lib directory, Maven Central, and Caplin’s software repository:
repositories {
    flatDir {
        dirs 'lib'
    }
    mavenCentral()
    maven {
        credentials {
            username "$caplinUsername"
            password "$caplinPassword"
        }
        url "https://repository.caplin.com"
    }
}
Import the project into your IDE
Follow the instructions for your IDE below.
IntelliJ
To import your project into IntelliJ, follow the steps below:
-
Click File > New > Project from existing sources
-
Select the project’s Gradle build file:
~/caplin-training/PermissioningAdapter/build.gradle
Eclipse
To import your project into Eclipse, follow the steps below:
-
In Eclipse, click File > Import. The Import dialog opens.
-
From the Import dialog, click Existing Gradle Project. The Import Gradle Project dialog opens.
-
Under Project location, deselect Use default location
-
In the Location field, select your permissioning adapter’s project directory.
If you are using Cygwin, your project directory is C:/cygwin64/home/username/caplin-training/PermissioningAdapter -
Click Finish
Post-creation tasks
After you have created the project, perform the following tasks. Refer to the Writing a pricing adapter (1) for help.
-
Enable your adapter’s JMX interface. Use different port numbers to the JMX ports used for the Pricing Adapter and the Trading Adapter.
-
Export the adapter’s configuration as a config-only blade and deploy it to your Deployment Framework
-
Run the adapter from your IDE
-
Add the adapter to the CMC panel
Overview of the permissioning project
The new PermissioningAdapter project contains the entry point class PermissioningAdapter and a PermissioningAdapterPermissioningProvider class that does the work.
The constructor of the PermissioningAdapterPermissioningProvider class creates a PermissioningDataSource object. This object is the one which you use to manage all the users and their permissions. All permission updates are propagated to the Permissioning Auth Module (PAM) in Liberator by means of a "transaction". The PermissioningDataSource object can be used to start a new transaction, add permissions to the transaction, and then commit the transaction so that the permissions are sent to the PAM. It is only when you commit the transaction that the permissions are sent to Liberator.
There are two types of transactions for sending permissions to the PAM. An image transaction (startImageTransaction() method) will clean any permissions you have previously set and add the new ones which are described inside the transaction. If you don’t want to clear everything, you can use an update transaction (startUpdateTransaction() method). Never forget the commitTransaction() method. You can also use the rollbackTransaction() method if you catch an exception while executing the transaction.
After starting a transaction, you can use the PermissioningDataSource methods createUser() or createGroup() to create a new user or group respectively. Then use user/group.applyPermission() to define permissions for that user or group before committing the transaction.
Create a user
The first user you will configure is the administrator who should have permission to see all data and trade on any data.
Follow the steps below:
-
Create a new user. Specify a hard-coded username and password.
File: PermissioningAdapterPermissioningProvider.javapublic PermissioningAdapterPermissioningProvider(DataSource dataSource) { PermissioningDataSource permissioningDataSource = new PermissioningDataSource(dataSource, Role.MASTER); permissioningDataSource.startImageTransaction(); User adminUser = permissioningDataSource.createUser("admin", "admin"); permissioningDataSource.commitTransaction(); } -
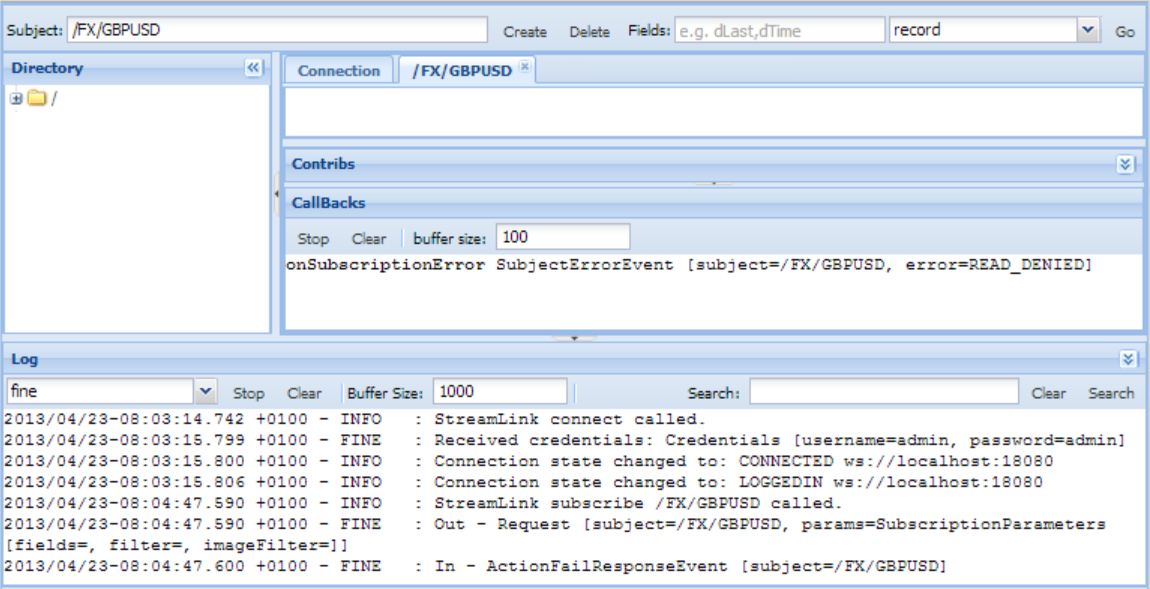
Restart the adapter and try logging in to Liberator Explorer again. Notice that now you are able to log in with u:admin/pw:admin. However if you try subscribing to any currency pair (e.g. /FX/GBPUSD) you get a READ_DENIED error because the admin user does not yet have the permission to view any data.
Assign view permissions
Now that the admin user exists and is able to login to Liberator, we will give that user permission to subscribe to streaming data.
Follow the steps below:
-
Allow the admin user to subscribe to (VIEW) all subjects as shown below. With this statement you are creating a new "ALLOW" permission and classifying it under the default namespace. The permission is to subscribe to any subject. When you restart the permissioning adapter and retry subscribing to a currency pair you should notice that the subscription is successful and prices are streamed to the client.
File: PermissioningAdapterPermissioningProvider.javapublic PermissioningAdapterPermissioningProvider(DataSource dataSource) { PermissioningDataSource permissioningDataSource = new PermissioningDataSource(dataSource, Role.MASTER); permissioningDataSource.startImageTransaction(); User adminUser = permissioningDataSource.createUser("admin", "admin"); adminUser.applyPermission(Collections.singleton("/.*"), Constants.DEFAULT_PERMISSION_NAMESPACE, "VIEW", Authorization.ALLOW); permissioningDataSource.commitTransaction(); } -
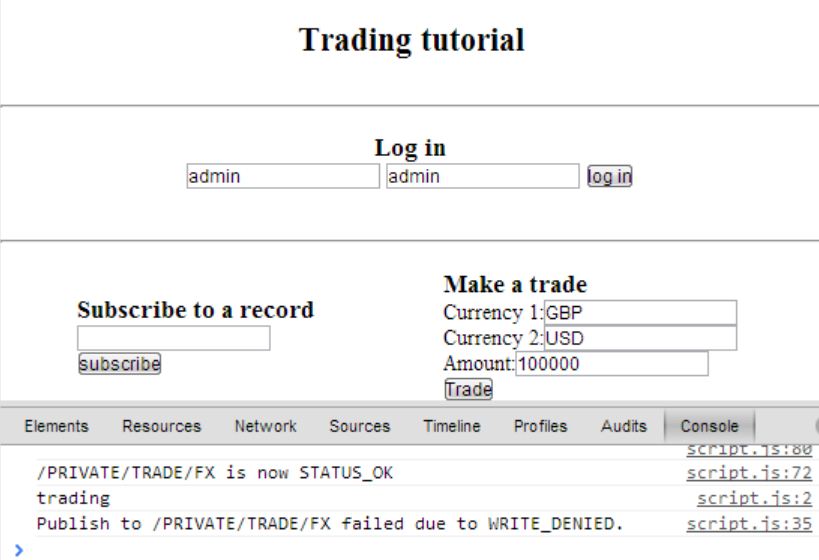
Open the trading test page (http://localhost:18080/testpage/), open the Chrome console panel (F12), log in and click the trade button.
The trade does not succeed and instead there is a WRITE_DENIED error. This is because we have only given permission for admin to subscribe to any subject. We have not given the admin user permission to publish messages to any subject.
View permissions are the simplest permissions you can create. They are simply defined by the action "VIEW" and a regular expression that must match the requested subject. The namespace is not important.
In this case we have provided the regular expression /.*, which will allow the user to subscribe to any subject that begins with a forward slash character. Later in the tutorial we will see what happens if we provide a more restrictive pattern, so that users can subscribe to some subjects but not others.
Assign trading permissions
Now we are going to create some trading permissions for the admin user. This is a bit more complicated than simple view permissions. First we have to create a rule that tells Liberator how to identify which incoming trade messages represent an ESP trade. Then we assign the admin user a permission that allows them to perform ESP trades on certain currency pairs.
Action rules and permissions make extensive use of regular expressions. The Caplin Permissioning Service uses the standard Java regular expression engine, java.util.regex.Pattern. For more information on the syntax supported by this engine, see the Java 8 documentation for java.util.regex.Pattern.
Follow the steps below:
-
Define a new rule specifically for messages published on our trade channel /PRIVATE/TRADE/FX
File: PermissioningAdapterPermissioningProvider.javapublic PermissioningAdapterPermissioningProvider(DataSource dataSource) { PermissioningDataSource permissioningDataSource = new PermissioningDataSource(dataSource, Role.MASTER); permissioningDataSource.startImageTransaction(); User adminUser = permissioningDataSource.createUser("admin", "admin"); adminUser.applyPermission(Collections.singleton("/.*"), Constants.DEFAULT_PERMISSION_NAMESPACE, "VIEW", Authorization.ALLOW); Map<String, String> espTradeFields = Collections.singletonMap("TradingProtocol", "ESP"); permissioningDataSource.createActionRule("/PRIVATE/%U/TRADE/FX", espTradeFields, Constants.DEFAULT_PERMISSION_NAMESPACE, "FX-ESP-TRADE", "Instrument"); permissioningDataSource.commitTransaction(); }The action rule defines that a message of subject
/PRIVATE/%U/TRADE/FXwith a fieldTradingProtocolof the valueESPis a request to execute the 'FX-ESP-TRADE' action on the product specified in theInstrumentfield.%Uis substituted with the user’s session name. To determine whether you should write the rule to match the user’s session name%Uor the user’s user name%u, check theObjectMapdirective for the channel. -
Now we have defined the action rule, we need to give our admin user permission to execute the 'FX-ESP-TRADE' action on a product.
File: PermissioningAdapterPermissioningProvider.javapublic PermissioningAdapterPermissioningProvider(DataSource dataSource) { PermissioningDataSource permissioningDataSource = new PermissioningDataSource(dataSource, Role.MASTER); permissioningDataSource.startImageTransaction(); User adminUser = permissioningDataSource.createUser("admin", "admin"); adminUser.applyPermission(Collections.singleton("/.*"), Constants.DEFAULT_PERMISSION_NAMESPACE, "VIEW", Authorization.ALLOW); Map<String, String> espTradeFields = Collections.singletonMap("TradingProtocol", "ESP"); permissioningDataSource.createActionRule("/PRIVATE/%U/TRADE/FX", espTradeFields, Constants.DEFAULT_PERMISSION_NAMESPACE, "FX-ESP-TRADE", "Instrument"); adminUser.applyPermission(Collections.singleton("/.*"), Constants.DEFAULT_PERMISSION_NAMESPACE, "FX-ESP-TRADE", Authorization.ALLOW); permissioningDataSource.commitTransaction(); }The permission allows the admin user to execute the 'FX-ESP-TRADE' action on a product with a name matching the regular expression
/.*.
Our test page sends the Open trade message with several fields, among them are:
-
TradingProtocol=ESP
-
Instrument= <whatever currency pair the user wants to trade>
Every time Liberator receives a message from a client, the PAM checks all of the rules to determine what type of action this is. It does this based on the subject and the fields in the message. In this example, we have defined a rule that says if the message is on the trade channel subject and contains the field TradingProtocol with the value 'ESP', then the action is FX-ESP-TRADE. The final part of the rule definition is the field on the message containing the name of the product on which the action is performed. In this case it is the Instrument field.
Having found the rule(s) that match the message, the PAM then checks that the user who sent the message permission to perform this action. In this example, the admin user has a permission that allows him to perform the FX-ESP-TRADE action on any product with a name matching the regular expression /.*. Since the value in the Instrument field will always match the pattern /.*, Liberator will allow this trade message to go through to the adapter.
If you restart the adapter and try to trade again from the test page, your trade should now be successful.
User1: A user in a group (simple inheritance)
Now that we’ve got the basics set up, let’s create some more fine-grained permissions. The aim in this section is to define a new user, user1, who will be allowed to view all the GBP currency pairs available on the Pricing Integration Adapter (e.g. /FX/GBPUSD) but not any other currency pairs (e.g. /FX/EURUSD). Additionally, we will demonstrate simple inheritance by applying these permissions to a group and adding user1 to the group so that it will inherit the group’s permissions.
Follow the steps below:
-
Start a new update transaction after committing the admin’s transaction. Create a new user, u:user1/pw:password1. (Don’t give the user any specific permission.) Create a group called "GBPGroup". Add the permissions to the group to view all the GBP currencies. Finally, add the user1 to the GBPGroup.
File: PermissioningAdapterPermissioningProvider.javapublic PermissioningAdapterPermissioningProvider(DataSource dataSource) { PermissioningDataSource permissioningDataSource = new PermissioningDataSource(dataSource, Role.MASTER); permissioningDataSource.startImageTransaction(); User adminUser = permissioningDataSource.createUser("admin", "admin"); adminUser.applyPermission(Collections.singleton("/.*"), Constants.DEFAULT_PERMISSION_NAMESPACE, "VIEW", Authorization.ALLOW); Map<String, String> espTradeFields = Collections.singletonMap("TradingProtocol", "ESP"); permissioningDataSource.createActionRule("/PRIVATE/%U/TRADE/FX", espTradeFields, Constants.DEFAULT_PERMISSION_NAMESPACE, "FX-ESP-TRADE", "Instrument"); adminUser.applyPermission(Collections.singleton("/.*"), Constants.DEFAULT_PERMISSION_NAMESPACE, "FX-ESP-TRADE", Authorization.ALLOW); permissioningDataSource.commitTransaction(); permissioningDataSource.startUpdateTransaction(); User user1 = permissioningDataSource.createUser("user1", "password1"); Group gbpGroup = permissioningDataSource.createGroup("GbpGroup"); gbpGroup.applyPermission(Collections.singleton("/FX/GBP.*"), Constants.DEFAULT_PERMISSION_NAMESPACE, "VIEW", Authorization.ALLOW); gbpGroup.addMember(user1); permissioningDataSource.commitTransaction(); } -
Reload the test page, open the Chrome console panel (F12), and log in as user1.
Be careful from this point on. Every time you reload the test page, the username and password in the text fields will reset to admin/admin. It’s easy to forget to change these fields touser1/password1and think your new permissions are not working. -
Enter /FX/GBPUSD, or another GBP-based currency pair, in the subscribe input box and press the subscribe button. In the Chrome console panel, you will see a number of updates coming in for that currency pair.
-
Try subscribing to /FX/EURUSD, or another non-GBP based currency pair. In the Chrome console panel, you will see the following error:
Error: Subject /FX/EURUSD is READ_DENIED
User2: A user in a group with some permission exceptions (masking)
In some cases, you may not want all group members to inherit all of the group’s permissions. For example, you have created a group that allows trading in all currency pairs, but you want to prohibit a subset of the group’s members from trading in the more volatile currency pairs.
You can restrict the permissions that a member inherits from a group by applying DENY permissions at member-level that override the ALLOW permissions of the group.
| DENY always takes precedence over ALLOW. So while you can override a group’s ALLOW permission at member level, you cannot override a group’s DENY permission at member level. |
You are going to add a new user, user2, to the GBPGroup group that you just created. This user, however, will not have permission to view one specific currency pair: GBPUSD.
Follow the steps below:
-
In the same update transaction that you used for user1, create a new user, user2. Add user2 to the GbpGroup group and override the GBPUSD permission:
File: PermissioningAdapterPermissioningProvider.javapublic PermissioningAdapterPermissioningProvider(DataSource dataSource) { PermissioningDataSource permissioningDataSource = new PermissioningDataSource(dataSource, Role.MASTER); permissioningDataSource.startImageTransaction(); User adminUser = permissioningDataSource.createUser("admin", "admin"); adminUser.applyPermission(Collections.singleton("/.*"), Constants.DEFAULT_PERMISSION_NAMESPACE, "VIEW", Authorization.ALLOW); Map<String, String> espTradeFields = Collections.singletonMap("TradingProtocol", "ESP"); permissioningDataSource.createActionRule("/PRIVATE/%U/TRADE/FX", espTradeFields, Constants.DEFAULT_PERMISSION_NAMESPACE, "FX-ESP-TRADE", "Instrument"); adminUser.applyPermission(Collections.singleton("/.*"), Constants.DEFAULT_PERMISSION_NAMESPACE, "FX-ESP-TRADE", Authorization.ALLOW); permissioningDataSource.commitTransaction(); permissioningDataSource.startUpdateTransaction(); User user1 = permissioningDataSource.createUser("user1", "password1"); Group gbpGroup = permissioningDataSource.createGroup("GbpGroup"); gbpGroup.applyPermission(Collections.singleton("/FX/GBP.*"), Constants.DEFAULT_PERMISSION_NAMESPACE, "VIEW", Authorization.ALLOW); gbpGroup.addMember(user1); User user2 = permissioningDataSource.createUser("user2", "password2"); gbpGroup.addMember(user2); user2.applyPermission(Collections.singleton("/FX/GBPUSD"), Constants.DEFAULT_PERMISSION_NAMESPACE, "VIEW", Authorization.DENY); permissioningDataSource.commitTransaction(); } -
Use the trading test page to login as user2 and subscribe to /FX/GBPUSD. You should see a READ_DENIED error in the Chrome console panel because this user has been specifically denied access to that currency pair. The other GBP based currency pairs (e.g. /FX/GBPAUD) will still return price updates successfully, because they are allowed by the "/FX/GBP.*" permission inherited from the user’s group.
User3: A user in multiple groups (multiple inheritance)
A user can be a part of more than one group. When this is the case, the user inherits the permissions associated with both groups. In this scenario there may be clashing permissions, i.e. ALLOW and DENY permissions on the same instruments. If this is the case, the DENY permission is always the one that is applied.
You are going to create two new groups, EURGroup1 and EURGroup2, and a new user, user3, who is a member of both groups. Some of the permissions associated with the groups will clash. No code example this time, but you should be able to complete the task based on the examples above.
Follow the steps below:
-
Create a new update transaction beneath the two existing transactions.
-
Within the new transaction, perform the following actions:
-
Create a group called EURGroup1 with permissions defined to view EURCHF and deny EURUSD subscriptions.
-
Create a group called EURGroup2 with permissions defined to view both EURCHF and EURUSD subscriptions.
-
Create user3 and add it to both groups.
-
-
In the test page, login as user3 and subscribe to /FX/EURCHF. What happens?
-
In the test page, login as user3 and subscribe to /FX/EURUSD. What happens?
Demouser
Finally, we are going to create a new user that will be used in the Caplin Trader tutorials to follow (where you will create a simple trading application, including a trade tile, that connects to the backend that you created in this first set of tutorials). These permissions will be used to demonstrate the frontend permission API.
The user, called 'demouser', can:
-
Subscribe to the FX Major (/CONTAINER/FX/MAJOR) container and the trade channel (/PRIVATE/TRADE/FX);
-
Subscribe to and trade on all FX currency pairs (with the exceptions below);
-
Subscribe to but not trade on /FX/GBPCHF;
-
Not subscribe to or trade on /FX/GBPAUD.
public PermissioningAdapterPermissioningProvider(DataSource dataSource)
{
    PermissioningDataSource permissioningDataSource =
        new PermissioningDataSource(dataSource, Role.MASTER);

    permissioningDataSource.startImageTransaction();

    User adminUser = permissioningDataSource.createUser("admin", "admin");
        adminUser.applyPermission(Collections.singleton("/.*"),
    Constants.DEFAULT_PERMISSION_NAMESPACE, "VIEW", Authorization.ALLOW);

    Map<String, String> espTradeFields = Collections.singletonMap("TradingProtocol", "ESP");
    permissioningDataSource.createActionRule("/PRIVATE/%U/TRADE/FX", espTradeFields,
        Constants.DEFAULT_PERMISSION_NAMESPACE, "FX-ESP-TRADE", "Instrument");

    adminUser.applyPermission(Collections.singleton("/.*"),
        Constants.DEFAULT_PERMISSION_NAMESPACE, "FX-ESP-TRADE", Authorization.ALLOW);

    permissioningDataSource.commitTransaction();

    permissioningDataSource.startUpdateTransaction();
    User user1 = permissioningDataSource.createUser("user1", "password1");
    Group gbpGroup = permissioningDataSource.createGroup("GbpGroup");
    gbpGroup.applyPermission(Collections.singleton("/FX/GBP.*"),
        Constants.DEFAULT_PERMISSION_NAMESPACE, "VIEW", Authorization.ALLOW);
    gbpGroup.addMember(user1);

    User user2 = permissioningDataSource.createUser("user2", "password2");
    gbpGroup.addMember(user2);
    user2.applyPermission(Collections.singleton("/FX/GBPUSD"),
        Constants.DEFAULT_PERMISSION_NAMESPACE, "VIEW", Authorization.DENY);

    permissioningDataSource.commitTransaction();

    //
    // Insert your code to implement the multiple inheritence task
    //

    permissioningDataSource.startUpdateTransaction();

    User demouser = permissioningDataSource.createUser("demouser","demopass");

    HashSet<String> allowedSubscriptions = new HashSet<String>();
    allowedSubscriptions.add("/FX/.*");
    allowedSubscriptions.add("/PRIVATE/%U/TRADE/FX");
    allowedSubscriptions.add("/CONTAINER/FX/MAJOR");
    demouser.applyPermission(allowedSubscriptions,
        Constants.DEFAULT_PERMISSION_NAMESPACE, "VIEW", Authorization.ALLOW);

    HashSet<String> allowedTrading = new HashSet<String>();
    allowedTrading.add("/FX/.*");
    demouser.applyPermission(allowedTrading,
        Constants.DEFAULT_PERMISSION_NAMESPACE, "FX-ESP-TRADE", Authorization.ALLOW);

    HashSet<String> deniedSubscriptions = new HashSet<String>();
    deniedSubscriptions.add("/FX/GBPAUD");
    demouser.applyPermission(deniedSubscriptions,
        Constants.DEFAULT_PERMISSION_NAMESPACE, "VIEW", Authorization.DENY);

    HashSet<String> deniedTrading = new HashSet<String>();
    deniedTrading.add("/FX/GBPCHF");
    deniedTrading.add("/FX/GBPAUD");
    demouser.applyPermission(deniedTrading,
        Constants.DEFAULT_PERMISSION_NAMESPACE, "FX-ESP-TRADE", Authorization.DENY);

    permissioningDataSource.commitTransaction();
}
FAQs
Answers to common questions:
- Why are we supplying a plain text password?
-
This is only for the tutorial. In real life users would be authenticated using the Caplin KeyMaster SSO integration product. This is why there is also a username-only method in the API:
permissioningDataSource.createUser("username"); - What is the DEFAULT_NAMESPACE? What does it do?
-
Namespaces are not actually used by Liberator to enforce permissions. They are only used when you want the client to retrieve a list of permissions (such as the allowed tenors for forward trades), for displaying in a drop-down menu for example.
- We’re hard coding permissions, but I thought PAM supported real-time permissioning?
-
Yes, PAM does support real time permissioning. We’ve hard coded permissions in this tutorial to keep things simple, but in a production system the permissioning adapter would connect to a backend security system. When the adapter receives an update from the backend security system, the permissioning adapter sends an update message to all subscribed Liberators. Each Liberator reacts to the update immediately. For example, if a user is currently subscribed to a subject and permission to access the object is revoked, then Liberator will terminate the user’s subscription. If an update transaction deletes a user account for a user who is currently logged in, then Liberator will terminate the user’s session.
Review
Having completed this tutorial you should now have understood how to use the PermissioningDataSource to create users and groups and how to assign permissions to the group. Also remember that you can define your own actions like you did for the FX-ESP-TRADE action. In reality it may be necessary to connect to a server providing permission data, interpret this data, and translate it into permission transactions.