Acceptance testing - simple example
Verifier is a tool for writing and executing given-when-then style acceptance tests in BladeRunnerJS. This article shows a fully worked example of an acceptance test for a GUI component and also explains the supporting infrastructure required.
To understand where to put your tests relative to your code, and about how to execute tests, first read Test Infrastructure and Execution.
Some Background
The purpose of acceptance tests is to check that a feature (usually composed of several collaborating classes) behaves as specified. The set of acceptance tests behaves as both an executable specification and a communication medium between developers, QA’s and the product owner. Acceptance tests are grouped into test suites, each of which has an associated theme. It is good practice to divide suites by user stories: for example having suites for "happy path" order entry (one for each order type), and separate suites for error handling. As is common in most literature, we refer to the feature being tested as the SUT (System Under Test). Another common term is fixture, which is code that is executed by the test runner, and whose purpose is to exercise the SUT.
We explain the acceptance testing framework using a simplified Foreign Exchange Trade Tile implemented using the Caplin Presenter library. (For more information about the Caplin Presenter library see our online documentation at: Presenter Live Examples.)
GUI’s written using Presenter are specifically designed to be tested with Verifier. In Presenter a GUI is logically represented by a presentation model, which is a standard JavaScript class that implements the caplin.presenter.PresentationModel interface. Verifier includes fixtures to help test presentation models.
The Example
The presentation model of a simple FX trade tile is shown below. The createTrade() method is responsible for creating the domain model object used by the presentation model. The trade model defines the business logic for executing FX trades and includes a state machine that co-ordinates sending and receiving the correct messages from a server. The _createProperties() method initialises all the property and field objects that are displayed on the screen. Some of the properties are created directly from the trade model using the TradeModelPropertyFactory. The properties and fields are automatically bound to the screen by _Presenter and the contained values are displayed on the screen. Testing the values of the presentation model is equivalent to testing the data displayed on the screen.
Demonstration Presentation Model Code
caplin.namespace("novox");

novox.SimpleFxTradePresentationModel = function()
{
  this.m_sCurrencyPair = "GBPUSD";
  this.m_oTrade = this._createTrade(this.m_sCurrencyPair);
  this.m_oTradeModelPropertyFactory = new caplin.presenter.domain.property.TradeModelPropertyFactory(this.m_oTrade);
  this._createProperties(this.m_oTradeModelPropertyFactory, this.m_sCurrencyPair);
};
caplin.implement(novox.SimpleFxTradePresentationModel, caplin.presenter.PresentationModel);

novox.SimpleFxTradePresentationModel.prototype._createProperties = function( tradeModelPropertyFactory, sCcyPair)
{
   this.instrument = new caplin.presenter.property.WritableProperty(sCcyPair);
   this.dealtCurrency = new caplin.presenter.property.WritableProperty(sCcyPair.substr(0,3));
   var accounts = {"ACCOUNT_01":"Account1","ACCOUNT_02": "Account2"};
   this.account = new caplin.presenter.node.SelectionField(accounts);

   this.amount = new caplin.presenter.node.Field(100000);
   this.amount.value.addFormatter(caplin.element.formatter.ThousandsFormatter, {});

   this.tradeID = tradeModelPropertyFactory.getProperty("TradeID");
   this.tradeID.addFormatter(new novox.ValueUnavailableFormatter("fxtrade.unavailable"));

   this.buyRate = tradeModelPropertyFactory.getProperty('legs.0.AskSpotPrice');
   this.buyRate.addFormatter(new novox.ValueUnavailableFormatter("fxtrade.unavailable"));

   this.sellRate = tradeModelPropertyFactory.getProperty('legs.0.BidSpotPrice');
   this.sellRate.addFormatter(new novox.ValueUnavailableFormatter("fxtrade.unavailable"));
   this.state = tradeModelPropertyFactory.getTradeStateProperty();
};

novox.SimpleFxTradePresentationModel.prototype._executeSpotTrade = function(sSide)
{
    ..... code removed ......
     this.m_oTrade.processClientEvent("Open");
};

novox.SimpleFxTradePresentationModel.prototype._createTrade = function(sInstrumentName)
{
     var oTradeService  = caplin.core.ServiceRegistry.getService("caplin.trade-service");
     var oTrade = oTradeService.createFXTrade("ESP", sInstrumentName);
     oTrade.getLeg(0).setTenor("SPOT");
     return oTrade;
};

novox.SimpleFxTradePresentationModel.prototype.buy = function()
{
     this._executeSpotTrade("ask");
};

novox.SimpleFxTradePresentationModel.prototype.sell = function()
{
      this._executeSpotTrade("bid")
};
Demonstration acceptance test code
The following code shows an initial happy path test of the presentation model shown above:
describe("Simple Fx Trade acceptance criteria", function(){
  fixtures("novox.testing.SimpleFxTradeFixtureFactory");

  it("starts trade in Initial state", function(){
     given("tile.opened = true");
     then("tile.model.state = 'Initial'");
   });

  it("is in OpenSent state after Open event is sent", function(){
      given("test.continuesFrom = 'starts trade in Initial state'");
       and("tile.model.amount.value = '4000000'");
       and("tile.model.account.value = 'ACCOUNT_01'");
       and("tile.model.tradeID = '111222'");
       and("tile.model.buyRate = '1.2345'");
       and("tile.model.sellRate = '1.5678'");
      when("tile.model.buy.invoked => true");
      then("trade.eventSent = 'Open|TRADE_MESSAGE'");
       and("tile.model.state = 'OpenSent'");
   });

   it("is in Opened state after OpenAck is received", function(){
        given("test.continuesFrom = 'is in OpenSent state after Open event is sent'");
    when("trade.eventReceived => 'OpenAck'");
    then("tile.model.state = 'Opened'");
    });

    it("is in TradeConfirmed state after TradeConfirmation is received", function(){
    given("test.continuesFrom = 'is in Opened state after OpenAck is received'");
    when("trade.eventReceived => 'TradeConfirmation'");
    then("tile.model.state = 'TradeConfirmed'");
    });
});
The acceptance test follows the Jasmine syntax, where each test suite is defined in a single file and is introduced with the describe() function. Each individual test is executed within an it() function. Remember to give suitably meaningful descriptions to both suites and tests.
The Jasmine test runner reads, parses and executes the tests. Fixtures are required to actually exercise your code (in this case the presentation model). The following line of code introduces a class that creates the appropriate fixtures.
fixtures("novox.testing.SimpleFxTradeFixtureFactory");
The factory registers fixtures upon which the first node of each expression of the given, when or then clause is dependent. For example the following clause expects a fixture to be registered with the name "tile":
and("tile.model.buyRate = '1.2345'");
The fixture factory binds the presentation model to the variable tile.model. Any properties that are public instance variables within the presentation model are then referred to using standard (dotted) object notation.
If the and clause is part of a given or when, the fixture sets the value of the buyRate property to "1.2345". If the and clause is part of a then, the fixture asserts that the value of the buyRate property is equal to "1.2345".
when("trade.eventReceived => 'OpenAck'");Rather than setting a value on a property the example above executes the eventReceived() method and passes it the value "OpenAck".
Often you will want to chain tests so that you do not have to repeat the initial conditions for every test. The test.continuesFrom operator shown in the example enables this.
Example Fixture Factory
The following code creates the fixtures required by the acceptance tests:
caplin.namespace("novox.testing");

novox.testing.SimpleFxTradeFixtureFactory = function()
{
};
caplin.implement(novox.testing.SimpleFxTradeFixtureFactory, caplin.testing.FixtureFactory);

novox.testing.SimpleFxTradeFixtureFactory.prototype.setUp()
{
    caplin.core.ServiceRegistry.registerService("caplin.trade-service", this._createTradeService());
};

novox.testing.SimpleFxTradeFixtureFactory.prototype.addFixtures = function(oTestRunner)
{
    var oTileFixture = new caplin.presenter.testing.PresenterComponentFixture("simplefxtrade-form","novox.SimpleFxTradePresentationModel");
    var oSubscriberStub = this.m_oTradeFactory.getTradeSubscriber();
    var oTradeFixture = new caplin.trading.testing.TradeMessageFixture();
    oTradeFixture.setTradeSubscriberStub(oSubscriberStub);
    oTradeFixture.addNamedValueMap("TRADE_MESSAGE", novox.testing.SimpleFxTradeFixtureFactory.MOCK_TRADE_DATA);
    oTestRunner.addFixture("tile", oTileFixture);
    oTestRunner.addFixture("trade", oTradeFixture);
};

novox.testing.SimpleFxTradeFixtureFactory.prototype._createTradeService = function()
{
     ..... code removed ......
}
Your fixture factory must implement the caplin.testing.FixtureFactory interface. The constructor is responsible for creating any dependencies that the SUT requires. The FixtureFactory registers all fixtures by calling the addFixture()method on the test-runner instance. Each fixture implements the caplin.testing.TestFixture interface. The addFixtures() method is called once after the FixtureFactory is instantiated. If a method named setUp() is defined it is executed before every test. This gives the FixtureFactory the opportunity to configure the fixtures ready for the test to run. If a method named tearDown() is defined it is executed after every test. This gives the fixture factory the opportunity to reset the fixtures to their original state.
The following diagram illustrates the relationships between the various classes used in testing:
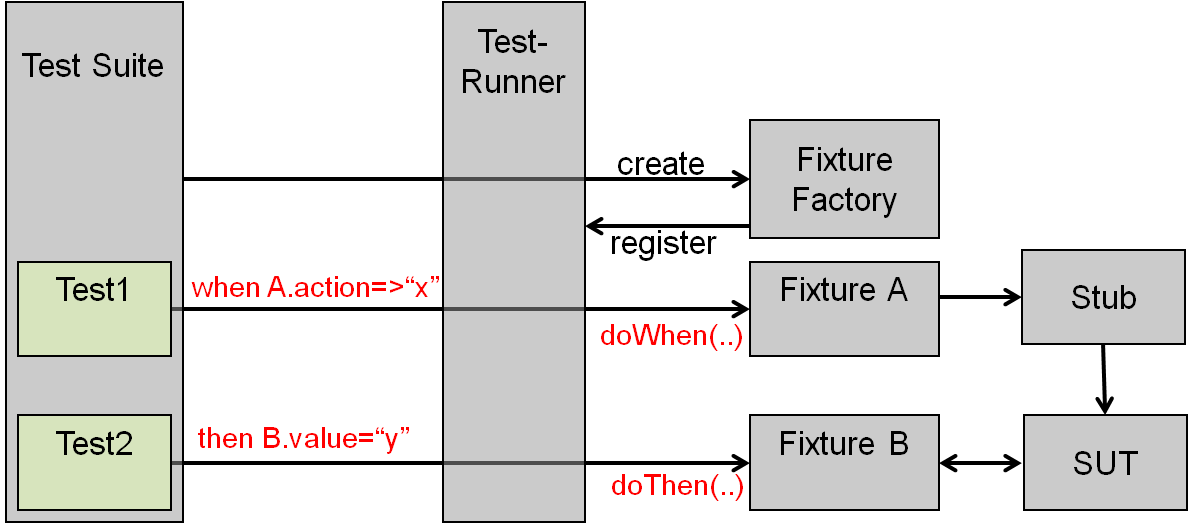
The test-suite defines the fixture factory that the test-runner instantiates. The fixture factory then creates and registers the appropriate fixtures. The test-runner is responsible for calling the appropriate methods of the fixture. The fixture may access the SUT directly (see Fixture B) or indirectly using a stub. Stubs encapsulate common code for accessing the SUT. The Caplin libraries provide useful default stubs and fixtures where appropriate.
Example Fixture
The following example is a simple fixture that tests the value of the TradeId within a trade object. The trade object is instantiated by the fixture factory and passed into the fixtures constructor.
caplin.namespace("novox");
novox.TradeFixture = function(oTrade)
{
    this.m_oTrade = oTrade;
};
caplin.implement(novox.TradingFixture, caplin.testing.Fixture);

novox.TradeFixture.prototype.canHandleProperty = function(sProperty)
{
    return sProperty == 'tradeId';
};

novox.TradeFixture.prototype.doGivenAndWhen = function(sProperty, vValue)
{
    this.m_oTrade.setTradeId(vValue);
};

novox.TradeFixture.prototype.doGiven = novox.TradingFixture.prototype.doGivenAndWhen;
novox.TradeFixture.prototype.doWhen = novox.TradingFixture.prototype.doGivenAndWhen;

novox.TradeFixture.prototype.doThen = function(sEvent, vValue)
{
    var sActualTradeId = this.m_oTrade.getTradeId();
    assertEquals("TradeId does not match '", vValue, sActualTradeId);
};
The fixture implements the caplin.testing.Fixture interface. The following line shows how this fixture could be used in a test.
then("trade.tradeId = '53'");The canHandleProperty() method returns the name of the property that the fixture can process. The doGiven() and doWhen() are responsible for taking the appropriate action on the SUT. In this case they set the tradeId on the trade model. The doThen()checks that the test condition is correct.