Presenter
Presenter is an MVVM (Model-View-ViewModel) framework used for creating GUI components for trading. It allows you to develop a component for your HTML5 application by creating your HTML view and JavaScript model separately and binding them together using Presenter.
Presenter is built on top of Knockout, which is an open source MVVM library. We have extended Knockout by adding additional features like parsers, formatters and validators, and also integrated it with the Caplin component API.
Objectives
In this first BladeRunnerJS/CT4 tutorial you are going to build a simple trade tile using Presenter. The objectives are:
-
Understand how the tile is composed from an HTML view and JavaScript presentation model which are bound together using Presenter
-
Learn to bind DOM events in the view to custom actions
-
Modularise your tile using sub-templates
-
Learn the difference between Properties and Fields
-
Theme your tile
We’ll build on the tile in later tutorials by testing it, adding pricing and trading functionality etc..
Setup
Before starting this tutorial you will first import a motif which was developed for this set of tutorials and includes several resources which will be useful in this and later tutorials.
Start by importing this motif into your Caplin Trader installation.
Download TutorialStartApp.zip. Open the Caplin Trader dashboard and start by importing this motif:
-
App Name: TutorialApp
-
App Namespace: mycompany
In Eclipse, or your IDE of choice, open the file CaplinTrader\conf\users.properties and replace the two default users with the following line: demouser: demopass, user
Therefore when prompted to log in to your application or the workbench, the credentials will be:
-
username: demouser
-
password: demopass
Refresh your Caplin Trader project in your IDE you will see that there is now a new "TutorialApp" folder in the apps directory. This contains a "tutorial-bladeset" which contains a "tile" blade and a "grids" blade. If you load the dashboard in your browser (http://localhost:7070) and click on the TutorialApp you will see this view:
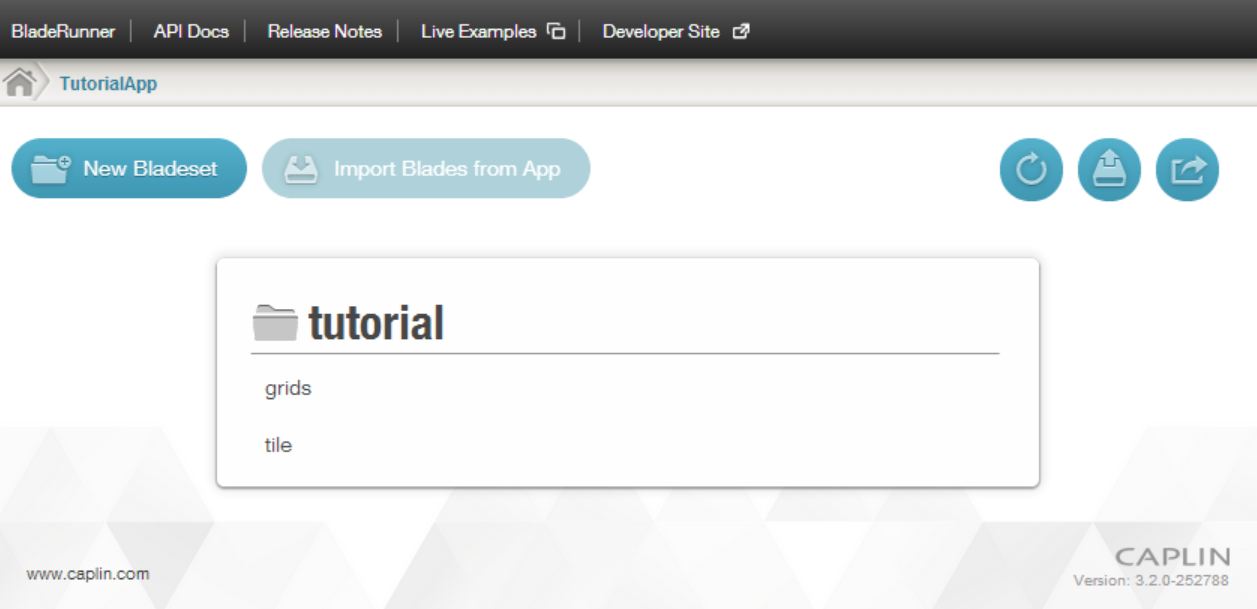
The namespace of the app is "mycompany", that of the bladeset is "mycompany.tutorial", and that of the blades is "mycompany.tutorial.tile" and "mycompany.tutorial.grids".
Create a Trade Tile
A trade tile is a trading UI component for making quick FX trades with just one click. The basic constituents are:
-
The currency pair, on which we are trading
-
The amount we are trading
-
The dealt currency, which is the currency that the amount we are trading is specified in
-
The buy and sell prices which will be streamed in from a backend system and displayed on the component.
Presentation Model
The presentation model contains the properties for all these constituents.
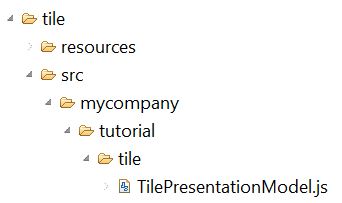
Open TilePresentationModel.js (in the "tile" blade of the "tutorial-bladeset"):
This file is a JavaScript module exporting the class TilePresentationModel, with a constructor that sets various properties. Each property can be represented as a visual element on the page. This object acts as the presentation or view model for your tile, literally a "model of the view". Note that the terms "view model" as used in the acronym MVVM and "presentation model" are interchangeable.
The class uses the Caplin inheritence mechanism to make this class extend the PresentationModel class from the Caplin Trader SDK.
View
The view contains all the HTML elements to display the constituents of the tile.
Open tile.html which is the HTML view template for our trade tile. It can be found in this location:

Take note of these features of the HTML template:
-
There is an outer DIV element for the template itself, with an ID. This ID is used to refer to the template in your code.
-
There is another container DIV just inside the outer div for the tile.
-
The template is just made up of standard HTML elements like label, input and span.
The most important point to understand is that some of the HTML elements contain the data-bind attribute, which links them to a property in the presentation model. For example, look at this element:
<span data-bind="text:currencyPair"></span>Switch back to the presentation model, TilePresentationModel.js. You will see that the presentation model contains this line:
this.currencyPair = new Property("GBPUSD");This means that the content of the span element is bound to the value of the currencyPair property, therefore when the page loads this element would initialise to <span>GBPUSD</span>.
The job of the Presenter library, and the underlying Knockout library, is to keep the bindings up to date. For example, if you changed the value of the currencyPair property in your code, Knockout would instantly change the content of the associated span element so that you would see the text on the screen change from GBPUSD to the new value.
The situation described above is a change in the model being reflected in the view. In fact, bindings are two-way - so a change in the view is also reflected in the model. This means that if a user changes the value of a bound HTML element, the value of the linked property in the code will instantly be updated. This is not applicable for span elements, which simply render content to the page and cannot be edited in the browser, but later on we will see how you can set data bindings on user-editable form elements like text boxes.
Exercise
Try launching the tile’s workbench from the Caplin Trader dashboard. You will need to login with the demouser/demopass credentials.
You will see that this brings up a tile and also a Presentation Model Visualiser tool which shows the values of the properties in the presentation model. One of the form elements, the amount input box, is empty.
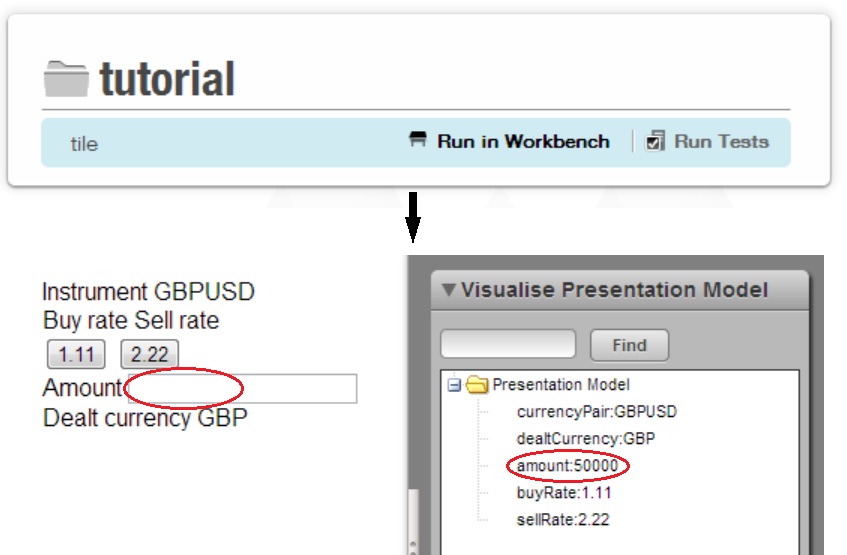
There is a bug in our tile! There is a property "amount" in our presentation model with a value of "50000", but the Amount text box in our view is empty. This means that the binding between the model and the view is not working. Let’s fix it.
Open up the tile.html file and find the input element that should contain the amount.
<div class="amount">
   <label>Amount</label>
   <input type="text" />
</div>
Notice that it does not have a data-bind attribute so there is no link between it and the amount property in your presentation model. This is the problem. You can try fixing it by adding a text data binding like you see elsewhere in the file. Make this change and then refresh the workbench in your browser:
<div class="amount">
   <label>Amount</label>
   <input type="text" data-bind="text:amount" />
</div>
It does not work, the text box is still empty. This is because we are using the wrong type of binding.
Recall that the data-bind attributes come from the open source Knockout MVVM library. Have a look at the Knockout documentation for text data binding here. Notice that it says "Typically this is useful with elements like <span> or <em> that traditionally display text", which is not what we are doing here. We are trying to apply a binding to an input form field.
If you scan down the list of bindings on the left side of the Knockout documentation page you will see a section entitled "Working with form fields", and in that section you will find the value binding. The description says "This is typically useful with form elements such as <input>, <select> and <textarea>." This sounds more like what we want, so update your code as follows:
<div class="amount">
   <label>Amount</label>
   <input type="text" data-bind="value:amount" />
</div>
Refresh the workbench page and this time you should see that the binding is now working and the text box correctly contains the value "50000".
Presenter Component
So far we have looked at the tile.htmlfile, which is your View, and the TilePresentationModel.js class, which is your View Model. You might be wondering how these two classes are glued together so that they know about each other.
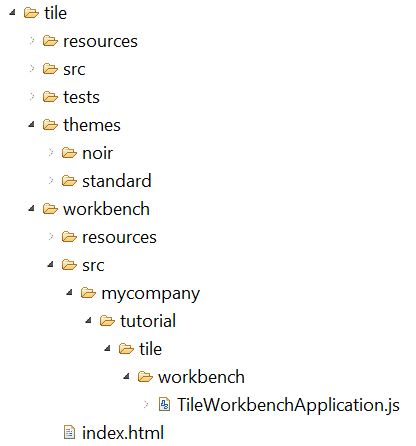
A Presenter Component is a component that links a view and a view model together. The workbench is creating the tile by creating a Presenter Component. Take a look at the workbench entry point, index.html. There are multiple instances of index.html in your project, so make sure you pick the right one.
You can ignore most of the contents of this file, it’s just boilerplate code to set up the workbench itself. The important line is this one:
var oApplication = new TileWorkbenchApplication();This leads us to the TileWorkBenchApplication.js file, which show you how to create a Presenter Component for your tile:
function TileWorkbenchApplication() {
    this._templateID = 'mycompany.tutorial.tile.tile-template'; (1)
    this._createPresenterComponents();
}

TileWorkbenchApplication.prototype._createPresenterComponents = function() {
    this._presentationModel = new TilePresentationModel(); (2)
    this._presenterComponent =
        new PresenterComponent(this._templateID, this._presentationModel); (3)
    this._presenterComponent.setFrame(null);
};| 1 | Defines a string variable this._templateID with a value of "mycompany.tutorial.tile.tile-template". If you recall, this is the ID of the template that you saw in your tile.html. |
| 2 | Creates a new instance of your presentation model, which is the class you were looking at in TilePresentationModel.js. |
| 3 | Creates an instance of PresenterComponent, linking the two things together. The constructor takes two arguments, a string that tells it the name of the template to use for the view, and an object that extends PresentationModel, which it uses as the view model. |
The HTMLResourceService
Notice that when we create a Presenter Component we only give it the ID of the template we want to use, and not the contents of the template itself. How does the Presenter Component use this ID to get the actual contents of the template?
The Presenter Component uses something called the HTMLResourceService in order to retreive the HTML contents of the template. This is a service provided by BladeRunnerJS. One of the main roles of BladeRunnerJS is bundling - it concatenates all of the hundreds or thousands of HTML files that make up an application into a single file that is served by the browser, in order to speed up application load. It does the same thing for JavaScript files and CSS files.
The HTMLResourceService allows you to pull out parts of the HTML bundle. You effectively give the service an ID, and it will return the corresponding fragment of HTML from the bundle.
The following diagram illustrates the service initialisation and its use in loading the HTML bundle and providing the tile view to create the Presenter Component. The TileWorkbenchApplication is doing all of this for us. But for now the main application is not creating the tile at all.
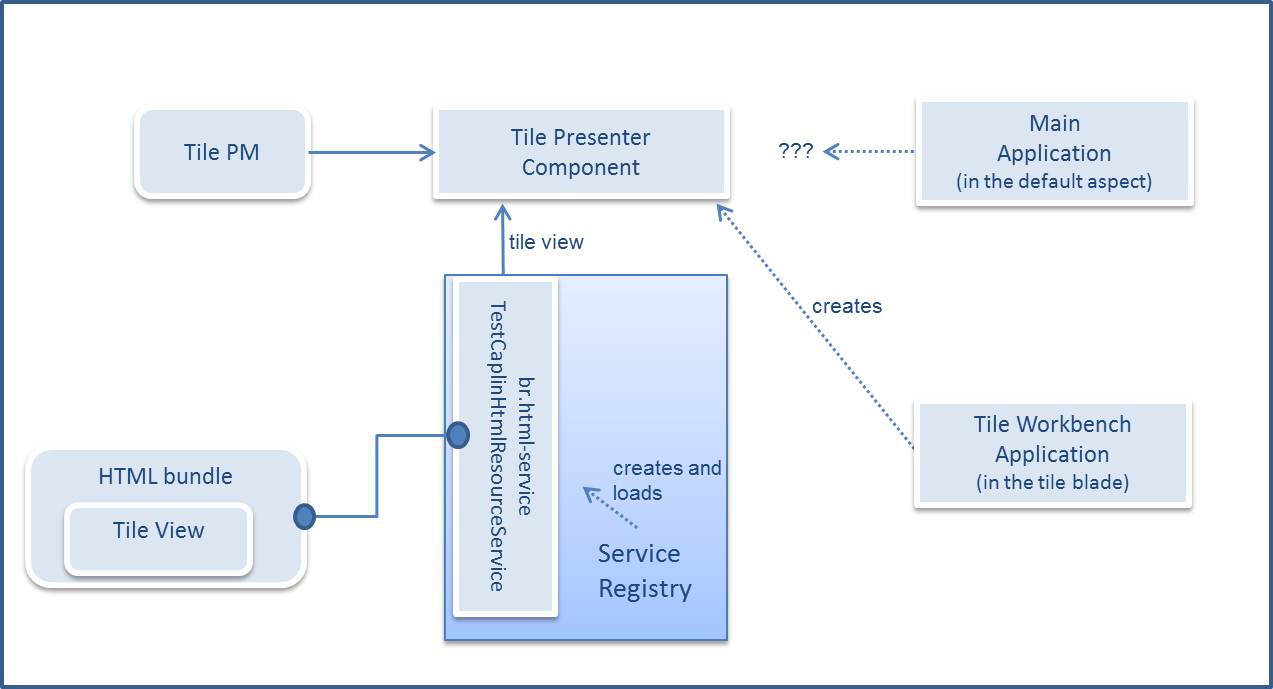
The components created in your application may need to use various application services, in the same way that the PresenterComponent requires the HTMLResourceService. A number of service interfaces are defined in the API, some of which are assigned a default implementation inside the libraries themselves. These aliased services and the default implementations are defined in the aliasDefinitions.xml files inside the SDK.
For example, the default implementation of the HTMLResourceService (alias: br.html-service) is the CaplinHtmlResourceService, or in the case of the workbench and tests (dev scenarios) the TestCaplinHtmlResourceService.
A service is initialised and registered with the ServiceRegistry the first time it is required by the application. E.g. The TestCaplinHtmlResourceService is being initialised and registered as the HTMLResourceService when the tile is being created by the PresenterComponent.
The services' default implementations can be overridden at the application, bladeset or blade level. You can also add new services to your application at a library, bladeset or blade level.
Exercise
When you launch the application (from the Launch App button in the Caplin Trader dashboard) you will notice that nothing appears on screen. We are going to modify our main application so that it displays our tile in the body of the HTML document.
The default aspect holds the default entry point for the a Caplin Trader application. Therefore, the main page for our application is CaplinTrader/apps/TutorialApp/default-aspect/index.html. Have a look at that file. You will see that it has a small piece of JavaScript which listens for the page load event and reacts by creating an instance of the class App and calling the start() method on it. We should find this class and see what it’s doing (or not doing).
The class we are looking for is in the file CaplinTrader/apps/TutorialApp/default-aspect/src/mycompany/App.js. There is a fair amount of code in this file already, most of which can be ignored for now. We will focus on the start() method:
/**
 * The start method is called on page load.
 */
App.prototype.start = function() {
    this._initialiseConfigService();

    this._initialiseStreamLink();
    this._startStreamLinkConnection();
    this._initialiseTradeMessageService();
    this._createTradeFactory();
    this._initialiseDelayedRedinessServices();

    this.createTile();
};
You can see from the names of the methods that are called that various initialisation tasks are happening. The last one, createTile() is the one we are interested in. That method is currently not implemented, it has two lines but both are commented out:
/**
 * Create your new tile Presenter component here. Add the element created to the document body.
 */
App.prototype.createTile = function() {
    //var presenterComponent = ...
    //document.getElementById('body').appendChild(presenterComponent.getElement());
};
We saw in the workbench code how to create a Presenter Component for our tile, so we will do the same thing here.
var PresenterComponent = require('caplin/presenter/component/PresenterComponent');
var TilePresentationModel = require('mycompany/tutorial/tile/TilePresentationModel');

/**
 * Create your new tile Presenter component here. Add the element created to the document body.
 */
App.prototype.createTile = function() {
    var templateID = "mycompany.tutorial.tile.tile-template";
    var presentationModel = new TilePresentationModel();
    var presenterComponent = new PresenterComponent(templateID, presentationModel);

    document.getElementById('body').appendChild(presenterComponent.getElement());
};
The first three lines should be familiar, we are creating a Presenter Component exactly as we did before in the workbench. The fourth line just adds the component to the page. Refresh the application in your browser and you should now see a tile in the top left corner of the page.
Click Handlers
The buy and sell buttons do not currently do anything when clicked. However we can bind the click events on the buttons to methods that we create in our presentation model. Take a look at the Presenter Live Examples section 2.1.7 (Browser events) to see how a browser event can be bound to a method in the Presentation model. You can use the toggle in the top right of the page to switch between the view and the presentation model, to see how it works.
Exercise
Try applying the a click binding to your buy and sell buttons so that a window alert is triggered.
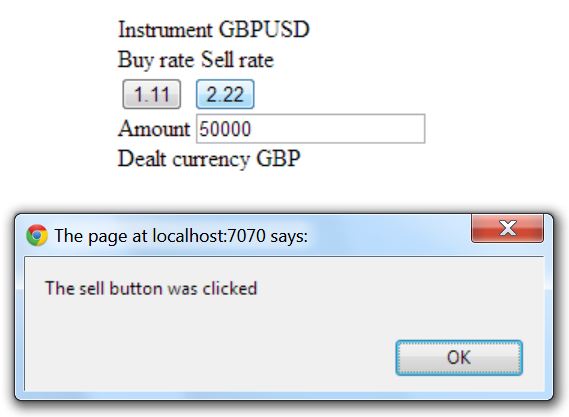
Start by opening up your presentation model (TilePresentationModel.js) and add a couple of methods to it called "buyClicked" and "sellClicked".
| Note: to create a "method" we are adding functions to the prototype of the TilePresentationModel object, which is a standard way of doing object-oriented JavaScript. If this is unfamiliar syntax, just go with it for now. There are plenty of resources online about what exactly the prototype is and how object-oriented JavaScript works. |
function TilePresentationModel() {
    this.currencyPair = new Property("GBPUSD" );
    this.dealtCurrency = new Property("GBP" );
    this.amount = new EditableProperty(50000);
    this.sellRate = new WritableProperty(1.11);
    this.buyRate = new WritableProperty(2.22);
};

topiarist.extend(TilePresentationModel, PresentationModel);

TilePresentationModel.prototype.buyClicked = function() {
    alert("The buy button was clicked");
};

TilePresentationModel.prototype.sellClicked = function() {
    alert("The sell button was clicked");
};
Then edit your view (tile.html) and add some click data bindings to the buttons:
<div class="buysell-buttons">
   <button data-bind="text:sellRate, click:sellClicked"></button>
   <button data-bind="text:buyRate, click:buyClicked"></button>
</div>
The click binding is just another kind of binding provided by Knockout, to go with the text and value bindings you have seen already. As before, you can read more about it on the related Knockout documentation page.
This exercise also shows you how to apply multiple bindings to the same element. We already had a text binding on the buttons, now we have both a text binding and a click binding. You can put as many bindings on an element as you like, by giving the data-bind attribute a comma-separated list.
Refresh your application and click the buttons to see the messages pop up.
Reading Property Values
Right now, we are popping up a hard-coded message when the buttons are clicked. In a real trading application, you would actually want to submit a trade message to the back end when the user clicks on the button. To send the correct message, we would need to read the values of some of the other properties on the presentation model - for example, we want to find out what amount the user has entered in the amount box, and which dealt currency they want to trade in.
Exercise
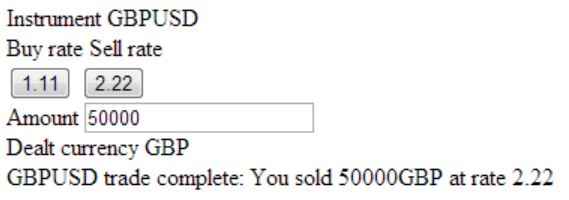
Change the message so that the tile "pretends" to have executed a trade and shows a confirmation message exactly like the one below:
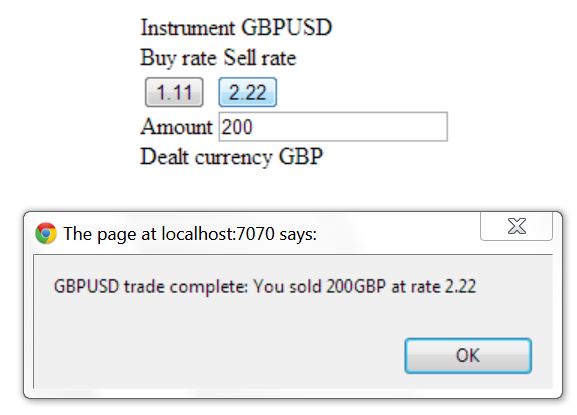
No sample code this time, you are on your own! You need to modify the string that is being alerted to the screen in your two new methods in the presentation model.
The only piece of API knowledge you need is how to read the value of a presenter Property, which you can do by calling the getValue() method. For example, to read the value of the currencyPair property you would write:
var sCurrencyPair = this.currencyPair.getValue();When you’re done, try editing the amount in the text box and click the buttons to see the amount in the confirmation message change.
Style
Your tile blade is beginning to work, but it looks quite ugly. That’s because your application is currently using the "standard" theme, which contains no styling at all. In fact, your blade contains some CSS styling for two themes - "common" and "noir". You can find the CSS for these themes in the CaplinTrader/app/TutorialApp/tutorial-bladeset/blades/tile/themes directory.
If we change your application over to use the "noir" theme, the "noir" styling for your blade will be applied and it should look like this:
Exercise
Switch the theme for your application to "noir". Then try changing something in the relevant CSS for your blade and watch your tile change appearance.
Open up the main entry point for your application, CaplinTrader/apps/TutorialApp/default-aspect/index.html. Near the top of the page you will find a strange looking tag:
<@css.bundle theme="standard"@ />
Change the value of the theme attribute from "standard" to "noir". Reload the page. Your tile should now be nicely styled in black. You can edit the CSS in the "noir" directory of your blade to change the look of your tile. If you want the workbench to use the same styles you need to update the css bundle tag in the index.html page of your workbench for the blade too.
When you load the application BladeRunnerJS does some server-side pre-processing of the files before it serves them to the browser. Specifically, it finds tags wrapped in the ampersand character and replaces them with something more appropriate. In this case BladeRunnerJS is finding this tag:
<@css.bundle theme="noir"@ />
BladeRunnerJS will replace this with a number of links to the CSS bundle required for your application. If you inspect the source of your application in the browser you will see that the @css.bundle tag has been replaced by some standard CSS imports:
<link rel="stylesheet" href="v/dev/css/common/bundle.css"/>
<link rel="stylesheet" title="noir" href="v/dev/css/noir/bundle.css"/>
The theme attribute of the @css.bundle tag just tells BladeRunnerJS which CSS it needs to bundle up and serve to the browser. In this case we specified "noir", which means BladeRunnerJS will:
-
Suck up all of the CSS files inside the themes/noir directories of all the various blades in your application.
-
Bundle the CSS together into a small number of concatenated CSS files.
-
Replace the @css.bundle tag with link tags to the generated CSS bundle files.
Advanced exercises
The exercises you have completed so far cover the basics of working with Presenter. There are three further exercises that cover more advanced features: Fields, Sub-Templates, and the Reset function. Solutions are not provided for these exercises, completing them is left as an exercise to the reader.
You should complete these exercises if you can as future tutorials are written expecting them to have been completed.
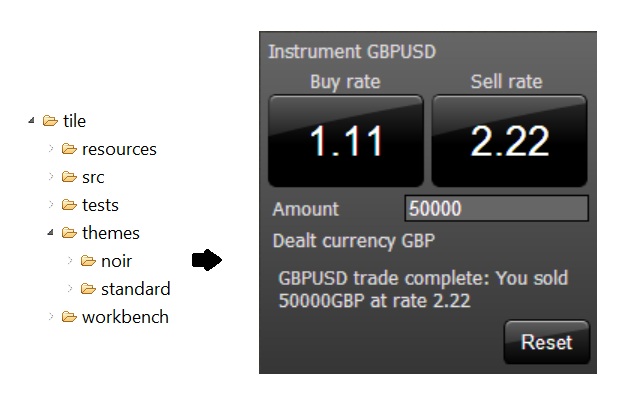
Sub-Template exercise
A complex presenter component may consist of several parts which need to be represented by different templates. We can create sub-templates and presentation nodes to implement these individual modules of the component. Read the Presenter Live Examples sections 2.3 and 2.3.1 (Sub-Templates) to understand how these are used in the view.
Try creating a sub-template to display a status message in the tile so that it can communicate that a trade has been completed. Hints:
-
You will need to add a message property in the TilePresentationModel
-
Consider what type of property this should be: simple Property, WritableProperty or EditableProperty?
-
You can create the sub-template in the same or a different HTML file
-
Just like the example in section 2.3.1 of the Live Examples you need to create the sub-template and remember to bind it to an element in the main template so that it will be included in the view.
-
To see the effect of this, set the value of the message property in the presentation model to the trade confirmation message after the buy/sell buttons are clicked (i.e. instead of displaying the alert), e.g.
this.message.setValue(sMessage);
Your tile should now show the confirmation message when a buy or sell button is clicked:
Fields exercise
Fields can be used inside your Presentation Model instead of Properties. A Field is a collection of properties, one of which is the value property. The others are enabled, visible, label, hasError, etc. So the constituents of your Presenter component might benefit from being Fields rather than Properties. Read Presenter Live Examples section 2.1.9 (Fields) to learn more about Fields and try out the demo.
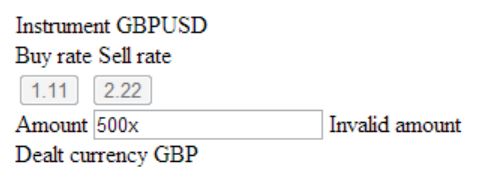
The amount property in the trade tile is a perfect candidate for conversion into a Field. When we convert it we will be able to validate the amount which the user has entered and see that it is a valid number.
-
Change your amount property into a Field and add a
NumericValidatorto it. -
Change the amount binding in the view so that it now binds to "amount.value". Previously "amount" was the property. Now "amount" is a Field and "amount.value" is the Property. (You need not worry about binding the "css" and "enable" attributes in the view.)
When we come to adding/updating tests that use properties we change to Fields, we will need to add ".value" to the tests wishing to access these values. -
Add an element to your view, e.g. a span adjacent to the amount input, and bind this to the failure message.
Note now that when you enter an invalid amount in the tile the error message should appear and then it should vanish when the amount is valid.
See section 2.1.5 (Validating User Input). Notice, in the presentation model, that it is listening to validation errors. Set up your
TilePresentationModelto listen to validation errors in the same way and create an alert when the amount is invalid. -
Rather than showing an alert, something you would typically want to do when a value on the tile becomes invalid is to disable the buy and sell buttons so that they cannot be clicked.
-
Change the buyRate and sellRate into Fields too (just like you did for the amount)
-
Bind the enable attribute on the buy/sell buttons to the enabled property in the Field (
<button data-bind="…, enable:buyRate.enabled"></button>) -
When the validation error callback is triggered, set the enabled property to false on the buy and sellRate (
this.buyRate.enabled.setValue(false);) -
To re-enable the buttons when the value is changed back to a valid number, make the tile model listen also to validation success of the amount. (Hint:
<property>.addValidationSuccessListener(this, <callback method name>);).
-
-
Remember to change the way you read the "amount", "buyRate" and "sellRate" values in methods buyClicked and sellClicked – these are now Fields, not Properties.
Reset exercise
To reset your tile after you have changed the amount or made a trade, you need to reload the page. Presenter has a Property Snapshots feature which is useful for resetting a component to its original state.
Check out Presenter Live Examples section 2.2.2 (Property Snapshots). Make the necessary changes to your tile to add a reset button at the bottom which will reset the tile to its original state.
Review
You should now have enough knowledge to be able to build and theme your Presenter components inside a blade. Always remember to refer to the Live Examples which contain a wealth of knowledge about the features available through Presenter with interactive demos.
More information and tutorials for Presenter can be found on the website. The website contains a Worked example which explains how to construct a more complex trade tile.