Writing a trading adapter
A trading integration adapter integrates your bank’s trading systems with the Caplin Platform.
Download the presentations for this course.
Overview
Trading requires a flow of interaction between the client and the server, conducted over a messaging channel. A messaging channel is a bi-directional, one-to-one subscription between the client and the adapter.
A trade may require several messages to be passed between the adapter and the client. For example, the adapter may send prices to the client before the client decides to execute a trade (as in RFS trades); the adapter may send message acknowledgements to the server (e.g. Execute Ack messages); or the client may choose to stop the trade while it is executing by sending a message to the adapter.
The message choreography between client and adapter is tracked by a state machine called the trade model. Each message between the client and the adapter causes a transition between states.
Tutorial objectives
In this tutorial, you will achieve the following objectives:
-
Create a trade model that represents the trading workflow
-
Create a trading adapter
-
Connect the trading adapter to a mock server
-
Submit trades using a test HTML page and the StreamLink JS library
Download Caplin’s training project
See Download Caplin’s training project in the Writing a pricing adapter (1) tutorial.
Create a Trading Adapter project
Create a new adapter project based on the Trading Adapter example.
Follow the steps below:
-
Copy the
TradingAdapterdirectory to yourcaplin-trainingdirectory:$ cp -r ~/caplin-training/CaplinTrainingBackendProject-version/TradingAdapter ~/caplin-training/TradingAdapter
Project dependencies
Choose one of the methods below to resolve project dependencies:
Local libraries
Requires Jar files supplied by your trainer or downloaded from Caplin Downloads by your Caplin account holder.
Copy the following dependency Jar files to your project’s lib directory:
-
Java DataSource API:
datasource-java-version-jar-with-dependencies.jar -
Java Trading API:
trading-datasource-version.jar
Caplin software repository
Requires network access to Maven Central, network access to https://repository.caplin.com, and a Caplin customer account.
In the file ~/.gradle/gradle.properties, declare the following properties and assign them your Caplin username and password:
caplinUsername=username
caplinPassword=password
In the project’s build.gradle file, modify the repositories { … } block so that it lists the project’s lib directory, Maven Central, and Caplin’s software repository:
repositories {
    flatDir {
        dirs 'lib'
    }
    mavenCentral()
    maven {
        credentials {
            username "$caplinUsername"
            password "$caplinPassword"
        }
        url "https://repository.caplin.com"
    }
}
Import the project into Eclipse
Follow the instructions for your IDE below.
IntelliJ
To import your project into IntelliJ, follow the steps below:
-
Click File > New > Project from existing sources
-
Select the project’s Gradle build file:
~/caplin-training/TradingAdapter/build.gradle
Eclipse
To import your project into Eclipse, follow the steps below:
-
In Eclipse, click File > Import. The Import dialog opens.
-
From the Import dialog, click Existing Gradle Project. The Import Gradle Project dialog opens.
-
Under Project location, deselect Use default location
-
In the Location field, select your trading adapter’s project directory.
If you are using Cygwin, your project directory is C:/cygwin64/home/username/caplin-training/TradingAdapter -
Click Finish
Running your adapter during development
To run the adapter from your IDE during development, you need to perform two tasks:
-
Deploy your adapter’s configuration to your Deployment Framework. Your adapter project includes configuration files that are required by Liberator and/or Transformer.
-
Configure the environment in which your IDE runs your adapter. This is called a "run configuration" in Eclipse and IntelliJ.
Deploy your adapter’s configuration
The Trading Adapter example includes a Gradle task that builds an installation kit that contains just your adapter’s configuration (no binary). This kit can be deployed to your Deployment Framework like any other installation kit.
Follow the steps below:
-
From the root of your adapter project, run the command below:
$ ./gradlew assemble -PconfigOnly
The installation kit is written to the directory
build/distributions. -
Copy the installation kit to the
kitsdirectory of your Deployment Framework. Do not extract the archive. -
From the root directory of your Deployment Framework, run the command below to deploy the kit:
$ ./dfw deploy
-
From the root directory of your Deployment Framework, run the command below to confirm that your adapter’s configuration has deployed:
$ ./dfw versions
Create a run configuration in your IDE
Follow the instructions for your IDE below.
IntelliJ
To create a run configuration in IntelliJ, follow the steps below:
-
Click Run > Edit Configurations
-
Click Add new run configuration, and click Application from the context menu.
-
Set Name to 'Trading Adapter'
-
Set JDK or JRE to your OpenJDK (Java 8 or Java 11)
-
Set Classpath to the classpath of the module below:
TradingAdapter.main
-
Set Main class to the text below:
com.caplin.TradingAdapter
-
Set Program arguments to the text below:
-f etc/datasource.conf --trading-property-file=etc/trading-provider.properties
-
Set Working directory to the adapter’s
DataSourcedirectory in your Deployment Framework:Linux, macOSdeployment_framework_root/active_blades/TradingAdapter/DataSource
Windowsdeployment_framework_root\kits\PricingAdapter\TradingAdapter-0.0.0\DataSource
-
Set Environment variables to the text below:
CONFIG_BASE=deployment_framework_root/global_config/
The value of CONFIG_BASE must end in a trailing forward-slash ( /) -
Click OK to close the dialog.
To run the Pricing Adapter, click Run > Run 'Trading Adapter'.
Eclipse
To run your adapter in Eclipse for the first time, follow the steps below:
-
In Eclipse, click Run > Run Configurations. The Run Configurations dialog appears.
-
From the list of configuration types, right-click Java Application and select New
-
In the Name box, type 'TradingAdapter'.
-
In the Project box, select the TradingAdapter project.
-
In the Main class box, select
com.caplin.TradingAdapter -
Click the Arguments tab
-
In the Working directory box, select Other, click File System, and select the path to your adapter’s
DataSourcedirectory in your Deployment Framework.Linux, macOSdeployment_framework_root/active_blades/TradingAdapter/DataSource
Windowsdeployment_framework_root\kits\PricingAdapter\TradingAdapter-0.0.0\DataSource
-
Under the Environment tab, click New, and create a new environment variable
CONFIG_BASEand assign it the value below:deployment_framework_root/global_config/
The value of CONFIG_BASE must end in a trailing forward-slash ( /). -
Under the Common tab, in Display in favorites menu, select Run.
-
Click Run
To run your adapter on subsequent occasions, click Run > Run, or press Ctrl-F11.
Project structure
The project example includes the skeleton code for a trading adapter:
com.caplin.TradingAdapter.java-
This is the main class for the project. When the adapter runs, it creates a new DataSource instance and a new
ExampleTradingApplicationListenerinstance. com.caplin.ExampleTradingApplicationListener.java-
This class implements the TradingApplicationListener interface and registers itself with a new instance of TradingProvider. As a TradingApplicationListener, this class is notified by the TradingProvider of connection and channel events. When this class is informed that a TradeChannel object has been created, it registers a new instance of
ExampleTradeChannelListeneras the TradeChannelListener for the channel. com.caplin.ExampleTradeChannelListener.java-
A separate instance of this class is registered as a TradeChannelListener with each TradeChannel object. This class is notified when a Trade object is created or closed. When this class is informed that a Trade object has been created, it registers a new instance of
ExampleTradeListeneras the TradeListener for the Trade. com.caplin.ExampleTradeListener.java-
A separate instance of this class is registered as a TradeListener with each Trade object. This class is notified when an event is raised on the Trade object’s trade model.
blade/DataSource/etc/trademodels.xml-
The trade model to be used by this adapter’s com.caplin.trading.TradingProvider instance. The name and location of this file are set in the adapter’s configuration file for the Java Trading API: trading-provider.properties
Class diagram:
Handle trade-channel messages
In this section of the tutorial, we will handle communication between your adapter and the client application.
On the Caplin Platform, trading is conducted via the exchange of messages on a trade channel. At a high-level, a channel is a subscription that supports the bi-directional exchange of private messages between a client and an adapter. For details of how channels are implemented at a low level (not required for this tutorial), see Channels.
The choreography of messages involved in a trade is managed by a trade model. Front end applications and trading adapters are configured with the same trade models. A change in the state of a trade is communicated by sending a message on the trade channel between a client and the adapter.
Set the trade models recognised by the adapter
Trade models are state machines used to manage trading workflows in the Java Trading API, the C Trading API, and Caplin Trader’s Trading API.
Trade models are defined in XML. Caplin’s front-end libraries (Caplin Trader) and back-end libraries use the same configuration file format, described here: Trade Model XML Schema.
A trading adapter can recognise more than one trade model. The trade model that applies to a trade is set by the TradingProtocol field in the first message of a workflow.
In this tutorial we will configure one trade model for the adapter, called "ESP". A state diagram for the model is shown below:
To define this trade model, open the file blade/DataSource/etc/trademodels.xml and replace the contents with the following:
<?xml version="1.0" encoding="UTF-8" ?>
<tradeModels>
  <tradeModel name="ESP" initialState="Initial">
    <state name="Initial">
      <transition target="Executing" trigger="Open" source="client" />
    </state>
    <state name="Executing">
      <transition target="TradeComplete" trigger="Confirm" source="server" />
    </state>
    <state name="TradeComplete" />
  </tradeModel>
</tradeModels>
This trade model is a much simplified version of the Caplin FX Suite’s ESP trade model.
Configure message fields
Field names in messages are encoded as numbers. In this section, we will map each field name to a number.
Add the following field names and codes to the file blade/blade_config/fields.conf:
add-field Price         -36003
add-field Message       -36004
add-field BaseCurrency  -36005
add-field TermCurrency  -36006
add-field BuySell       -36007
add-field Amount        -36008
Receive trade messages from clients
Trading events are sent by messages on the trade channel between the client and the adapter. A trade begins when a client sends an "Open" event, taking a new trade from the "Initial" state to the "Executing" state and then waiting for the adapter to respond with a "Confirm" message.
The ExampleTradeListener.receiveEvent method is called whenever there is an incoming trade message on the /PRIVATE/TRADE/FX channel.
Follow the steps below:
-
Edit the
receiveEventmethod in yourExampleTradeListenerclass. Add the highlighted code below to handle "Open" event messages:File: ExampleTradeListener.java@Override public void receiveEvent(TradeEvent event) throws TradeException { logger.log(Level.INFO, "receiveEvent"); String transition = event.getType(); if (transition.equals("Open")) { // Fields coming from the client Map<String, String> fields = event.getFields(); String user = event.getTrade().getChannel().getUser(); String requestID = fields.get("RequestID"); String baseCurrency = fields.get("BaseCurrency"); String termCurrency = fields.get("TermCurrency"); String currencyPair = baseCurrency + "/" + termCurrency; double amount = Double.parseDouble(fields.get("Amount")); double price = Double.parseDouble(fields.get("Price")); String buySellString = fields.get("BuySell"); System.out.println("Open message from user " + user + " to " + buySellString + " " + currencyPair); } } -
Download and extract testpage.zip to Liberator’s
htdocsfolder:<DeploymentFramework>\kits\Liberator\Liberator-<version>\htdocs. -
Run the following command from the root of your Deployment Framework to start all components:
$ ./dfw start
-
In Google Chrome, navigate to the following URL: http://localhost:18080/testpage
-
Press F12 to bring up Chrome’s Developer Tools, then click the Console tab to view the log messages produced by the client application.
-
On the test page, click Login, then click Trade. You will now see that a trade message has been sent to the adapter in your browser’s console window:
Publish to /PRIVATE/TRADE/FX succeeded.You will also notice from the Trading Adapter’s logs that the adapter receives the message:
Open message from user admin to BUY GBP/USD.
|
Each time a trade is submitted from the test client page, your adapter will throw the following error: com.caplin.management.jmx.MBeanServerManagerImpl notifyMBeanAttributeChanged, SEVERE: Error Notifying Bean Change, java.lang.Exception: Bean has not been registered This error is thrown because we have not enabled JMX for the adapter. The error does not indicate that you have followed the tutorial incorrectly. |
Send trade messages to clients
TradeEvent objects passed to ExampleTradeListener.receiveEvent include a reference to the original Trade object with which ExampleTradeListener was registered as a TradeListener. You can use this Trade object to send a trade message back to the client.
The first trade event in the trade model is "Open", which is sent by the client when a trade is first opened. The TradeEvent object for the "Open" event includes the details of the trade. Later in this tutorial, we will modify ExampleTradeListener.receiveEvent to pass those details to a mock backend trading system. However, to keep things simple at this stage, we will pretend the trade has executed successfully and send back a "Confirm" trade event.
Follow the steps below:
-
In the file
ExampleTradeListener.receiveEvent, add the highlighted code below to send a "Confirm" event message back to the client when you receive an "Open" event message:File: ExampleTradeListener.java@Override public void receiveEvent(TradeEvent event) throws TradeException { logger.log(Level.INFO, "receiveEvent"); String transition = event.getType(); if (transition.equals("Open")) { // Fields coming from the client Map<String, String> fields = event.getFields(); String user = event.getTrade().getChannel().getUser(); String requestID = fields.get("RequestID"); String baseCurrency = fields.get("BaseCurrency"); String termCurrency = fields.get("TermCurrency"); String currencyPair = baseCurrency + "/" + termCurrency; double amount = Double.parseDouble(fields.get("Amount")); double price = Double.parseDouble(fields.get("Price")); String buySellString = fields.get("BuySell"); System.out.println("Open message from user " + user + " to " + buySellString + " " + currencyPair); // Send a "Confirm" event to the client TradeEvent tradeEvent = event.getTrade().createEvent("Confirm"); event.getTrade().sendEvent(tradeEvent); } } -
Restart the adapter.
-
Start a new trade from the test client page. You will notice in the browser console that a new message arrives. If you expand the message and then expand the
_fieldsproperty, you will see that the incoming message contains the fieldMsgTypewith the value "Confirm". This indicates that the trade was completed successfully. In a real application you would of course render these incoming trade messages to the screen rather than inspect them in the browser console.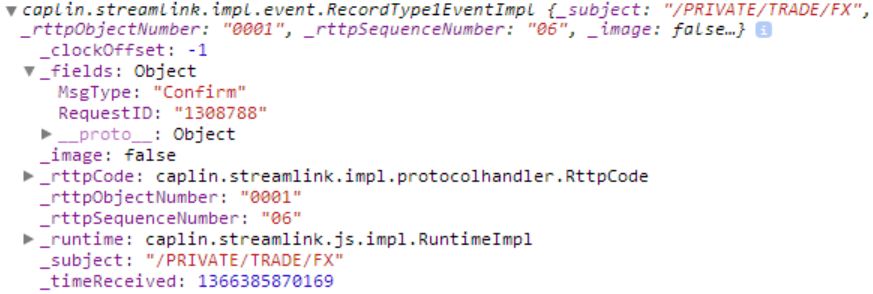
Connect to a trade server
In the previous section, your code immediately confirmed a trade without executing it through a backend trading system. In production, you would establish a connection between the adapter and the bank trading system, then pass on any new trades to be processed by the bank system. You would only send a "Confirm" event when the bank system has completed the trade’s execution. In a more realistic scenario, the trade model would also have a failure transition in case the bank system rejected the trade request.
To complete this section, you will need the following two files from the TrainingTradeProject zip file:
-
SimpleFXServer-<version>.jar -
SimpleFXMessenger-<version>.jar
Connect to the mock server
In this part of the tutorial you will implement a connection between the adapter and a mock trading server, just as we did in the Pricing Integration Adapter 2 tutorial. We will also ensure that the trading adapter only establishes the connection to Liberator once it has successfully connected to the mock server.
Follow the steps below:
-
In the directory containing the mock server’s jar file (see Pricing Integration Adapter 2 tutorial), type the following command to start the mock server:
$ java -jar SimpleFXServer-<version>.jar
The following console output indicates that the server is running:
<timestamp> [main] INFO  quickfix.SocketAcceptor  - SessionTimer started
<timestamp> [main] INFO  quickfix.mina.NetworkingOptions  - Socket option: SocketTcpNoDelay=true
<timestamp> [main] INFO  quickfix.mina.NetworkingOptions  - Socket option: SocketSynchronousWrites=false
<timestamp> [main] INFO  quickfix.mina.NetworkingOptions  - Socket option: SocketSynchronousWriteTimeout=30000
<timestamp> [main] INFO  quickfix.SocketAcceptor  - Listening for connections at 0.0.0.0/0.0.0.0:14045
-
Copy the file
SimpleFXMessenger-<version>.jarto thelibdirectory in your adapter project. -
Edit the
build.gradlefile in the root directory of your adapter project, and addSimpleFXMessengeras a dependency in thedependencies { }stanza:File: build.gradleimplementation (name: 'SimpleFXMessenger', version: '0+') { transitive = false } -
Reload the Gradle configuration for your project in your IDE.
-
In the file
ExampleTradingApplicationListener.java, import the Simple FX Messenger classes:File: ExampleTradingApplicationListener.javaimport messenger.*; -
To communicate with the mock server, your
ExampleTradingApplicationListenerclass will need to implement themessenger.FXTradingListenerinterface. This interface extends themessenger.FXConnectionListenerinterface and provides the methodsonConnect(),onDisconnect(), andonTradeReport(FXTradeReport).File: ExampleTradingApplicationListener.javapublic class ExampleTradingApplicationListener implements TradingApplicationListener, FXTradingListener { private final Logger logger; private ExampleTradeChannelListener tradeChannelListener; // ... @Override public void onConnect() { // ... } @Override public void onDisconnect() { // ... } @Override public void onTradeReport(FXTradeReport report) { // ... } // ... } -
Define a new
FXTradingMessengerfield in yourExampleTradingApplicationListenerclass. Instantiate the field in theExampleTradingApplicationListenerconstructor and callFXTradingMessenger.connect()to connect to the mock server.The session ID and the port used in the code below are deliberately different values to the ones used in the Pricing Integration Adapter 2 tutorial, so don’t copy and paste the line from that project.
File: ExampleTradingApplicationListener.javapublic class ExampleTradingApplicationListener implements TradingApplicationListener, FXTradingListener { // ... private final FXTradingMessenger messenger; public ExampleTradingApplicationListener (DataSource dataSource) throws IllegalArgumentException, IOException { this.logger = dataSource.getLogger(); new TradingProvider(this, dataSource); this.messenger = new FXTradingMessenger(this, FXTradingMessenger.DEFAULT_SESSION_ID_2, FXTradingMessenger.DEFAULT_PORT_2); this.messenger.connect(); } // ... }
The adapter connects to Liberator as soon as the call to dataSource.start() is made in the main method. We will update it to only initialise the connection to Liberator once the connection to the mock server is established, just as we did in the Pricing Integration Adapter 2 tutorial.
-
Remove the
dataSource.start()instruction from the main method of theTradingAdapterclass. -
In your
ExampleTradingApplicationListenerclass, declare a new field,datasource, and in your constructor, assign it a reference to theDataSourceobject. This allows you to access theDataSourceobject from within all the methods in your class.Also declare a boolean field,
dataSourceIsStarted, to keep track of whether the DataSource has been started or not, and initialise it tofalse.File: ExampleTradingApplicationListener.javapublic class ExampleTradingApplicationListener implements TradingApplicationListener, FXTradingListener { // ... private final DataSource dataSource; private boolean dataSourceIsStarted = false; public ExampleTradingApplicationListener (DataSource dataSource) throws IllegalArgumentException, IOException { this.logger = dataSource.getLogger(); this.dataSource = dataSource; new TradingProvider(this, dataSource); this.messenger = new FXTradingMessenger(this, FXTradingMessenger.DEFAULT_SESSION_ID_2, FXTradingMessenger.DEFAULT_PORT_2); this.messenger.connect(); } // ... } -
In the
ExampleTradingApplicationListener.onConnect()method, start the DataSource if it has not yet been started, otherwise toggle the status to UP.File: ExampleTradingApplicationListener.java@Override public void onConnect() { if (this.dataSourceIsStarted) { this.dataSource.setStatusUp(); } else { this.dataSource.start(); this.dataSourceIsStarted = true; } System.out.println("Connected to mock server"); } -
In the
ExampleTradingApplicationListener.onDisconnect(), change the DataSource status to DOWN.File: ExampleTradingApplicationListener.java@Override public void onDisconnect() { this.dataSource.setStatusDown(); } -
At this point you should be able to start your adapter and see it connect to your mock server:
Connected to mock server
To test the effects of your changes, follow the steps below:
-
Stop the CMC if it is already running.
-
Update the CMC’s configuration:
$ ./dfw mon
-
Start the CMC:
$ ./dfw cmc
-
Right-click any available white space in the CMC canvas and click Add new DataSource.
-
In the DataSource Properties dialog, complete the fields according to the values below. Click OK when done.
Field Value Name
Trading Adapter
Host
localhost
Port
11009
Username
admin
Password
admin
We add the trading adapter to CMC manually because the Deployment Framework command moncannot automatically detect the trading adapter while you run it in your IDE. -
Stop the mock server (Ctrl-C).
-
Watch both the Pricing Adapter and Trading Adapter go from blue to red in the CMC.
-
Restart the mock server:
$ java -jar SimpleFXServer-<version>.jar
-
Watch the Pricing Adapter and the Trading Adapter go from red to blue in the CMC.
Make the FXTradingMessenger available to TradeListeners
Currently our ExampleTradingApplicationListener class is the only class that has a reference to the FXTradingMessenger object. To give the ExampleTradeListener.receiveEvent method access to the messenger object to submit trades, we will need to do a little bit of plumbing.
Follow the steps below:
-
In your
ExampleTradingApplicationListenerclass, change the implementation ofTradingApplicationListener.channelCreated()so that it passes themessengerobject toExampleTradeChannelListeneras a new constructor argument.File: ExampleTradingApplicationListener.java@Override public void channelCreated(TradeChannel tradeChannel) throws TradeException { logger.log(Level.INFO, "Trade channel created: " + tradeChannel.toString()); this.tradeChannelListener = new ExampleTradeChannelListener(this.messenger, this.logger); tradeChannel.setTradeChannelListener(this.tradeChannelListener); } -
In the
ExampleTradeChannelListenerclass, import the Simple FX Messenger classes:File: ExampleTradeChannelListener.javaimport messenger.*; -
Update the
ExampleTradeChannelListenerconstructor so that it expects anFXTradingMessengerinstance as an extra argument and sets it as a field.File: ExampleTradeChannelListener.javapublic class ExampleTradeChannelListener implements TradeChannelListener { private final Logger logger; private TradeListener tradeListener; private final FXTradingMessenger messenger; // ... public ExampleTradeChannelListener(FXTradingMessenger messenger, Logger logger) { this.logger = logger; this.messenger = messenger; } // ... } -
Still in your
ExampleTradeChannelListenerclass, change thetradeCreated()method so that it passes themessengerobject to theExampleTradeListeneras a new constructor argument.File: EXampleTradeChannelListener.java@Override public void tradeCreated(Trade trade) throws TradeException { this.logger.log(Level.INFO, "Trade created"); this.tradeListener = new ExampleTradeListener(this.messenger, this.logger); trade.setTradeListener(this.tradeListener); } -
In the file
ExampleTradeListener.java, import the Simple FX Messenger classes:File: ExampleTradeListener.javaimport messenger.*; -
Update the
ExampleTradeListenerconstructor so that it expects anFXTradingMessengeras a new constructor argument and sets it as a field.File: ExampleTradeListener.javapublic class ExampleTradeListener implements TradeListener { private final Logger logger; private final FXTradingMessenger messenger; // ... public ExampleTradeListener (FXTradingMessenger messenger, Logger logger) { this.logger = logger; this.messenger = messenger; } // ... }
Instances of your ExampleTradeListener class now have access the FXTradingMessenger object and can use it to submit trades.
Submit a trade to the mock server
Now we are going to change the implementation of the TradeListener.receiveEvent() method so that it uses the FXTradingMessenger to execute the trade instead of immediately confirming the trade.
In a real system, there are always some field and formatting differences between how the client application submits a trade instruction and how the bank server expects to receive it, so you have to perform some transformations on the incoming data before you can submit it to the bank.
This example is no different: the FXTradingMessenger.execute method accepts the char constants FXTradeReport.BUY and FXTradeReport.SELL, but our BuySell field is a string ("BUY" or "SELL").
To send trade requests to the trading server, follow the steps below:
-
In the
ExampleTradeListener.receiveEventmethod, remove the code that sends a "Confirm" event to the client. -
At the end of the
ExampleTradeListener.receiveEventmethod, add code to convert the "BuySell" field value and execute the trade.File: ExampleTradeListener.javapublic void receiveEvent(TradeEvent event) throws TradeException { logger.log(Level.INFO, "receiveEvent"); String transition = event.getType(); if (transition.equals("Open")) { // Fields coming from the client Map<String, String> fields = event.getFields(); String user = event.getTrade().getChannel().getUser(); String requestID = fields.get("RequestID"); String baseCurrency = fields.get("BaseCurrency"); String termCurrency = fields.get("TermCurrency"); String currencyPair = baseCurrency + "/" + termCurrency; double amount = Double.parseDouble(fields.get("Amount")); double price = Double.parseDouble(fields.get("Price")); String buySellString = fields.get("BuySell"); System.out.println("Open message from user " + user + " to " + buySellString + " " + currencyPair); // Convert buySellString to an FXTradeReport constant char buySell; if (buySellString.equals("BUY")) { buySell = FXTradeReport.BUY; } else { buySell = FXTradeReport.SELL; } // Execute the trade messenger.executeTrade(user, requestID, currencyPair, amount, buySell, price); } } -
Restart your Adapter.
-
Re-open the test page and execute a trade. Notice that as soon as this is done, the log message below appears in the mock server’s console output:
<timestamp> INFO server.GradFIXApplication - fromApp: [Message Type = Trade Request (OrderSingle)]
To locate this message quickly, right-click the console, click find, and search for 'OrderSingle'.
This is followed by the mock server sending back a trade report to the adapter, so the adapter knows that the trade was successful. However, the client is not yet aware that the trade was successful because we are no longer sending back a "Confirm" event. The next step is to listen for the confirmation from the mock server and send the "Confirm" trade event on to the client.
Receive a trade confirmation from the mock server
The FXTradingMessenger.execute method is asynchronous. The response from the trade server is handled by the interface method FXTradingListener.onTradeReport(FXTradeReport), which is implemented by your ExampleTradingApplicationListener class.
The ExampleTradingApplicationListener class receives the response from the server, but it’s the trade’s ExampleTradeListener instance that needs to be informed of the response. We will add code to implement this, working from ExampleTradeListener outwards to ExampleTradingApplicationListener.
To send "Confirm" event to the client when the trade server responds, follow the steps below:
-
In
ExampleTradeListener.receiveEvent, assign the event’s Trade object to a new private instance variable,trade:File: ExampleTradeListener.javapublic class ExampleTradeListener implements TradeListener { private Trade trade; // ... @Override public void receiveEvent(TradeEvent event) throws TradeException { logger.log(Level.INFO, "receiveEvent"); this.trade = event.getTrade(); // ... } // ... }Unlike the other instance fields, Java will not allow you to declare tradeasfinal, becausefinalfields must have their value set inline or in the constructor. We can’t set the value oftradeuntil we get thereceiveEvent()callback. -
In
ExampleTradeListener, add a newonTradeReportmethod:File: ExampleTradeListener.javapublic class ExampleTradeListener implements TradeListener { // ... public void onTradeReport(FXTradeReport fxTradeReport) { try { TradeEvent event = trade.createEvent("Confirm"); event.addField("Message", fxTradeReport.toString()); this.trade.sendEvent(event); } catch (TradeException e) { logger.log(Level.SEVERE, e.getMessage()); } } // ... } -
In
ExampleTradeChannelListener, add a newonTradeReportmethod and change the datatype of thetradeListenerfield from the interfaceTradeListenerto the implementation classExampleTradeListener:File: ExampleTradeChannelListener.javapublic class ExampleTradeChannelListener implements TradeChannelListener { // ... private ExampleTradeListener tradeListener; (1) // ... public void onTradeReport(FXTradeReport fxTradeReport) { this.tradeListener.onTradeReport(fxTradeReport); (2) } // ... }1 Data type changed from TradeListenertoExampleTradeListener.2 The method onTradeReportis not part of theTradeListenerinterface. -
Still in
ExampleTradeChannelListener, update the data type of thetradeListenermember variable toExampleTradeListener. We need to do this because theonTradeListenermethod -
In
ExampleTradingApplicationListener, update theonTradeReportmethod so that it callsonTradeReporton theExampleTradeChannelListenerinstance:File: ExampleTradingApplicationListener.java@Override public void onTradeReport(FXTradeReport fxTradeReport) { this.tradeChannelListener.onTradeReport(fxTradeReport); } -
Restart the adapter and execute a trade from the test page.
-
Open the browser console. You should see an incoming record message on your trade channel. If you expand this message and then expand the
_fieldsproperty, you will see that you have received your confirmation message from the adapter.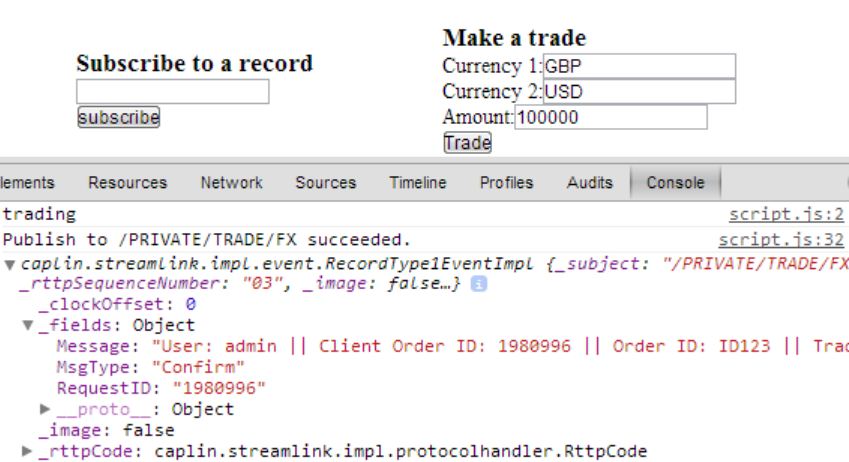
Note that there are three fields on the message, and they were all set in different ways:
-
MsgType— the value of this field is the name of the transition in the trade model that this message represents. It has the value "Confirm" because you created the message in your adapter code by callingtrade.createEvent("Confirm"). -
Message— this is the field that you explicitly set on the message in your adapter code before sending it. You can set any number of these fields. -
RequestID— this is a unique identifier set automatically by the trading library, to identify the trade that this message relates to. It will have been present on every message that relates to this trade.
-
-
In your adapter’s console output, note that your
ExampleTradeChannelListenerreceived atradeClosed()callback, because the trade has reached a final state in the model. In this tutorial we won’t do anything when we receive this callback, but in a real application you could use it as a trigger to do any clean up or post-trade logging required for your system.
Extension question
To simplify this tutorial, the ExampleTradingApplicationListener class maintains a reference to only one ExampleTradingChannelListener. A production adapter, however, would have to handle multiple channels simultaneously.
What changes would you need to make so that the adapter can manage multiple trading channels?
When designing your solution, consider the following points:
-
When the
ExampleTradingApplicationListener.onTradeReportmethod receives a response from the mock trade server, how will the method determine which trade channel the response relates to? -
What would happen if a user logged in from their mobile and from their desktop and then placed trades simultaneously on both clients?
Review
This tutorial covered the basic aspects of the Trading Integration Adapter API and showed how to implement a basic adapter.
The first step is to design the trade model that models the sequence of events that pass between the client and the adapter. For more examples of trade models, see the trade models used to manage trading-state between Caplin FX Professional and the Caplin FX Integration API:
The second step is to build your trading adapter around the following three classes:
-
TradingProvider establishes the connection to a backend trading server (we used a mock server in this tutorial). This class is informed by the Java Trading API when a user creates or closes a trade channel.
-
TradeChannelListener is informed by the Java Trading API when a user creates a new trade.
-
TradeListener is informed by the Java Trading API when a trade event is received from the client.