Presenter worked example
A tutorial to guide you through the actual process of using Presenter to create a new trade tile component.
- Using Presenter to Create a Trade Tile
- Part 1: Creating a Presenter Component
- Part 2: Sub-templates and Presentation Nodes
- Part 3: Injecting Properties and Adding Property Change Listeners
- Part 4: Field Validation
- Part 5: Adding Trade Buttons and using Property Formatters
- Part 6: Binding onClick Functions and Linking to the Domain Model (Trading)
- Part 7: Finalising the Tile, and Binding Visible & Enabled Properties
- Part 8: Styling the Tile
Using Presenter to Create a Trade Tile
To give you an idea of how to create a display component using Presenter, we’re going to go through the process of building a basic Trade Tile component from scratch. We’ll go through everything step-by-step, creating the Trade Tile within a blade, and view the results in a workbench. Before you start, you will need to have installed BladeRunnerJS, and know how to create blades and bladesets (if you have no idea what I’m talking about, have a look at the BladeRunnerJS Directory Structure Overview, which will make things clearer).
For the purposes of this example, we’re going to be creating a BladeRunnerJS application called "TutorialMotif", with the application namespace "tutorial". Within that, we’ll have a bladeset called "presenter", and the trade tile blade we are developing, which we’ll call "simpletile".
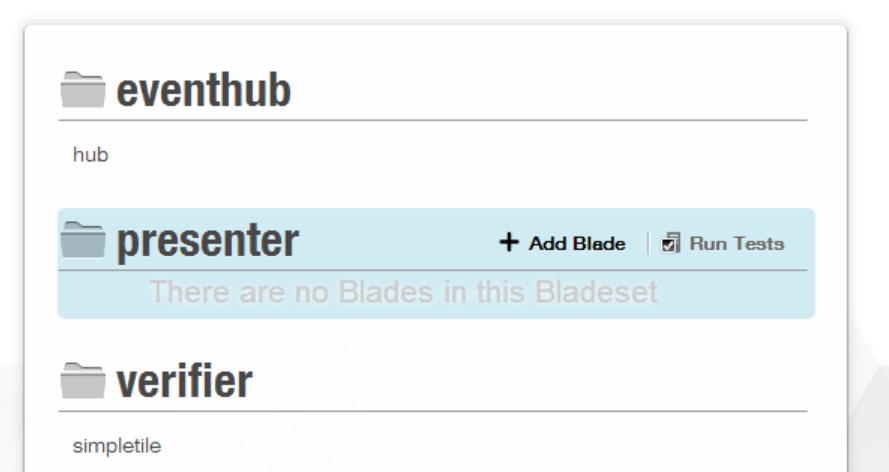
You can create a new blade easily using the BladeRunnerJS dashboard. Simply click "Add Blade" under the designated bladeset and name it "simpletile".
When you create the new blade using this method, BladeRunnerJS will automatically create a "Hello World" Presenter component and a workbench for the blade. You can open the workbench by clicking on "Run in Workbench" and you’ll see a workbench that looks something like this:
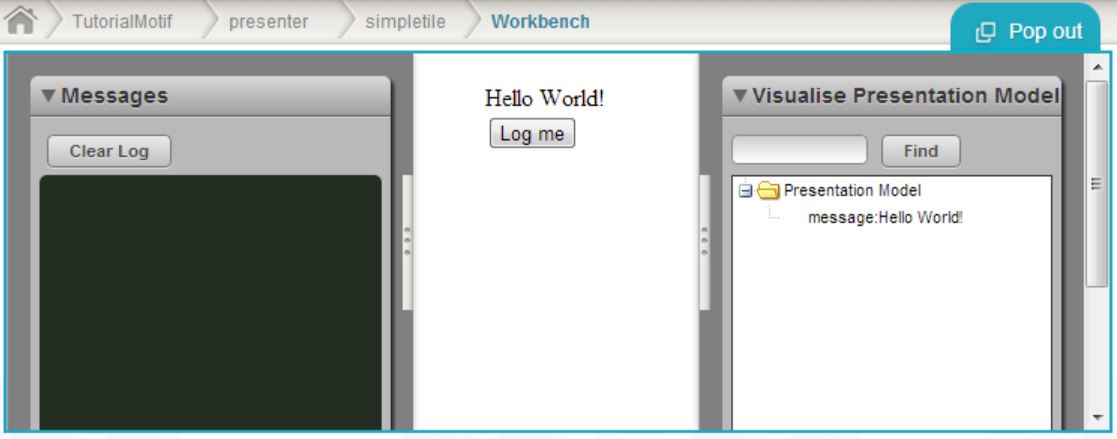
We’re going to be creating the tile Presenter component in its place but we’ll find the prepared workbench (with the "Messages" and "Visualise Presentation Model" widgets) handy.
Part 1: Creating a Presenter Component
First of all, we need to create a simple View template (the HTML), and a Presentation Model (in JavaScript), and then bind them together with a PresenterComponent.
At first, our tile is just going to consist of a <select> box, for picking the tile’s instrument. We’ll put that in a <div> block so that our tile can have a nice border, and we have to wrap another <div> around that, with an id that will allow the Presentation Model to be bound to it. That’s important; it won’t work otherwise. The id has to be structured like this:
<app namespace>.<bladeset name>.<blade name>.<template name>
In our case, we’ll call our template 'simpletile-template', so it will be: tutorial.presenter.simpletile.simpletile-template
<div id="tutorial.presenter.simpletile.simpletile-template">
    <div style="width: 300px; border: 1px solid black;">
        <select></select>
    </div>
</div>
In the Presentation Model, the options for our <select> box are going to be two currency pairs (GBPUSD and AUDUSD), which we’ll hard-code inside a SelectionField; an extension of the caplin.presenter.node.PresentationNode class. In Real Life, you would get your currency pairs from a currency pairs provider.
In setting up the Presentation Model, we have to define the namespace, and also include the caplin.presenter.PresentationModel class, which the Presentation Model extends.
//This is the class name of this Presentation Model.
//We'll use it when we need to refer to the Presentation Model in the code.
tutorial.presenter.simpletile.TilePresentationModel = function() {
    this.currencyPairs = new caplin.presenter.node.SelectionField(['GBPUSD', 'AUDUSD']);
};
caplin.implement(tutorial.presenter.simpletile.TilePresentationModel,
    caplin.presenter.PresentationModel);

tutorial.presenter.simpletile.TilePresentationModel.prototype.addEventLogger = function(logger) {
    this.m_fLogger = logger;
};
We can now go back to the View, and bind our <select> tag to the new SelectionField node, which we’ve called currencyPairs. A SelectionField contains the option, value and label properties that you might need to populate the options of a selection list. We’ll add a data-bind attribute to call all the options in currencyPairs, and the value of the option selected:
<select data-bind="options: currencyPairs.options, value: currencyPairs.value, optionsValue: 'value'"></select>Finally, we’re going to create the component and show it within the blade’s workbench. The blade we created already has a default entry-point to the workbench in the workbench "src" directory. Here we must make our modifications to get it to construct a PresenterComponent which binds our View and Model by passing in the View’s template id and the Model’s class name.
tutorial.presenter.simpletile.workbench.ExampleBladeApplication = function() {
    this.m_sTemplateId = 'tutorial.presenter.simpletile.simpletile-template';
    this.m_eElement = null;
    ...
};
...
tutorial.presenter.simpletile.workbench.ExampleBladeApplication.prototype._createPresenterComponents = function() {
    this.m_oPresentationModel = new tutorial.presenter.simpletile.TilePresentationModel();
    this.m_oPresenterComponent = new caplin.presenter.component.PresenterComponent(this.m_sTemplateId, this.m_oPresentationModel);
    ...
};
The workbench is opened via the "workbench\index.html" file. This file should already be populated if you created the blade using the dashboard, as described in the introduction. If you look inside this file, for the initialise() function, you’ll see that upon loading the page, the workbench application (ExampleBladeApplication) is started, and the DOM element containing our Presenter component is centred on the workbench.
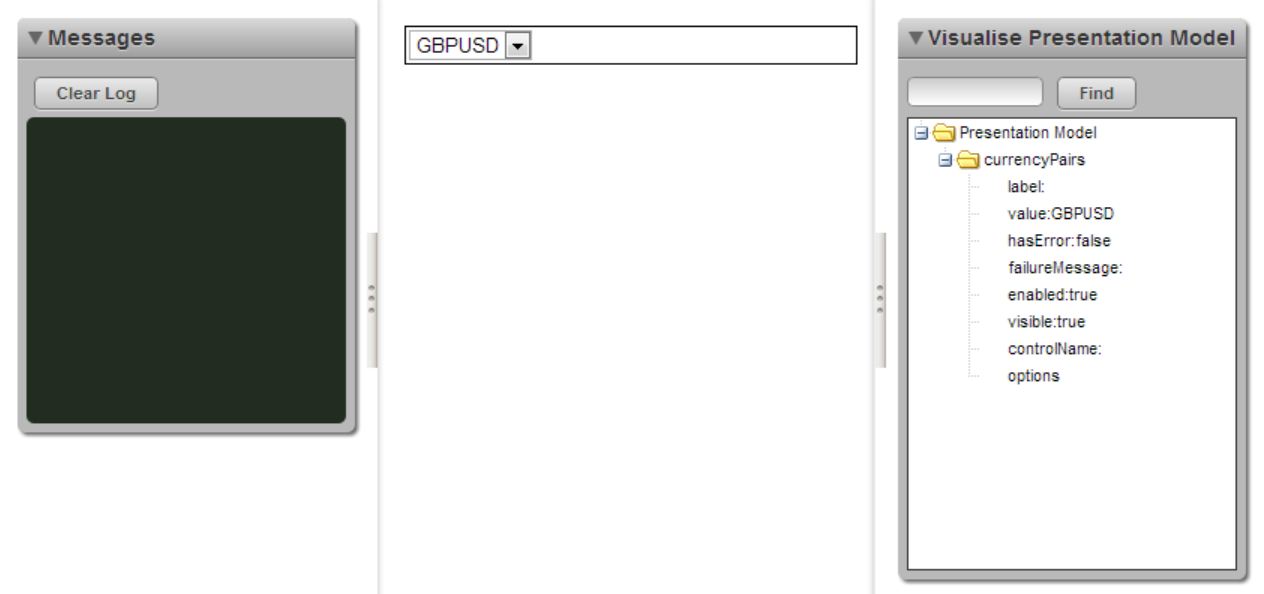
Also, in the createWorkbench() function, two other components are added. Most Caplin libraries include workbench widgets that can be appended to the sidelines of your workbench to help you to develop your components within the workbench. In this case, an Event Logger and a Presentation Model Visualiser are added by default. The Visualiser shows all the properties and fields and their values under the Model of our Presenter component. For now it will contain only the currencyPairs field, but it will grow as we add more to the model later in the tutorial.
Having done all this, you can now start up BladeRunnerJS and open the simpletile workbench page in a browser, and if all has gone according to plan, you should see your shiny new Presenter component. I mean OK, at the moment, it’s just a drop-down list in a box, which may not seem that exciting, but we’re only just getting started! We can now build on that until we have a fully functional tile. The workbench should be accessible at: http://localhost:7070/simpletrader/presenter-bladeset/blades/simpletile/workbench/
The workbench should look something like this:
Part 2: Sub-templates and Presentation Nodes
So far, all we can do with our tile is to select a currency pair. Next, we want to be able to set up the details of the trade we want to perform with this currency pair, for which we’ll need an <input> box for the trade amount, a way to select the dealt currency, and some "Sell" and "Buy" buttons.
To do all that, we are going to set up a sub-template. Of course for one little tile, you don’t actually need a sub-template, but once you start developing something bigger, using sub-templates and nested presentation nodes will be incredibly useful, allowing you to split large components into modules, making them much easier to maintain.
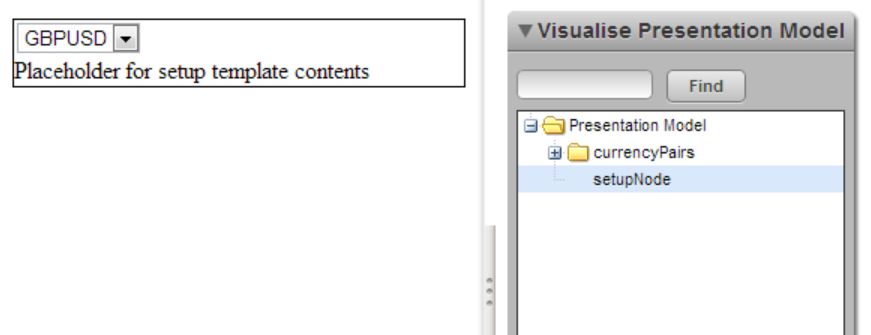
We’ll start by creating a new HTML template containing some placeholder text, in much the same way that we set up our original View page, but we’ll call this one setup-template.
<div id="tutorial.presenter.simpletile.setup-template">
    Placeholder for setup template contents
</div>
And then we’ll set up a corresponding presentation node, which extends caplin.presenter.node.PresentationNode. We’ll call it SetupPresentationNode.
tutorial.presenter.simpletile.SetupPresentationNode = function() {};
caplin.extend(tutorial.presenter.simpletile.SetupPresentationNode, caplin.presenter.node.PresentationNode);
Having done that, we need to go back to our original View and parent Presentation Model, and link the new HTML template and its presentation node to them.
We’ll do that by adding a new <div> block to the View, which binds the sub-template to it using the template’s id. That can go just under the select element we’ve already got…
<!-- 'template' binding indicates we're binding to a presentation node nested within the presentation model -->
<div style="display:block" data-bind='template: { name: "tutorial.presenter.simpletile.setup-template", data: setupNode }'> </div>
Underneath the SelectionField in the Presentation Model, we’ll call our new Presentation Node, like this:
    this.setupNode = new tutorial.presenter.simpletile.SetupPresentationNode();
    this._onInstrumentUpdated();
Refreshing the workbench updates our tile with the sub-template’s placeholder text.
Part 3: Injecting Properties and Adding Property Change Listeners
To enter an amount for the trade, we’ll need a text box, and while we’re at it, we can set up another <select> box for the dealt currencies. Before we add them to the HTML though, we’ll add the necessary fields to the Presentation Node.
tutorial.presenter.simpletile.SetupPresentationNode = function() {
    this.amount = new caplin.presenter.node.Field(100000);
    this.dealtCurrencies = new caplin.presenter.node.SelectionField([]);
};
A Note About Properties and Fields
The most basic unit of information that passes between the Presentation Model and the View is a Property, which extends the caplin.presenter.property.Property class. A standard property (caplin.presenter.property.Property) is quite limited, but there are Writable and Editable Properties as well, which are more versatile.
We could have used an EditableProperty for the amount, but using a field gives us a lot more flexibility. A Field contains several properties, some of which equate to the attributes and contents of an HTML input tag, so we can control the input’s value, label and name (should we need to), as well as being able to control whether it is enabled or disabled, visible or invisible.
The dealtCurrencies SelectionField is much the same as the one we set up for currency pairs, except that we haven’t added any values yet. Similarly, now we get to the HTML, our dealtCurrencies <select> box is set up as we’ve seen before. The amount field’s data-bind is being set to populate the value attribute of the <input> element with the value property of the amount field in the Presentation Node.
<div id="tutorial.presenter.simpletile.setup-template">
    <div>
        <label>@{tutorial.presenter.simpletile.amount_lbl}</label>
        <input data-bind="value:amount.value"></input>
    </div>
    <div>
        <label>@{tutorial.presenter.simpletile.dealt_currency_lbl}</label>
        <select data-bind="options: dealtCurrencies.options, value:dealtCurrencies.value, optionsValue: 'value'"></select>
    </div>
</div>
For the labels to be displayed correctly we will need to add the tokens used above to the translation file:
tutorial.presenter.simpletile.amount_lbl=Amount
tutorial.presenter.simpletile.dealt_currency_lbl=Dealt currency
We must ensure the i18n tokens are bundled for the workbench by including <@i18n.bundle@/> inside the head element of index.html before the js bundle.
Now we need to populate the dealtCurrencies options. Naturally, the dealt currencies available depend on which currency pair is selected. If we use Presenter to add a change listener to the tile’s currencyPairs value, we can then use the newly selected value to populate the dealtCurrencies SelectionField.
To do this, we add a change listener to currencyPairs.value, as shown below, and tell it to return _onInstrumentUpdated, when a change occurs. We define the function called _onInstrumentUpdated, which in turn launches a function called populateDealtCurrencies, to pass the new value over to the Presentation Node…
tutorial.presenter.simpletile.TilePresentationModel = function() {
...
// Parameters: context for callback (i.e. listener object), and name of callback function
this.currencyPairs.value.addChangeListener(this, '_onInstrumentUpdated');
...
};
tutorial.presenter.simpletile.TilePresentationModel.prototype._onInstrumentUpdated = function() {
var currencyPair = this.currencyPairs.value.getValue();
this.setupNode.populateDealtCurrencies(currencyPair);
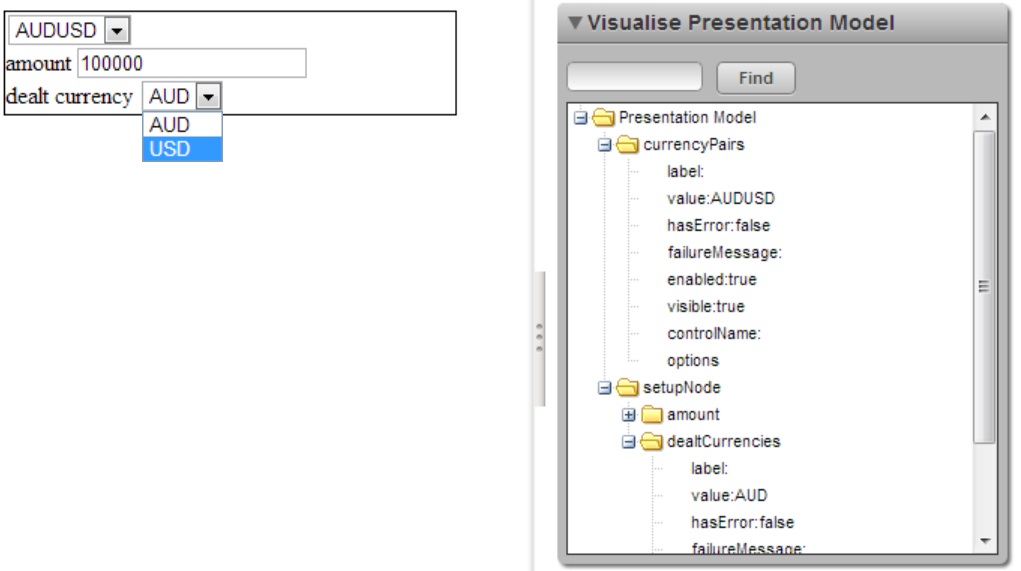
};We then go back to our Presentation Node to populate the dealtCurrencies SelectionField. We’ll do that by defining the populateDealtCurrencies function that we called a moment ago, so that we can capture and isolate the selected value (which will be either "GBPUSD" or "AUDUSD"). Once we’ve got it, we can populate our dealtCurrencies options by stripping out the relevant bits of the currency pair, for example: "GBP" or "USD". Easy.
tutorial.presenter.simpletile.SetupPresentationNode.prototype.populateDealtCurrencies = function(currencyPair) {
    //Extracting the dealt currencies from the currency pair string value
    this.dealtCurrencies.options.setOptions([currencyPair.substr(0, 3), currencyPair.substr(3, 3)]);
};
Back in the workbench, the tile should now update according to the currency pair selected.
Part 4: Field Validation
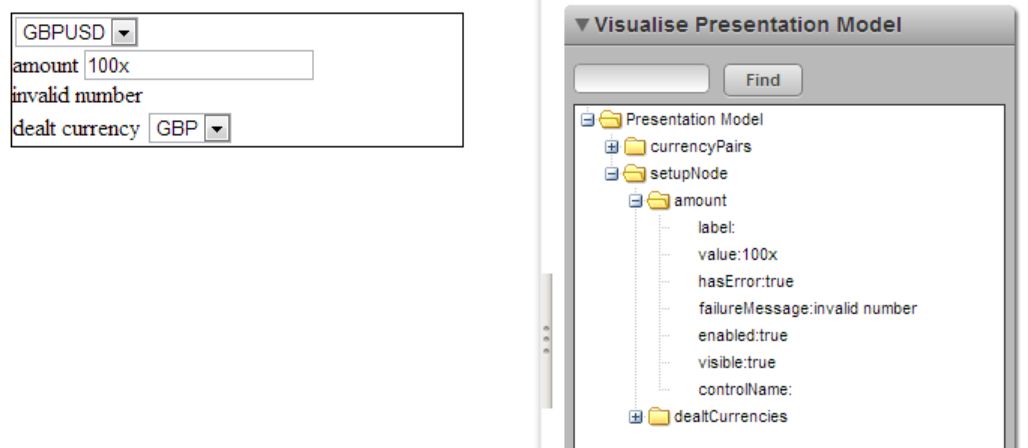
If we want the amount field to accept only numeric values, we can apply Caplin’s NumericValidator on the amount field’s value property, setting an error message that will be displayed if someone tries to enter anything other than a valid number.
var validator = new caplin.core.validator.NumericValidator('tutorial.presenter.simpletile.invalid.amount');
    this.amount.value.addValidator(validator);
For the message to be displayed correctly we will need to add the token used above to the translation file:
tutorial.presenter.simpletile.invalid.amount=invalid numberThe validator will be triggered whenever the value in the field is changed. If validation fails, failureMessage (which is a built-in attribute of caplin.presenter.node.Field) is set to the error message that we just defined. Now all we have to do is bind an element to that failureMessage, and it will be displayed whenever the amount field fails validation.
<!-- failureMessage property is available on Fields -->
<div data-bind="text:amount.failureMessage"></div>
If you go back to the workbench page, you should now see this, when you enter an invalid string into the amount input box. (Notice how the presentation model visualiser gives us more insight into the contents of the amount field and how its values change.)
Part 5: Adding Trade Buttons and using Property Formatters
OK. We can select our currency pair, enter an amount to trade, and specify a dealt currency. Now we need some "Sell" and "Buy" buttons that display the appropriate trade rates for the selected currencies.
Note that we’re still using our sub-template for this, so we’ll start by adding some buttons to the sub-template, and binding them to properties called sellRate and buyRate in the Presentation Node.
<div id="tutorial.presenter.simpletile.setup-template">
    <div >
        <label>@{tutorial.presenter.simpletile.sell_rate_lbl}</label>
        <label>@{tutorial.presenter.simpletile.buy_rate_lbl}</label>
    </div>
    <div>
        <button data-bind="text:sellRate"></button>
        <button data-bind="text:buyRate"></button>
    </div>
    ...
For the labels to be displayed correctly we will need to add the tokens used above to the translation file:
tutorial.presenter.simpletile.sell_rate_lbl=Sell rate
tutorial.presenter.simpletile.buy_rate_lbl=Buy rate
And now we’d better create the sellRate and buyRate properties, to make sure that our buttons have something to bind to. For the sake of this exercise, we’ll hard-code the exchange rates. In reality of course, you’d be streaming live prices straight into the tile.
this.sellRate = new caplin.presenter.property.Property('1.1234567');
    this.buyRate = new caplin.presenter.property.Property('0.9876');
Now it’s quite likely that you don’t actually want your buttons to display prices down to seven decimal places, but as luck would have it, Presenter provides us with a very simple way to format property values before they are displayed! We must first create a formatter which is an extension of caplin.core.Formatter and which will format any numeric value to a desired number of decimal places. The code for this class is pretty straightforward:
tutorial.presenter.simpletile.formatter.DecimalFormatter = (function() {
var Formatter = function() {};
caplin.implement(Formatter, caplin.core.Formatter);
/**
* Formats the value to the specified number of decimal places.
* @param value the value to format
* @param attributes { 'dp': x } where x is the number of decimal places to format to
* @returns the number formatted to the required number of decimal places
*/
Formatter.prototype.format = function(value, attributes) {
return caplin.core.Number.isNumber(value) ? caplin.core.Number.toFixed(value, attributes.dp) : value;
};
Formatter.prototype.toString = function() {
return 'tutorial.presenter.simpletile.formatter.DecimalFormatter';
};
return new Formatter();
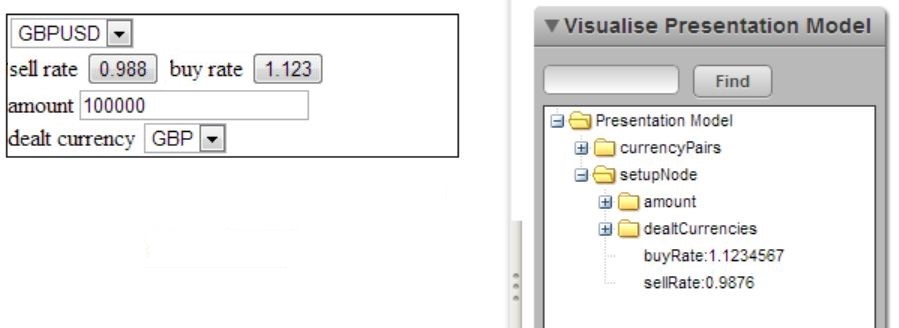
})();This formatter must be a singleton and therefore must be created when the script is loaded. Once a formatter has been added to a property, the format() will be applied every time the property’s value is updated.
this.sellRate.addFormatter(tutorial.presenter.simpletile.formatter.DecimalFormatter, { dp:3 });
    this.buyRate.addFormatter(tutorial.presenter.simpletile.formatter.DecimalFormatter, { dp:3 });
There are several formatters available in Caplin Trader 4, which are extensions of caplin.element.Formatter. One of these is the caplin.element.formatter.DecimalFormatter, which achieves the same functionality we’ve just implemented. If you have CaplinTrader4, as opposed to just BladeRunnerJS, you can bypass the creation of a formatter and just apply the one that’s already implemented:
|
//Configuration varies between formatters. In DecimalFormatter, { dp: 3 } rounds the value to 3 decimal places
    this.sellRate.addFormatter(caplin.element.formatter.DecimalFormatter, { dp: 3 });
    this.buyRate.addFormatter(caplin.element.formatter.DecimalFormatter, { dp: 3 });
Notice from the visualiser, when you refresh the workbench page, that the values of the sell and buy rates have not changed. The formatter only changes the way they are displayed.
Our tile is almost there now. All that’s left is to implement the trading behaviour.
Part 6: Binding onClick Functions and Linking to the Domain Model (Trading)
Now we have our buttons, what we really need is to be able to trade when we click them. We’ll do that by binding the click event on each button to a function that we will then set up in our presentation node:
<button data-bind="click:executeSell, text:sellRate"></button>
...
<button data-bind="click:executeBuy, text:buyRate"></button>//Event bindings bind to functions in the Presentation Node
tutorial.presenter.simpletile.SetupPresentationNode.prototype.executeSell = function() {
};
tutorial.presenter.simpletile.SetupPresentationNode.prototype.executeBuy = function() {
};These functions will have to call out to the tile’s Presentation Model to execute a trade. To do that, we’ll add a reference to the Presentation Model as the parent node of the Setup Presentation Node, and the Presentation Model must identify itself to the Setup Presentation Node as its parent.
tutorial.presenter.simpletile.TilePresentationModel = function() {
    ...
    //Providing the Presentation Node with a reference to the 'parent' Presentation Model
    this.setupNode = new tutorial.presenter.simpletile.SetupPresentationNode(this);
};tutorial.presenter.simpletile.SetupPresentationNode = function(parentPresentationNode) {
this.m_oParentPresentationNode = parentPresentationNode;
...
};
tutorial.presenter.simpletile.SetupPresentationNode.prototype.executeSell = function() {
this.m_oParentPresentationNode.executeTrade('SELL');
};
tutorial.presenter.simpletile.SetupPresentationNode.prototype.executeBuy = function() {
this.m_oParentPresentationNode.executeTrade('BUY');
};The executeTrade function, which we’ll create in the Presentation Model, will now have to link out to a Domain Model in order to process the trade. For our purposes, this will be a fake trade model, which at the risk of becoming predictable, we will call FakeTradeModel.
Our executeTrade function has to collect all the trade details from the Presenter Component, and pass them into the FakeTradeModel upon construction. We’ll create an object from the selected option values of the currencyPairs and dealtCurrencies selection fields, the amount property value, and the property value of the rate that applies to the button that the user clicked on.
tutorial.presenter.simpletile.TilePresentationModel.prototype.executeTrade = function(direction) {
    var instrument = this.currencyPairs.value.getValue(),
        dealtCurrency = this.setupNode.dealtCurrencies.value.getValue(),
        rate = (direction == 'BUY') ? this.setupNode.buyRate.getValue() : this.setupNode.sellRate.getValue(),
        tradeParameters = {
            instrument: instrument,
            dealtCurrency: dealtCurrency,
            amount: this.setupNode.amount.value.getValue(),
            side: direction,
            rate: rate
        },
        trade = new tutorial.presenter.simpletile.FakeTradeModel(tradeParameters, this);

    trade.executeTrade();
};
The fake trade is constructed using the trade details, and identifies the listener to which confirmation should be sent, once the trade has completed. When the executeTrade function in the Trade Model is called, it creates a confirmation message from the trade details, and notifies the listener (which in this case is the tile Presentation Model) with an onTradeCompleted callback.
tutorial.presenter.simpletile.FakeTradeModel = function(tradeDetails, tradeListener) {
    this.m_oTradeListener = tradeListener;
    this.m_mTradeDetails = tradeDetails;
};

tutorial.presenter.simpletile.FakeTradeModel.prototype.executeTrade = function() {
    var instrument = this.m_mTradeDetails.instrument,
        side = this.m_mTradeDetails.side == 'BUY' ? 'Bought' : 'Sold',
        amount = this.m_mTradeDetails.amount,
        dealtCcy = this.m_mTradeDetails.dealtCurrency,
        rate = this.m_mTradeDetails.rate,
        message = instrument + ': ' + side + ' ' + amount + ' ' + dealtCcy + ' at ' + rate;

    this.m_oTradeListener.onTradeCompleted(message);
};tutorial.presenter.simpletile.TilePresentationModel.prototype.onTradeCompleted = function(tradeCompletionMessage) {
window.alert(tradeCompletionMessage);
};If you click on one of the trading buttons now, your tile should now react something like this:

Part 7: Finalising the Tile, and Binding Visible & Enabled Properties
All that’s left at this point is to finalise the tile, and to display the confirmation message within the tile itself. To do that, we’ll create a new sub-template and presentation node, just as we did for the setup.
<div id="tutorial.presenter.simpletile.confirmation-template">
    <div data-bind="text:confirmationMessage"></div>
</div>tutorial.presenter.simpletile.ConfirmationPresentationNode = function() {
//We use EditableProperties when the value needs to be changed.
this.confirmationMessage = new caplin.presenter.property.EditableProperty ('');
};
caplin.extend(tutorial.presenter.simpletile.ConfirmationPresentationNode, caplin.presenter.node.PresentationNode);
tutorial.presenter.simpletile.ConfirmationPresentationNode.prototype.setMessage = function(message) {
this.confirmationMessage.setValue(message);
};Next, we’ll bind this new sub-template and alter the onTradeCompleted callback, to set the confirmation message on the new presentation node, instead of just outputting it to an alert box.
<div style="display:block" data-bind='template: {name: "tutorial.presenter.simpletile.confirmation-template", data: confirmationNode}'> </div>tutorial.presenter.simpletile.TilePresentationModel = function() {
...
//Adding nested presentation node for confirmation
this.confirmationNode = new tutorial.presenter.simpletile.ConfirmationPresentationNode();
};
tutorial.presenter.simpletile.TilePresentationModel.prototype.onTradeCompleted = function(tradeCompletionMessage) {
this.confirmationNode.setMessage(tradeCompletionMessage);
};
We can now make the tile hide the setup area when the trade is complete, and also disable the currency pair selector when the confirmation message is displayed. We’ll add two Boolean editable properties to the Presentation Model, and bind them to the sub-templates' visibility, so that the setup node is visible by default and the confirmation node isn’t. We’ll also use the ‘enable’ binding for the currency pairs selector, to bind it to the enabled property of the associated SelectionField.
<select  data-bind="…, enable: currencyPairs.enabled"></select>
<div style="display:block" data-bind='template: {…}, visible: setupVisible'> </div>
<div style="display:block" data-bind='template: {…}, visible: confirmationVisible'> </div>this.setupVisible = new caplin.presenter.property.EditableProperty(true);
this.confirmationVisible = new caplin.presenter.property.EditableProperty(false);We can now add a bit more to the onTradeCompleted function, to make it swap the visibility settings of the nodes, and disable the currency pairs selector when a trade is completed.
tutorial.presenter.simpletile.TilePresentationModel.prototype.onTradeCompleted = function(tradeCompletionMessage) {
this.currencyPairs.enabled.setValue(false);
this.confirmationNode.setMessage(tradeCompletionMessage);
this.setupVisible.setValue(false);
this.confirmationVisible.setValue(true);
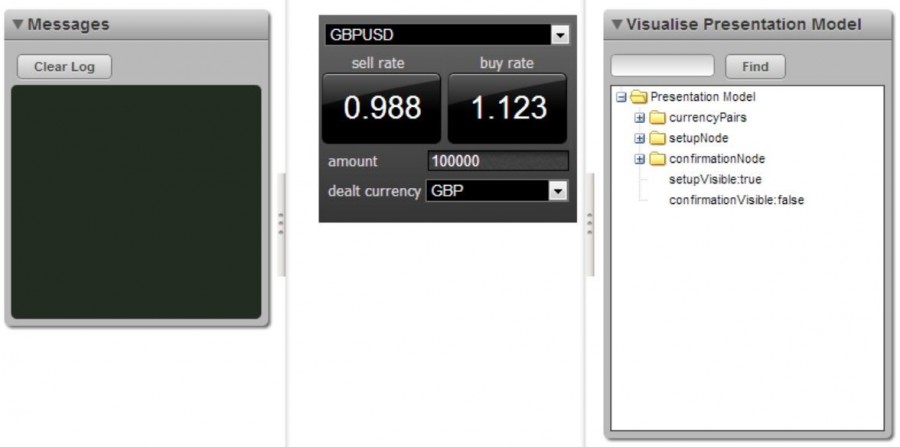
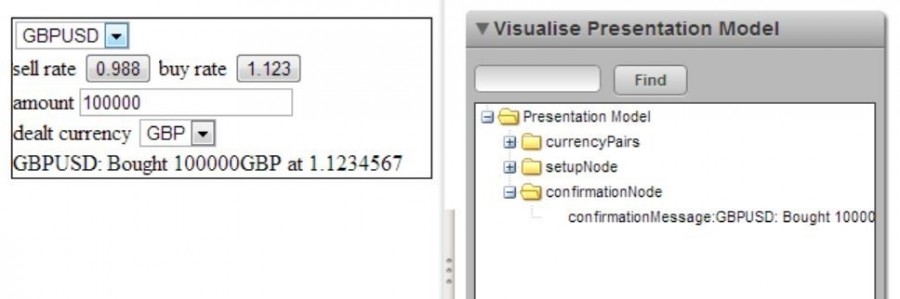
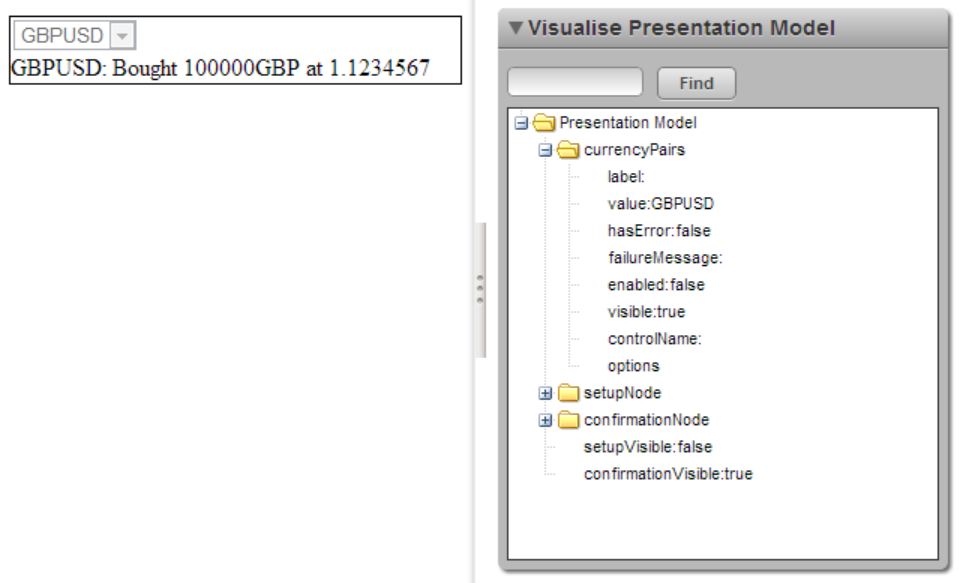
};Our tile is now fully functional. After a trade has been completed, it now displays the confirmation message and hides all the setup controls, while disabling the currency pair, so that we can’t click it again, as you can see here:
Part 8: Styling the Tile
Now we have completed the structure and functionality of the tile, all that remains is to add a liberal sprinkling of CSS to make it look pretty, and we’re done! Simply adjust the HTML to have the following classes and ids. We will also need to add a couple of images and some CSS in the themes folder under presenter-bladeset\blades\simpletile\themes, these can be copied across from the TutorialMotif.zip.
<div id="tutorial.presenter.simpletile.simpletile-template">
    <div class="tile">
        <select id="currencyPair" …></select>
        ...
    </div>
</div><div id="tutorial.presenter.simpletile.setup-template">
<div class="buysell-labels">
...
</div>
<div class="buysell-buttons">
...
</div>
<div class="amount">
...
<div id="amtError" …></div>
</div>
<div class="dealt">
...
</div>
</div><div id="tutorial.presenter.simpletile.confirmation-template">
<div id="confirm" …></div>
</div>Once this is done your tile should now look complete, like this: