Tickets
RFS Tickets allow users to issue a "Request For Stream" (RFS) of prices for a currency pair and trade on those prices. Spot, forward and swap trades are supported. RFS Tickets consist of a blade where the code is under the directory <YOURAPP>/fxexecution-bladeset/blades/rfsticket. They are implemented as a Presenter component whose main presentation model class is caplinx.fxexecution.rfsticket.RFSTicket and HTML template is <blade-home>/html/resources/rfs_ticket.html
Configuration is held in the RFSTicket factory object, which is retreived from the service registry as follows:
var appService = caplin.core.ServiceRegistry.getService("caplin.config-service");
var ticketFactory = oAppService.getProperty("RFS.TICKET.FACTORY");
The factory object is registered when the app is bootstrapped. If you want to reconfigure the RFSTicket then inside caplinx.AppConfig replace the default factory class caplinx.fxexecution.rfsticket.multiway.config.MultiWayRFSConfig with one of your own that extends caplinx.fxexecution.fxticket.config.DefaultRFSConfig.
GUI Structure
The RFS ticket supports one-way and two-way spot, forward and swap trades. The image below shows a two-way outright, before a price stream is requested with the menu showing.
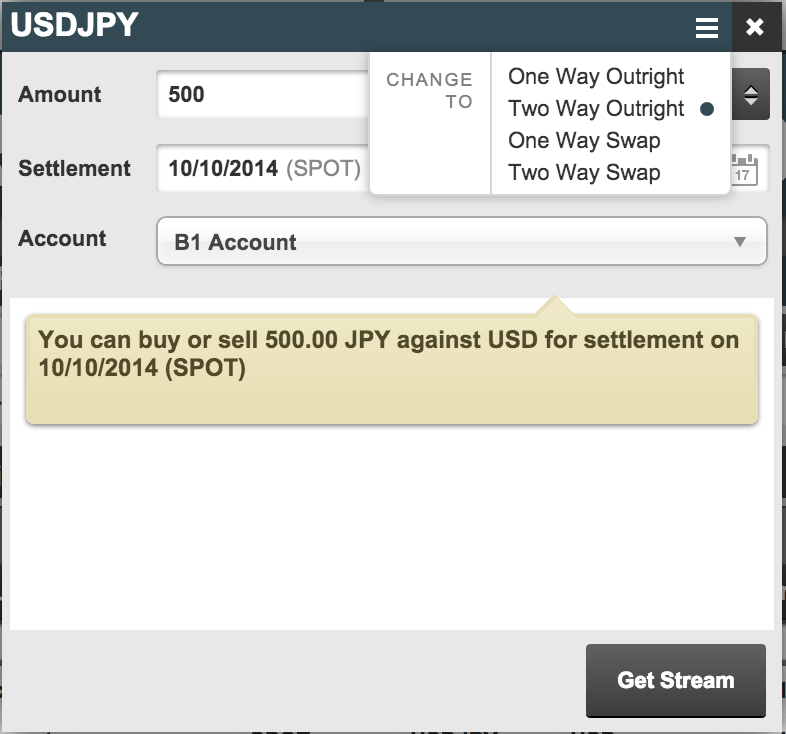
The ticket is split into several parts:
-
Control panel: holds the currency pair control, menu (shown above) and close icon.
-
Main ticket body panel: is replaced dependent on the menu option chosen.
-
Footer: contains action buttons.
-
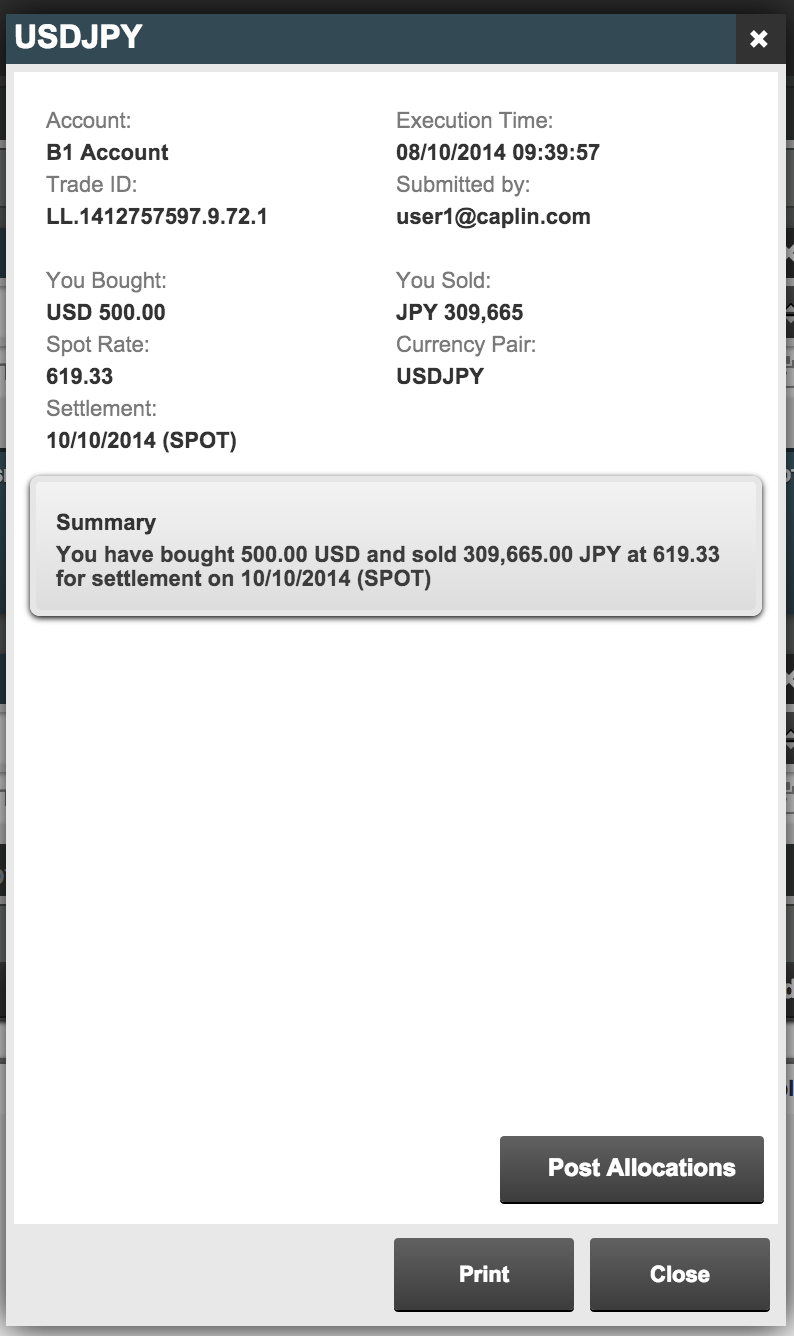
Confirmation panel: displays trade summary data once the trade completes. If you have purchased the post-trade allocations blade then clicking the "Post Allocations" buttons will open a panel that allows users to allocate parts of the trade to different accounts. See here for more on Post Trade Allocations.
-
Overlay: used to prevent user interaction whilst trades are in progress.
Ticket Body
The main ticket body is further subdivided into:
-
Setup panel: contains the details of the trade. In the two-way outright example shown above this includes settlement date, amount and account.
-
Summary Message: shown in the yellow bubble in the example above.
-
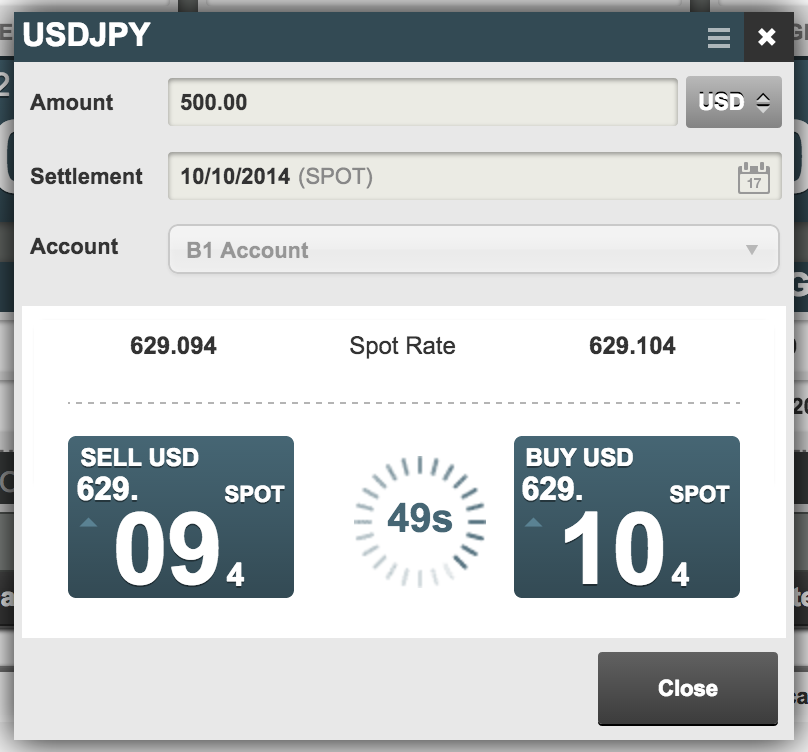
Execution panel: This is displayed when the user requests a price stream. An example is shown below:
Code Architecture
The RFSTicket class is responsible for the overall control of the ticket. Every time it is displayed a new instance is instantiated and a new trade model instance requested from the TradeFactory.
The top level contains superclasses for the ticket bodies and its constituents: AbstractTicketBody, AbstractTicketSetup and AbstractTradeExecutor. Subclasses of these supply specific behaviour for one-way, two-way and swaps.
The AbstractTicketBody controls the overall workflow listening to the trade model state change events. Once the user requests the stream it disables further input from the setup panel and displays the execution panel. The subclasses of AbstractTradeExecutor return appropriately configured instances of the caplinx.fxexecution.rfsticket.TradeExecutionButtons class.
The TradeExecutionButtons class is responsible for executing the trade at the quoted price. While the trade executes both the AbstractTicketBody and the caplinx.fxexecution.rfsticket.state.RFSTicketStateHandler listen to state change events emitted by the trade and update Presenter properties.
The AbstractTicketBody controls the ticket body subpanel whilst the RFSTicketStateHandler controls the main ticket and, in particular, displays the confirmation panel.
The RFSTicketBootstrap class registers the caplin.fx.execution.FXTradeFactory class with the TradeFactory for the RFS protocol. See the Trade model: RFS for details of the messages sent by the trade model to the server.
Confirmation and Post Trade Allocations
The confirmation panel is implemented as an independent Caplin component (i.e., it implements caplin.component.Component) and is embedded in the RFSTicket class using a Presenter component node (caplin.presenter.node.ComponentNode). If you are NOT using post trade allocations then caplin.fx.confirmation.TradeConfirmation class is used to implement the confirmation component. Otherwise you will use the caplinx.fxexecution.allocation.ConfirmationWithAllocation class that is defined within the Post Trade allocation blade. As the name suggests, it displays the standard trade confirmation data (by extending the TradeConfirmation class). However, it adds a button that allows the user to open a panel that allows them to allocate parts of the trade to different accounts.
Metals
The RFS Ticket can be configured to allow metals to be traded. There is a set of metals classes found under the directory <blade-home>/src/caplinx/fxexecution/rfsticket/metal. The directory contains a MetalRFSConfig class contains the appropriate configuration that uses these metal classes.
See more: