Writing a pricing adapter (2)
Pricing adapters integrate your bank’s pricing systems with the Caplin Platform. It is the responsibility of the adapter to connect to the bank’s pricing server, retrieve the requested data from the server, and convert it into the format expected by the Caplin Platform.
Download the presentations for this course.
Objectives
In this tutorial you will make the following changes to the pricing adapter you created in the tutorial Pricing Integration Adapter 1:
-
Handle request for a currency pair and return a specific price
-
Handle requests for a container of currency pairs and return the subjects in the container
-
Connect to a backend pricing server and return regular price updates to subscribed peers
Handling requests for individual currency pairs
In this section you will create code to respond to requests for individual currency pairs.
Take a look at the src directory in your project. Here you will find the following files:
com.caplin.pricing/PricingAdapter.java-
The
PricingAdapterclass is the application entry point for your adapter. When the adapter is run, this class creates a new DataSource object and a newPricingDataProviderinstance. com.caplin.pricing/PricingDataProvider.java-
The
PricingDataProviderclass implements the DataProvider interface, which provides methods for handling subscription requests and discards. During initialisation, thePricingDataProviderclass registers itself with the DataSource as a DataProvider for the namespace '/FX/' and receives an ActivePublisher instance in return. We will use the ActivePublisher instance later to create new messages (records) and send them to the Caplin Platform.
Handling a subject request
In this section, we’re going to handle a subject request for the namespace '/FX/' (all subjects that begin with '/FX/').
To handle subject requests for a namespace, you register an instance of DataProvider with a DataSource object by calling DataSource.createActivePublisher(Namespace, DataProvider).
You will notice in the source code that PricingDataProvider implements the DataProvider interface, and that it registers itself as the DataProvider for the namespace '/FX/':
public class PricingDataProvider implements DataProvider
{
    // ...
    private final DataSource dataSource;
    private ActivePublisher publisher;

    // ...

    public void initialise() {
        publisher = dataSource.createActivePublisher(new PrefixNamespace("/FX/"), this);
    }

    // ...

}|
How does the subject request reach your adapter?
When this adapter is packaged as a Caplin Platform blade, the blade includes the configuration file |
Follow the steps below to make your adapter write to the console each time it receives a message from Liberator:
-
Edit the
onRequestandonDiscardmethods so that they each log the subject name associated with the event:File: PricingDataProvider.java@Override public void onRequest(RequestEvent requestEvent) { System.out.println("Received request for " + requestEvent.getSubject()); } @Override public void onDiscard(DiscardEvent discardEvent) { System.out.println("Received discard for " + discardEvent.getSubject()); } -
Restart the adapter in your IDE.
-
In your IDE, open your adapter’s console output.
Follow the steps below to send a request to your adapter from a web client:
-
Open a web browser and navigate to your Liberator’s homepage (http://localhost:18080).
-
On the Liberator home page, click Diagnostics > Liberator Explorer. Login with the default credentials: username 'admin' and password 'admin'.
-
In the Subject box at the top of Liberator Explorer, type
/FX/GBPUSDand press Return.
After you submit the request for /FX/GBPUSD, the follow events occur:
-
Liberator creates an object for /FX/GBPUSD and sends a request message to your adapter.
-
Your adapter receives the subscription request and writes the following line to its console window:
Received request for /FX/GBPUSD -
Your adapter does not publish a response to Liberator. After 10 seconds, Liberator Explorer times out the request and writes the following entry in the Callbacks panel:
In - ActionFailEvent [subject=/FX/GBPUSD] -
Liberator discards the object it created for /FX/GBPUSD and sends a discard message to your adapter, indicating that Liberator is no longer interested in the subject.
-
Your adapter receives the discard message and writes the following line to its console window:
Received discard for /FX/GBPUSD
Publishing a response to a subject request
In this section, you add new code to the onRequest method to publish a response to Liberator’s request.
The ActivePublisher class has two methods for publishing messages to DataSource peers:
-
publishInitialMessage: publishes a message to all peers that have not yet received an initial message. This method sets the image flag on the message, which indicates to the subscribing peer that the message contains a complete set of fields for the subject. -
publishToSubscribedPeers: publishes a message to all peers that have received an initial message. This method does not set the image flag on the message. The message may contain a partial set of fields for the subject.
The first response to a peer is sent by publishInitialMessage; subsequent messages to the peer are sent by publishToSubscribedPeers. The distinction between the methods publishInitialMessage and publishToSubscribedPeers provides compatibility with backend servers that send full and partial images of data. While the order in which methods are called must be observed, the requirement to send a full set of fields in the initial message is not applicable in all cases. For example, if an adapter retrieves backend data asynchronously, then only the callback method has access to backend data and the onRequest method can only send an empty initial message.
Follow the steps below to publish an initial message in response to a request:
-
Edit the
onRequestmethod so that it creates and publishes an empty record:File: PricingDataProvider.java@Override public void onRequest(RequestEvent requestEvent) { System.out.println("Received request for " + requestEvent.getSubject()); RecordType1Message initialMessage = publisher.getMessageFactory().createRecordType1Message(requestEvent.getSubject()); publisher.publishInitialMessage(initialMessage); } -
Restart your adapter
Using Liberator Explorer, submit a request for the subject /FX/GBPUSD (see Handling a subject request above). This time Liberator Explorer receives a response and the "Callbacks" panel indicates that the subscription was successful:
In - RecordType1DataEvent [subject=/FX/GBPUSD, fields=[Type=211,SID=PricingAdapterPricingSvc1], image=false, timeReceived=1397567812085]
Notice that even though you created an empty message in your adapter, Liberator has added two fields of its own:
-
Type=211: indicates that this is a record message. -
SID=PricingAdapterPricingSvc1: the source ID of the message. Indicates which data service provided this record message.
These metadata fields are typically not useful for display in the client application, but can be useful for monitoring and log analysis.
Adding fields to responses
In this section, you add code to publish a second message that contains a full set of fields with hard-coded values. This second message is published using the ActivePublisher.publishToSubscribedPeers method. This method does not set the 'image' flag on the message, so it can be used to send messages with a partial set of fields if required. For the sake of simplicity, the adapter in this tutorial does not track field values and always sends the same set of fields with each update.
Follow the steps below:
-
Create a new record and set these fields before publishing the message:
File: PricingDataProvider.java@Override public void onRequest(RequestEvent requestEvent) { System.out.println("Received request for " + requestEvent.getSubject()); RecordType1Message initialMessage = publisher.getMessageFactory().createRecordType1Message(requestEvent.getSubject()); publisher.publishInitialMessage(initialMessage); RecordType1Message updateMessage = publisher.getMessageFactory().createRecordType1Message(requestEvent.getSubject()); updateMessage.setField("InstrumentName", requestEvent.getSubject()); updateMessage.setField("BidPrice", "1.23"); updateMessage.setField("AskPrice", "2.34"); updateMessage.setField("BidPriceId", "00011"); updateMessage.setField("AskPriceId", "00022"); updateMessage.setField("BidGFA", "500000"); updateMessage.setField("AskGFA", "300000"); Date date = new Date(); String timestamp = String.valueOf(date.getTime()); updateMessage.setField("Timestamp", timestamp); publisher.publishToSubscribedPeers(updateMessage); } -
Restart your adapter
-
Make a request from Liberator Explorer for
/FX/GBP. It fails! Notice that the adapter displays a warning in its console output in your IDE:java.lang.IllegalArgumentException: Cannot set field: No entry in field name/number mappings for name InstrumentName
The reason for this error is that field names in Type 1 messages are encoded as numbers rather than field names, and we have yet to map our fields to numbers.
-
Open the file
blade/blade_config/fields.conf. Add the configuration below to the bottom of this file. Note that the field IDs are arbitrary; they simply have to be unique integers.File: blade/blade_config/fields.confadd-field InstrumentName -10003 add-field BidPrice -10004 add-field AskPrice -10005 add-field BidPriceId -10006 add-field AskPriceId -10007 add-field BidGFA -10008 add-field AskGFA -10009 add-field Timestamp -10010
-
Re-export your adapter’s configuration as a config-only blade and deploy the blade to your Deployment Framework (see Export your adapter’s configuration as a config-only blade and Deploy the config-only blade to your DFW)
Every time you change your adapter’s configuration you must re-export your adapter’s configuration and deploy it to your Deployment Framework. -
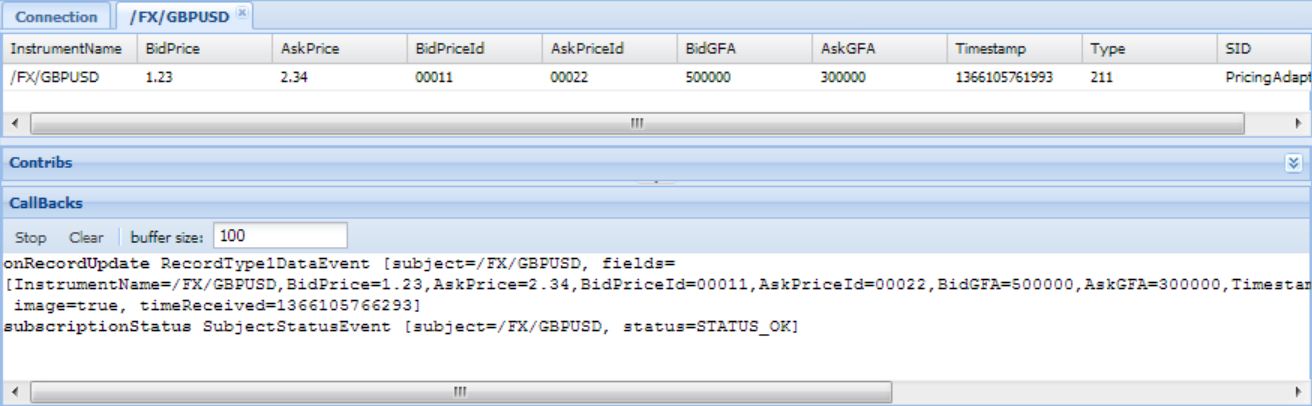
Restart the deployment framework and try requesting /FX/GBPUSD (or any other instrument with the /FX/ prefix) from the Liberator Explorer. You will now notice that a full record comes through with the hard-coded field values that we set:
Handling requests for containers
A container is a special type of subject that contains a list of other subjects. When a client subscribes to a container, the client is also automatically subscribed to all the subjects listed in the container.
In this section you will add code to the PricingDataProvider.onRequest method to handle requests for a container of major currency pairs: /CONTAINER/FX/MAJOR. On receiving a request for /CONTAINER/FX/MAJOR, your adapter should publish a ContainerMessage containing the subjects listed in the container. The container message does not reach the client directly; Liberator intercepts it and automatically subscribes the client to each of the subjects listed in the message.
Handling the request
Follow the steps below:
-
Declare a new ActivePublisher for your container as a field at the top of your class:
File: PricingDataProvider.javaprivate ActivePublisher containerPublisher;You need to create a separate ActivePublisher for the /CONTAINER/FX/MAJOR container because the container has a different prefix to the existing ActivePublisher.
-
Instantiate the container’s publisher in the PricingDataProvider’s
initialisemethod:File: PricingDataProvider.javathis.containerPublisher = dataSource.createActivePublisher(new PrefixNamespace("/CONTAINER/FX"), this); -
In the
onRequestmethod, check if the request is for /CONTAINER/FX/MAJOR. If so, create a container message and add five record subjects to it. Otherwise, fall back to your existing record message code.File: PricingDataProvider.java@Override public void onRequest(RequestEvent requestEvent) { System.out.println("Received request for " + requestEvent.getSubject()); String subject = requestEvent.getSubject(); if (subject.equals("/CONTAINER/FX/MAJOR")) { ContainerMessage containerMsg = containerPublisher.getMessageFactory().createContainerMessage(subject); containerMsg.addElement("/FX/GBPUSD"); containerMsg.addElement("/FX/GBPEUR"); containerMsg.addElement("/FX/GBPJPY"); containerMsg.addElement("/FX/GBPAUD"); containerMsg.addElement("/FX/GBPCHF"); containerPublisher.publishInitialMessage( containerMsg ); } else { RecordType1Message recordType1Message = publisher.getMessageFactory().createRecordType1Message(requestEvent.getSubject()); publisher.publishInitialMessage(recordType1Message); } }
Configuring the data service
In the project file blade/Liberator/etc/rttpd.conf you will find configuration for Liberator that defines your adapter as a data service for all subjects prefixed with /FX/. You must add a similar piece of configuration to define your adapter as a data service for subjects prefixed with /CONTAINER/FX.
To update the Liberator and Transformer configuration, follow the steps below:
-
Edit your adapter’s Liberator configuration file
blade/Liberator/etc/rttpd.conf. Add a secondinclude-patternto theadd-data-servicestanza:add-data-service service-name ${ADAPTER_NAME}PricingSvc${THIS_LEG} include-pattern ^/FX/ include-pattern ^/CONTAINER/FX/ (1) # ... end-data-service1 New include-pattern -
Do the same for the Transformer configuration in the file
blade/Transformer/etc/transformer.conf. -
Re-export your adapter’s configuration as a config-only blade and deploy the blade to your Deployment Framework (see Export your adapter’s configuration as a config-only blade and Deploy the config-only blade to your DFW)
Every time you change your adapter’s configuration you must re-export your adapter’s configuration and deploy it to your Deployment Framework. -
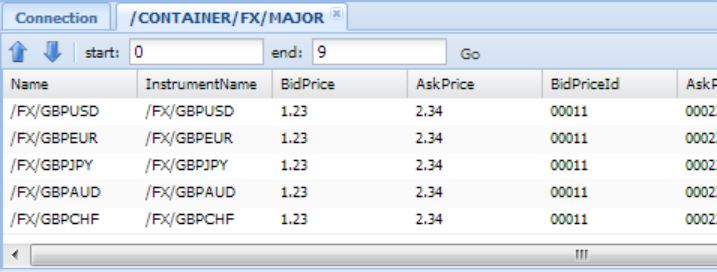
In Liberator Explorer, subscribe to /CONTAINER/FX/MAJOR. You should see all the currencies you added to the container appearing, each having the same data:
Connecting to a pricing server
So far we have only replied to requests with hard-coded data. In production, your adapter will open a subscription to a backend pricing server for each requested currency pair. Upon receiving updates, you adapter will publish an update message to all subscribed peers.
In this part of the tutorial you will connect your adapter to a mock pricing server that represents a bank’s pricing server. The mock server generates prices for a set of currency pairs and provides trading functionality for spot trades. It produces prices for any pair of the following currencies: EUR, USD, GBP, JPY, DKK, ZAR, CHF and AUD.
Running the mock pricing-server
Follow the steps below to start the mock pricing-server:
-
Download the TrainingTradeProject zip file. Extract "TrainingTradeProject-<version>.zip" and copy the file "SimpleFXServer-<version>.jar" to a location on your hard drive.
-
In the directory in which you unzipped the file, type the following command in your command line tool to start the server:
$ java -jar SimpleFXServer-<version>.jar
The following console output indicates that the server is running:
<timestamp> [main] INFO  quickfix.SocketAcceptor  - SessionTimer started
<timestamp> [main] INFO  quickfix.mina.NetworkingOptions  - Socket option: SocketTcpNoDelay=true
<timestamp> [main] INFO  quickfix.mina.NetworkingOptions  - Socket option: SocketSynchronousWrites=false
<timestamp> [main] INFO  quickfix.mina.NetworkingOptions  - Socket option: SocketSynchronousWriteTimeout=30000
<timestamp> [main] INFO  quickfix.SocketAcceptor  - Listening for connections at 0.0.0.0/0.0.0.0:14045
| To stop the mock server, press Ctrl + C. |
Connecting the adapter to the mock pricing-server
Each bank server generally provides a library that provides an API for subscribing to data updates and server status. The mock server is no different: it has a client library that your adapter can use to communicate with the mock server.
Follow the steps below:
-
Copy the file
SimpleFXMessenger-<version>.jar(contained in the zip file which you extracted in the previous step) to thelibdirectory in your adapter project.This is not the same jar that you used in the previous step. There are two jars with similar names: the pricing server ( SimpleFXServer-<version>.jar) and the client library (SimpleFXMessenger-<version>.jar). -
Edit the
build.gradlefile in the root directory of your adapter project, and addSimpleFXMessengeras a dependency in thedependencies { }stanza:File: build.gradleimplementation (name: 'SimpleFXMessenger', version: '0+') { transitive = false } -
In your IDE, reload the Gradle configuration for your project.
-
Import the Simple FX Messenger classes:
File: PricingDataProvider.javaimport messenger.*; -
Implement the
messenger.FXPricingListenerinterface on yourPricingDataProviderclass. This interface is provided by the mock server’s client library.File: PricingDataProvider.javapublic class PricingDataProvider implements DataProvider, messenger.FXPricingListener { ... } -
Add the following
messenger.FXPricingListenermethods to yourPricingDataProviderclass:File: PricingDataProvider.java@Override public void onConnect() { } @Override public void onDisconnect() { } @Override public void onPriceUpdate(FXQuote arg0) { } @Override public void onSubscriptionError(String arg0, String arg1) { } -
Update the implemented
onConnectmethod to print a message to the console:File: PricingDataProvider.java@Override public void onConnect() { System.out.println("Connected to mock server"); } -
Declare a new field of type
messenger.FxPricingMessengerat the top of yourPricingDataProviderclass. In thePricingDataProvider.initialise()method, assign a new instance ofFXPricingMessengerto the field and then call theFXPricingMessenger.connect()method to make a connection to the MockServer. Thismessenger.FXPricingMessengerinstance is used to communicate with the mock server.File: PricingDataProvider.javaprivate ActivePublisher publisher; private ActivePublisher containerPublisher; private FXPricingMessenger messenger; public PricingDataProvider(DataSource dataSource) { this.dataSource = dataSource; } public void initialise() { this.publisher = dataSource.createActivePublisher(new PrefixNamespace("/FX/"), this); this.containerPublisher = dataSource.createActivePublisher(new PrefixNamespace("/CONTAINER/FX"), this); this.messenger = new FXPricingMessenger(this, FXPricingMessenger.DEFAULT_SESSION_ID_1, FXPricingMessenger.DEFAULT_PORT_1); this.messenger.connect(); } -
Restart your adapter. In the adapter’s console output you should now see the line "Connected to mock server".
Improving the start-up behaviour of your adapter
When your adapter starts up, it automatically connects to Liberator. This can create an undesirable situation where the adapter connects successfully to Liberator but the underlying bank server is down. This is problematic because Liberator will send requests to the adapter that the adapter cannot service.
It is considered best practice for the status of the adapter to reflect the status of the underlying bank server. We are now going to improve the adapter so that it only initialises the connection to Liberator once it has successfully connected to the bank server.
Follow the steps below to postpone calling dataSource.start() until the adapter has successfully achieved a connection with the mock server:
-
Remove the
dataSource.start()instruction from the main method of thePricingAdapterclass. -
In the constructor of the
PricingDataProviderclass, store the DataSource object as a field so that it can be accessed from any method in this class. Also add a boolean field that we will use to keep track of whether or not the DataSource has been started. This boolean field will be initialised to false.File: PricingDataProvider.javaprivate final ActivePublisher publisher; private final ActivePublisher containerPublisher; private final FXPricingMessenger messenger; private final DataSource dataSource; private boolean dataSourceIsStarted = false; public PricingDataProvider(DataSource dataSource) { this.dataSource = dataSource; } -
In the
onConnectmethod, which is called when thePricingDataProvidersuccessfully connects to the mock server, start the DataSource if it has not yet been started or toggle its status to UP if it has been started before. You will use your boolean field to know if the DataSource has been started or not.File: PricingDataProvider.java@Override public void onConnect() { System.out.println("Connected to mock server"); if (dataSourceIsStarted) { dataSource.setStatusUp(); } else { dataSource.start(); dataSourceIsStarted = true; } } -
In the
onDisconnectmethod, which is called when the adapter loses connection to the mock server, toggle the DataSource status to DOWN.File: PricingDataProvider.java@Override public void onDisconnect() { System.out.println( "Disconnected from mock server" ); dataSource.setStatusDown(); } -
At this point you should be able to start your adapter and see it turn blue in the CMC, indicating that it has successfully connected to Liberator.
-
Try stopping the mock server by pressing Ctrl+C in the command window. You should see the Pricing Adapter turn red in the CMC, indicating that it is unavailable. This is because when you stopped the mock server the
onDisconnect()method would have been called, resulting in the adapter toggling its status to DOWN. -
Restart the mock server. The Pricing Adapter should turn blue in the CMC, indicating that it is available again. This is because the
onConnect()method would have been called when connection to the mock server was re-established, resulting in the adapter toggling its status to UP.
Requesting data from the mock server
Next, we’ll change the onRequest method so that when a request is made for an FX subject, the adapter requests data from the mock server. (This is instead of returning a record with hard-coded data as we did previously.)
Subject requests are received from the platform in the form "/FX/<currency pair>" e.g. "/FX/GBPUSD". This particular mock server, however, expects requests in the form "<currency>/<currency>" e.g. "GBP/USD". When a request comes in you will need to convert the requested subject to a currency pair that matches the expected format.
Follow the steps below:
-
Create a new private method that converts a Caplin Platform subject into the format expected by the mock server:
File: PricingDataProvider.javaprivate String convertSubjectToInstrumentName(String subject) { String[] splittedSubject = subject.split("/"); String currencyPair = splittedSubject[2]; return currencyPair.substring(0, 3) + "/" + currencyPair.substring(3, 6); } -
In the
onRequestmethod, convert the requested subject into the format expected by the mock server and subscribe to the subject on the mock server.File: PricingDataProvider.java@Override public void onRequest(RequestEvent requestEvent) { String subject = requestEvent.getSubject(); if (subject.equals("/CONTAINER/FX/MAJOR")) { // ... } else { String instrumentName = convertSubjectToInstrumentName(subject); messenger.subscribe(instrumentName); // ... } } -
Re-run your adapter and request a valid currency pair using Liberator Explorer. The result should still be the hard-coded record, but now, in the console window for the mock server, you will notice some messages appearing, every 5 seconds. These correspond to the new price updates being sent to the adapter as a response.
Propagating pricing updates to subscribing DataSource peers
The final step is to receive the data updates coming from the mock server, create a record, and propagate the update to Liberator. To receive incoming messages from the Mock Server you must implement the FXPricingListener.onPriceUpdate method.
Follow the steps below:
-
Create a new private method that converts currency pairs to the format expected by the Caplin Platform (e.g. convert "GBP/USD" to "/FX/GBPUSD").
File: PricingDataProvider.javaprivate String convertInstrumentNameToSubject(String instrumentName) { String subject = "/FX" + "/" + instrumentName.substring(0, 3) + instrumentName.substring(4, 7); return subject; } -
In the
onPriceUpdate()method, create a new record message with a subject name converted using theconvertInstrumentNameToSubjectmethod. Populate the fields on the message with the data in theFXQuote, using the same field names as in the hard-coded initial response. Then publish the message to the subscribed peers.File: PricingDataProvider.java@Override public void onPriceUpdate(FXQuote fxQuote) { String instrumentName = fxQuote.getCurrencyPair(); String subject = convertInstrumentNameToSubject(instrumentName); RecordType1Message updateMessage = publisher.getMessageFactory().createRecordType1Message(subject); updateMessage.setField("InstrumentName", subject); updateMessage.setField("BidPrice", String.valueOf(fxQuote.getBidPrice())); updateMessage.setField("AskPrice", String.valueOf(fxQuote.getOfferPrice())); updateMessage.setField("BidPriceId", String.valueOf(fxQuote.getBidID())); updateMessage.setField("AskPriceId", String.valueOf(fxQuote.getOfferID())); updateMessage.setField("BidGFA", String.valueOf(fxQuote.getBidSize())); updateMessage.setField("AskGFA", String.valueOf(fxQuote.getOfferSize())); Date date = new Date(); String timestamp = String.valueOf(date.getTime()); updateMessage.setField("Timestamp", timestamp); publisher.publishToSubscribedPeers(updateMessage); } -
In the
onRequestmethod, remove the hard-coded data update after the initial record request so that you go back to just sending a blank initial response when a request is received:File: PricingDataProvider.java@Override public void onRequest(RequestEvent requestEvent) { System.out.println("Received request for " + requestEvent.getSubject()); String subject = requestEvent.getSubject(); if (subject.equals("/CONTAINER/FX/MAJOR")) { ContainerMessage containerMsg = containerPublisher.getMessageFactory().createContainerMessage(subject); containerMsg.addElement("/FX/GBPUSD"); containerMsg.addElement("/FX/GBPEUR"); containerMsg.addElement("/FX/GBPJPY"); containerMsg.addElement("/FX/GBPAUD"); containerMsg.addElement("/FX/GBPCHF"); containerPublisher.publishInitialMessage( containerMsg ); } else { String instrumentName = convertSubjectToInstrumentName(subject); messenger.subscribe(instrumentName); RecordType1Message recordType1Message = publisher.getMessageFactory().createRecordType1Message(requestEvent.getSubject()); publisher.publishInitialMessage(recordType1Message); } } -
Restart your adapter.
-
Open Liberator Explorer and, once again, subscribe to the /FX/GBPUSD object and the /CONTAINER/FX/MAJOR container. You should now see data updates appearing with realistic ticking updates from the mock server.


Discarding subscriptions when the client disconnects
One minute after closing the Liberator Explorer window/tab in your browser, Liberator will drop the subscription and send a discard message to your adapter. This is your cue to end the subscription with the mock server.
Follow the steps below:
-
Convert the discarded subject to the instrument required by the mock server (e.g. "/FX/GBPUSD" to "GBP/USD"), then use the messenger to unsubscribe from the instrument.
File: PricingDataProvider.java@Override public void onDiscard(DiscardEvent discardEvent) { System.out.println("Received discard for " + discardEvent.getSubject()); String subject = discardEvent.getSubject(); String instrumentName = convertSubjectToInstrumentName(subject); messenger.unsubscribe(instrumentName); } -
Make a subscription using Liberator Explorer then close the Liberator Explorer browser window. Liberator will send a discard message one minute after you closed the Explorer window. When this happens and the adapter unsubscribes from the mock server, the mock server’s output log will display:
pricing.IntervalTaskUpdate - CANCELLING interval update
Review
In this tutorial we looked at the implementation of new Pricing Integration Adapters – how to receive requests from the Platform and respond by sending an initial response. We also looked at how to send price updates to the Platform. We used a mock server to retrieve the price updates. While the way you communicate with backend servers will differ from one backend server to another, the way you deal with object and container requests, create new records, and send initial and update records does not change.