Introducing React and Redux
This tutorial aims to introduce you to React and Redux. We can use both to build a simple to-do list application, which you can view in your browser.
Objectives
-
Use React and then React-Redux to create a single page to-do list application.
-
Create a React component and learn how to manage state.
-
Set up a Redux store so your React components can read data from it.
React
React is an open source front-end JavaScript library used to build UIs and UI components. React is also used for state management within an application, so when your data changes React updates and renders just the specified components. You can read more about React here.
This tutorial will walk you through creating a simple React component, including some basic state management. For this, we’ll be creating a component using Class components.
We’ll create a simple list component, and then gradually improve it by adding state. We’ll follow a few steps:
-
Getting started - Set up a project and create the component.
-
Creating the to-do list - Create a simple component.
-
Adding tasks - Create a task component.
-
Adding state - Store our tasks in state.
-
Adding a form - Create a form to add new tasks.
Getting started
Set up your project.
-
Extract the
front-end-training-main.zipfile, available from your Caplin trainer.If you want to host your project in a different directory to the 'downloads' directory, then create a new directory and extract the ZIP file to that location. -
Import your project into your IDE, which is either Visual Studio Code or IntelliJ IDEA.
-
Open a terminal in the
frontend-training-main/myTradingApplication/apps/todo-listdirectory: -
Run the command below to install the projects dependencies:
$ pnpm install
Creating the to-do list
With our project set up, we can start creating our custom component.
-
Replace the contents of
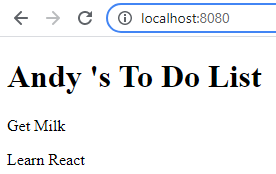
frontend-training-main/myTradingApplication/apps/todo-list/src/todoList/TodoList.jswith the following:import React, { useState } from "react"; export default function TodoList(props) { const {name} = props; return ( <div> <h1> {`${name}'s To Do List`} </h1> <p> Get Milk </p> <p> Learn React </p> </div> ); }The syntax in the
<h1>allows you to pass in anameproperty to this component, which sets the owner of the to-do list. This gives us a basic list to render, but we still need to display it. -
In the file
frontend-training-main/myTradingApplication/apps/todo-list/src/index.js, add the following:import React from "react"; import ReactDOM from "react-dom"; import TodoList from "./todoList/TodoList"; import "./index.less"; function startApp() { ReactDOM.render( <TodoList name="Andy" />, // Add your own name here. document.getElementById("root") ); } startApp(); if (module.hot) { module.hot.accept(); } -
In the
frontend-training-main/myTradingApplication/apps/todo-list/index.htmlfile check that the body includes the following tag:<div id="root"></div>ReactDOM.render requires an existing element to append your new HTML to, in this case, an element with the ID "root".
-
Run the command below to start the app:
$ pnpm start
You are now able to see your app by going to http://localhost:8080.
Adding tasks
With our to-do list created, we can refactor it to add some nicer architecture and behaviour. Let’s start by adding a list of Task components.
Create a Task.js file in frontend-training-main/mytTradingApplication/apps/todo-list/src/todoList/ with the following contents:
import React from "react";
export default function Task(props) {
  const { id, task } = props;
  return <li key={id}>{task}</li>;
}
Then we refactor our TodoList.js file to display a list of tasks instead:
import React, { Component } from "react";
import Task from "./Task";
export default function TodoList(props) {
  const {name} = props;
  return (
    <div>
      <h1> {`${name}'s To Do List`} </h1>
      <ul>
        <Task task="Get Milk"/>
        <Task task="Learn React"/>
      </ul>
    </div>
  );
}
Adding state
Our component is looking pretty good, but adding Task components to it individually isn’t ideal. Let’s refactor the TodoList.js to use a list of tasks from the state instead. Refactor our TodoList.js as follows:
import React, {useState} from "react";
import Task from "./Task";

const initialValue = [
  {id:0, value:"Get Milk"},
  {id:1, value:"Learn React"},
];

export default function TodoList(props) {
  const {name} = props;
  const[tasks, setTasks] = useState(initialValue);

  return (
    <div>
      <h1> {`${name}'s To Do List`} </h1>
      <ul>
        {tasks.map(({value, id}) => {
          return <Task key={id} task={value}/>
        })}
      </ul>
    </div>
  );
}
There are a few things going on with this change:
-
useState- We imported theuseStatehook from React. A hook is a special function that lets you 'hook into' React features. TheuseStatefunction is a hook that lets you add React state to function components. This allows us to set up our initial state. We define our initial state outside our function with 2 tasks. Then we useuseStateto initialize our state and declare our state variable which we call tasks. -
Render tasks - We use the
array.map()method from JavaScript to loop through the current tasks and render a Task component for each. To ensure good performance, any time you create a list in React, you should provide a unique key to each component. If the array then changes it allows React to identify a component as the same instance from the last render.
Refresh the page and have a look at what difference your changes have made.
Adding a form
Now we’ve got the components and some basic state, let’s add a final improvement by adding a form to the page. This allows us to add new items to our to-do list. Copy the code below to TodoList.js:
import React, {useState} from "react";
import Task from "./Task";
const initialValue = [
{id:0, value:"Get Milk" },
{id:1, value:"Learn React" },
];
export default function TodoList({name}) {
const[tasks, setTasks] = useState(initialValue);
const[inputValue, setInputValue] = useState("")
function addTask (event){
event.preventDefault();
setTasks(
[...tasks, {id: tasks.length, value: inputValue},]
);
setInputValue("");
}
return (
<div>
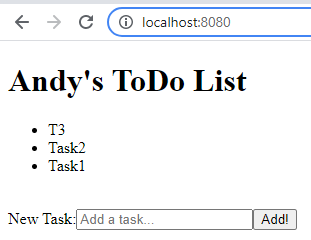
<h1> {`${name}'s To Do List`} </h1>
<ul>
{tasks.map(({value, id}) => {
return <Task key={id} task={value}/>
})}
</ul>
<br />
<form onSubmit={addTask}>
<label>
New Task:
<input
type="text"
value={inputValue}
name="inputValue"
onChange={e => setInputValue(e.target.value)}
placeholder="Adding a task..."
/>
</label>
<input type="submit" value="Add!"/>
</form>
</div>
);
};There are a few things going on with this change:
-
State - We’ve added a new piece of state
inputValuewhich we will use later in our form. -
We’ve added two new pieces of logic:
-
addTask- This method is used to update the list of tasks in the state. It’s called as a result of submitting the input form. We need to useevent.preventDefaultto prevent unintended side effects. The default behaviour of the event is to submit the form to the server, which would refresh our page. -
onChangehandler - This is a simple lambda function to update theinputValuestate whenever the user types in the "New Task" input. onChange is called anytime the user changes the text in the input box.
-
Refresh the page again and see the new functionality you’ve added!
There’s some additional reading about components, props and hooks below:
Redux
Redux is an open source JavaScript library which focuses on managing and centralizing state. It works together with React libraries, and helps your applications to share state between components. You can read more about Redux here.
We’re starting to limit our use of Redux in our component libraries, as for streaming large amounts of data it has a big performance overhead. In addition, large parts of the benefits of state management can now be found in React hooks such as useReducer.
|
In this section of the tutorial, in order to provide a simple example, we’ll change our implementation of the todo-list to using Redux to manage the state.
Getting started
Set up your project. Having already completed the React tutorial above there are only a few more steps to follow to set up your project:
Redux has a couple of dependencies: redux and react-redux. These should already be installed in the todo-list project. These can be found under the dependencies of the package.json (myTradingApplication/apps/todo-list/package.json) similar to below.
"dependencies": {
  ...
  "react-redux": "^7.2.6",
  "redux": "^4.1.2"
},
Store layout
Let’s think about the Store for our app. As we’ve discussed, it’s important to create a good structure for our data. We’re going to keep the structure very simple for this app. We have a map of "todos" which are objects with an id and a value.
const store = {
    todos: [{id, value}]
}

// Initial Value:
const store = {
  todos: [
    {id: 0, value: "Get Milk"},
    {id: 1, value: "Learn React"},
  ],
};
Before we can create our store, we’re going to need some actions and reducers. Let’s create those next. Actions are events that are triggered by react code. Reducers are functions that fire on those events and modify the store.
(Optional) Advanced store layout
As our to-do items are a simple list, an array is fine. If we were building something more complex, we could use the following pattern and use a map in our store:
const store = {
  trades: {
    "a-1234": {
      amount: "1234.56",
      tenor: "spot"
    },
    "b-5678": {
      amount: "5678.91",
      tenor: "fwd"
    }
  },
  tradeIds: ["a-1234", "b-5678"]
};
This is a more scalable design that allows objects to be found via an id.
If you find you’re comfortable with the contents of this tutorial, try experimenting with your store design to explore these patterns.
Creating actions
We’re going to add one simple action. Let’s use an action creator so we have a template for creating actions later on. Make sure you add and export the constant, so the reducer can reference it.
-
Create a new folder in
apps/todo-list/src/named redux. The directory tree should now look like this: -
Create an
actions.jsfile within the new folder with the following content:export const ADD_TODO = "ADD_TODO"; export function addTodo(text) { return { type: ADD_TODO, text }; }
Creating reducers
Now we can create our reducers to handle our actions and produce new states.
Create a reducers.js file within the redux folder with the following content:
const initialState = {
  todos: []
};

export function todoReducer(state = initialState, action) {
  return state;
};
There are a couple interesting things to note here:
-
We’ve created an
initialStateand used it as the default parameter of state. -
Our reducer currently just returns the same state it was called with.
The reducer doesn’t currently do anything, but it will be called with
undefinedwhen the app is first created, this sets our initial state.
Adding logic to handle our action is straightforward, just make the following changes in the reducers.js file:
import { ADD_TODO } from "./actions";

const initialState = {
  todos: [
    {id: 0, value: "Get Milk"},
    {id: 1, value: "Learn React"},
  ]
};

export function todoReducer(state = initialState, action)
{
  switch (action.type) {
    case ADD_TODO:
      return {
        todos: [
          {id: state.todos.length, value: action.text},
          ...state.todos
        ],
      };
    default:
      return state;
  }
}
Again, there are few things to note here:
-
The
switchstatement. Switching on action like this is a common pattern for reducers. -
The return statement for our
ADD_TODOcase is a little complex.This is because we’re ensuring we create a new state rather than mutating the existing one. This is crucial so that React knows to update! -
You can already see how our initial store layout is presented in the
todoReducerfunction.
Creating the store
We can now set our Store up. In the apps/todo-list/src/index.js file add the following:
import React from "react";
import ReactDOM from "react-dom";
import TodoList from "./todoList/TodoList";
import "./index.less";
import { createStore } from "redux";
import { todoReducer }  from "./todoList/redux/reducers";

const store = createStore(todoReducer);

function startApp() {
  ReactDOM.render(
      <TodoList name="Andy"/>,
    document.getElementById("root")
  );
}
startApp();
if (module.hot) {
  module.hot.accept();
}
This has created our store.
The reducer we pass in is our root reducer. All actions pass through this reducer. However, usually we’d combine several reducers into one using combineReducers or something similar, and using that as our root reducer.
Creating the provider
React-Redux gives us a <Provider> component. We can use that provider to wrap our app in, and then pass it through our store. This is very simple - just make the following changes to your apps/todo-list/src/index.js file:
import React from "react";
import ReactDOM from "react-dom";
import TodoList from "./todoList/TodoList";
import "./index.less";
import { createStore } from "redux";
import { todoReducer }  from "./todoList/redux/reducers";
import { Provider } from "react-redux";

const store = createStore(todoReducer);

function startApp() {
  ReactDOM.render(
    <Provider store={store}>
      <TodoList name="Andy"/>
    </Provider>,
    document.getElementById("root")
  );
}
startApp();
if (module.hot) {
  module.hot.accept();
}
Connecting our component to the store
To do this we use selectors, functions that take the store as a parameter and return a piece of data we’re interested in.
react-redux now provides a hook useSelector that automatically calls a selector and returns the data when the store is updated.
-
We need to create a selector to that returns the current task list.
Create a
selectors.jsfile within the redux folder with the following content:export function getTodoList(state){ return state.todos; } -
In
apps/todo-list/src/todoList/TodoList.js, make the following changes:import React, { useState } from "react"; import Task from "./Task"; import { useSelector } from "react-redux"; import { getTodoList } from "./redux/selectors"; export default function TodoList({name}) { const tasks = useSelector(getTodoList); const [inputValue, setInputValue] = useState(""); function addTask (event){ event.preventDefault(); setInputValue(""); } return ( <div> <h1> {`${name}'s To Do List`} </h1> <ul> {tasks.map(({value, id}) => { return <Task key={id} task={value}/> })} </ul> <br /> <form onSubmit={addTask}> <label> New Task: <input type="text" value={inputValue} name="inputValue" onChange={e => setInputValue(e.target.value)} placeholder="Adding a task..." /> </label> <input type="submit" value="Add!"/> </form> </div> ); }
We’ve replaced the existing useState with the useSelector hook using the new selector we just added. We’ll add back in the update code to addTask in a moment.
Now that we’ve done this, we have the Redux state in out component - If you refresh the page you’ll see the list is now rendering again.
Dispatching actions
Finally, we’ll use the dispatch hook to fire our action when user presses submit.
import React, { useState } from "react";
import Task from "./Task";
import {useDispatch, useSelector} from "react-redux";
import { getTodoList } from "./redux/selectors";
import {addTodo} from "./redux/actions";

export default function TodoList({name}) {
  const dispatch = useDispatch();
  const tasks = useSelector(getTodoList);
  const [inputValue, setInputValue] = useState("");

  function addTask (event){
    event.preventDefault();
    setInputValue("");
    dispatch(addTodo(inputValue))
  }

  return (
    <div>
      <h1> {`${name}'s To Do List`} </h1>
      <ul>
        {tasks.map(({value, id}) => {
          return <Task key={id} task={value}/>
        })}
      </ul>
      <br />
      <form onSubmit={addTask}>
        <label>
          New Task:
          <input
            type="text"
            value={inputValue}
            name="inputValue"
            onChange={e => setInputValue(e.target.value)}
            placeholder="Adding a task..."
          />
        </label>
        <input type="submit" value="Add!"/>
      </form>
    </div>
  );
}
At this point we should have a working app.
Let’s go through the interesting parts of that last change:
-
We’re still using component level state, if the input value was also needed somewhere else (e.g for validation) we could also add this to the store
-
Adding an item is as simple as using
dispatch(addTodo(inputValue))- because of our action creator, we can just call one function to create and dispatch an action.
You’ll also notice that adding to-do list items puts them at the start of the list rather than the end. Where would you change this?
Optional exercises
If you’re already comfortable with Redux and got through this exercise quickly, you can try one or more of these extensions:
-
Refactor the app to use the advanced Store layout.
-
Create another component using the tasks state.
-
Add the ability to delete and hide tasks.