Post-trade allocations
A post-trade allocation is an action completed after a trade has been executed whereby the user allocates the currency traded into one or more accounts. The post trade allocations interface allows sales dealers to perform a single FX trade and later split it across several accounts at the locked-in rate. If so permitted, a user may also roll a partial or full amount to a new settlement date.
This page provides an overview of Post-trade Allocation. For information on implementing Post-trade Allocation in your FX Sales deployment, see Implementing Post-trade Allocation.
Features
FX Sales supports the following post-trade actions:
-
Allocate and/or roll spot, forward, and non-deliverable forward trades.
-
Allocate and/or roll a trade to one or more accounts belonging to the original client.
-
Allocate and/or roll a trade to one or more accounts belonging to other clients.
-
Change the direction (buy/sell) of individual allocations.
-
Change the fixing source of a set of non-deliverable allocations.
-
Change the settlement currency of a set of non-deliverable allocations.
-
Specify allocation amounts manually or let FX Sales split either the full amount of the original trade, or the unallocated amount across allocations.
Requirements
This feature has the following requirements:
-
Front end: FX Sales 2.33.0 or greater
-
Back end: an integration adapter with a registered implementation of the FX Integration API’s
AllocateTradeListenerinterface (FX Integration API 3.69+).
For information on implementing Post-trade Allocation in your FX Sales deployment, see Implementing Post-trade Allocation.
Overview
When the back-end trading system supports allocation of an executed trade, the More Actions menu of the trade’s confirmation ticket includes the option Allocate / Roll:
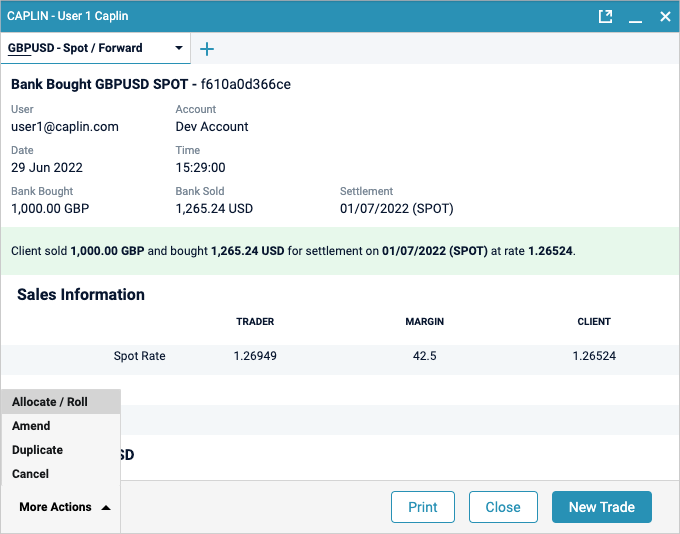
Click More Actions > Allocate / Roll to open the Post-Trade Allocation ticket:
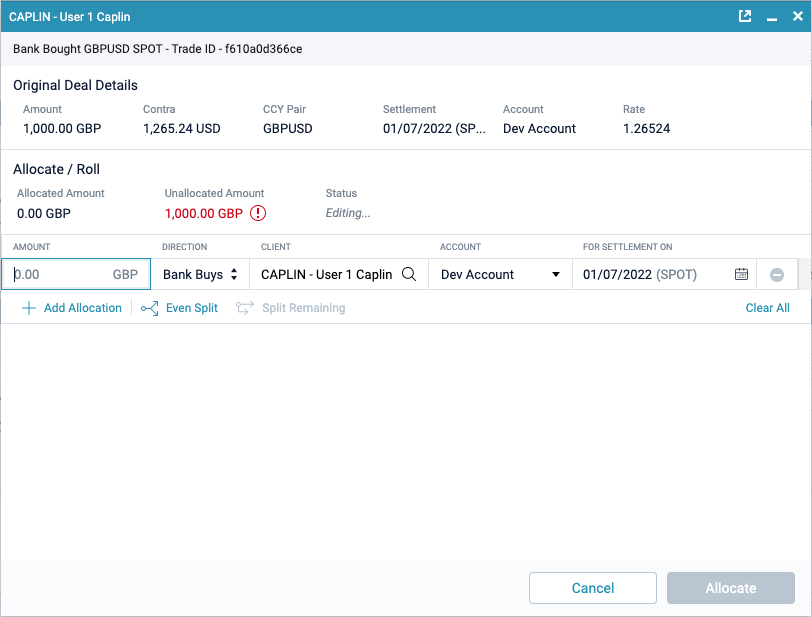
The ticket displays details about the original trade and a table of allocations.
Allocated and Unallocated totals
The Allocated and Unallocated totals update dynamically as you edit the ticket:
-
Allocation amounts in the same direction as the original trade are added to the Allocated total.
-
Allocation amounts in the opposite direction to the original trade are subtracted from the Allocated total.
When the Unallocated total is positive, a warning icon ( ![]() ) is displayed next to the total.
) is displayed next to the total.
When the Allocated total is negative, a warning icon ( ![]() ) is displayed next to the total.
) is displayed next to the total.
Ticket status
The ticket status is displayed next to the Unallocated total and can have one of three values:
| Description | |
|---|---|
Editing |
The ticket is partially complete, and all completed fields pass validation. |
Error |
One or more fields fail validation. |
Ready |
The ticket is complete, and no fields fail validation. |
Allocation amounts are validated when all Amount cells in the allocation table have a value.
When the ticket is in the Ready state, you may submit the ticket. See Submitting the allocation request.
Adding and removing allocations
When the Allocation ticket is opened, only one allocation row is shown.
-
To add another allocation row, click Add Allocation.
-
To remove an allocation row, click the row’s delete icon ()
-
To reset the ticket, click Clear All.
Editing allocations
To change the direction of an allocation, click the Direction cell and toggle between directions.
To change the client of an allocation, click the Client cell and select a different client. You are free to select any client that you are permitted to trade on behalf of, but your trading system may reject the allocation if there is no relationship between the selected client and the original trade’s client.
To hide the Client column and prevent users from allocating amounts to a different client, set the configuration option CAPLIN.PTA.ENTITY_SEARCH.ENABLED to false.
|
To change the amount of an allocation, click the Amount cell and type an amount.
To change the date of an allocation, click the date picker cell and a filtered calendar popup will appear with valid settlement dates. You are free to select any of the tenor shortcuts or click on any of the valid dates within the popout. You may also manually type in the dates in the default format of the user’s locale (e.g. DD/MM/YYYY for British English, or MM/DD/YYYY for American English). Note that any date picked that is different from the original trade settlement date will result you going into the repricing workflow.
When all allocation rows are in the same direction (buy/sell) as the original trade, you can click Even Split to allocate amounts evenly across all rows. This overwrites any manually allocated amounts. You can also choose Split Remaining, to split the remaining unallocated amount across all allocations that have no amount or that have an invalid amount. The distribution algorithm respects the number of decimal places in the base currency and distributes any division remainder over as many allocation rows as possible.
Submitting the allocation request
When you have allocated all funds, and the ticket is in the Ready state, click Allocate to submit your allocation request.
The allocation ticket reports one of three server responses:
-
Allocated: the allocation was accepted
-
Rejected: the allocation was rejected
-
Error: there was an error processing the request
If your submission was accepted, then the status of the original trade changes from Completed to Allocated (a status equivalent to Cancelled). Each allocation in your submission is created as a new trade. You can open these new trades from the blotter, and allocate them in turn (if supported by your trading system).
If your submission was rejected or raised an error, then the status of the original trade does not change, and the trade remains in the Execution blotter. You can re-attempt the allocation now or in the future.
Submitting the reprice request
If you select a settlement date that is different from that of the original trade, the cell is highlighted in yellow to indicate that those changes require repricing. The Allocate button is replaced with a Reprice button, and a message "Your changes will require repricing" is shown.
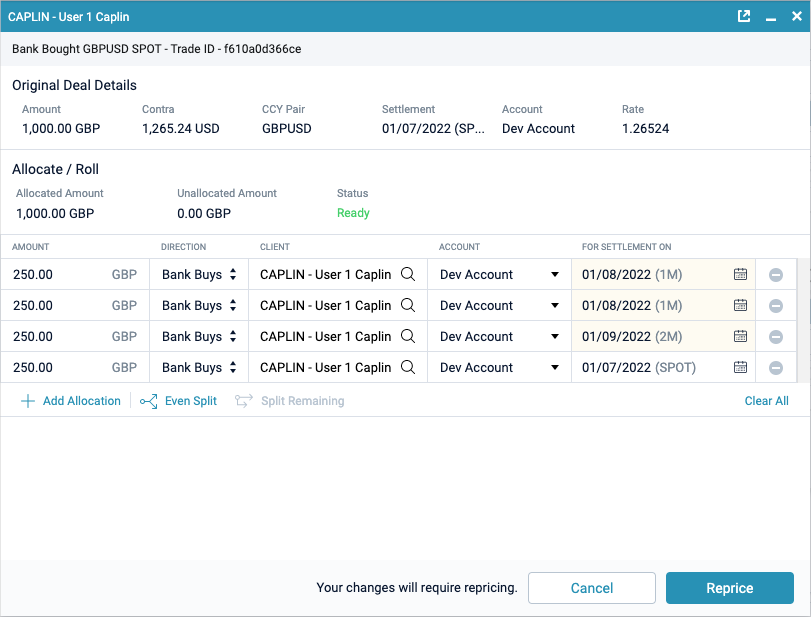
When you have allocated all the funds, and the ticket is in the Ready state, click Reprice to submit your repricing request.
The repricing interface lists all of your submitted allocations rows. These rows may be netted by the adapter, typically by settlement date. Any non-spot allocation rows are highlighted in yellow and any spot allocation rows are highlighted in grey.
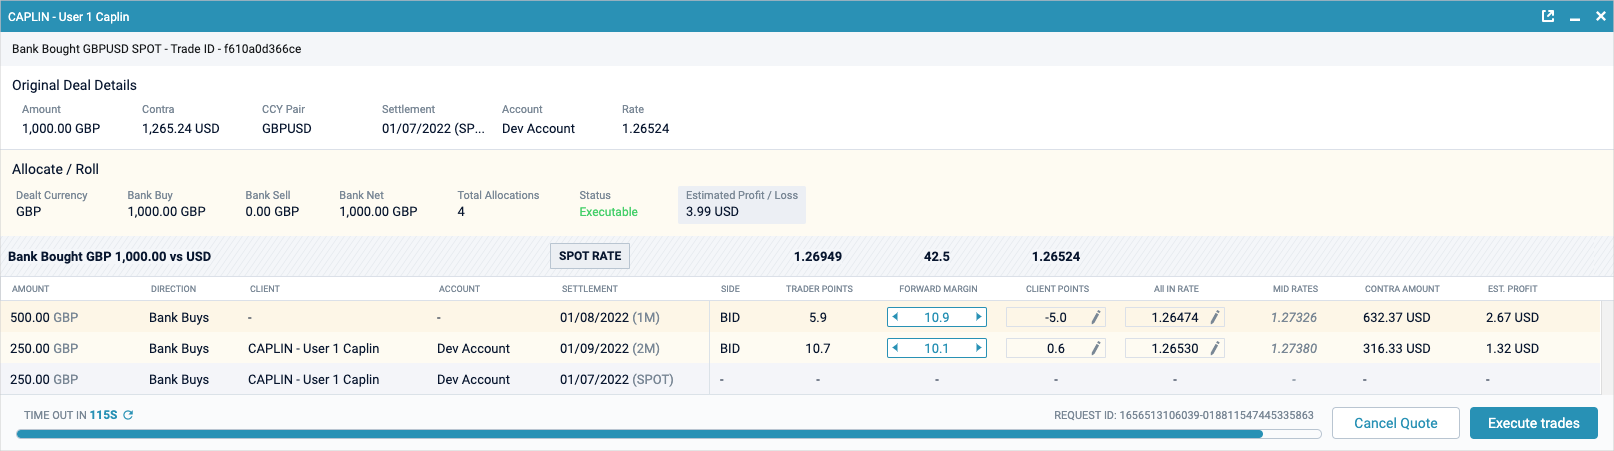
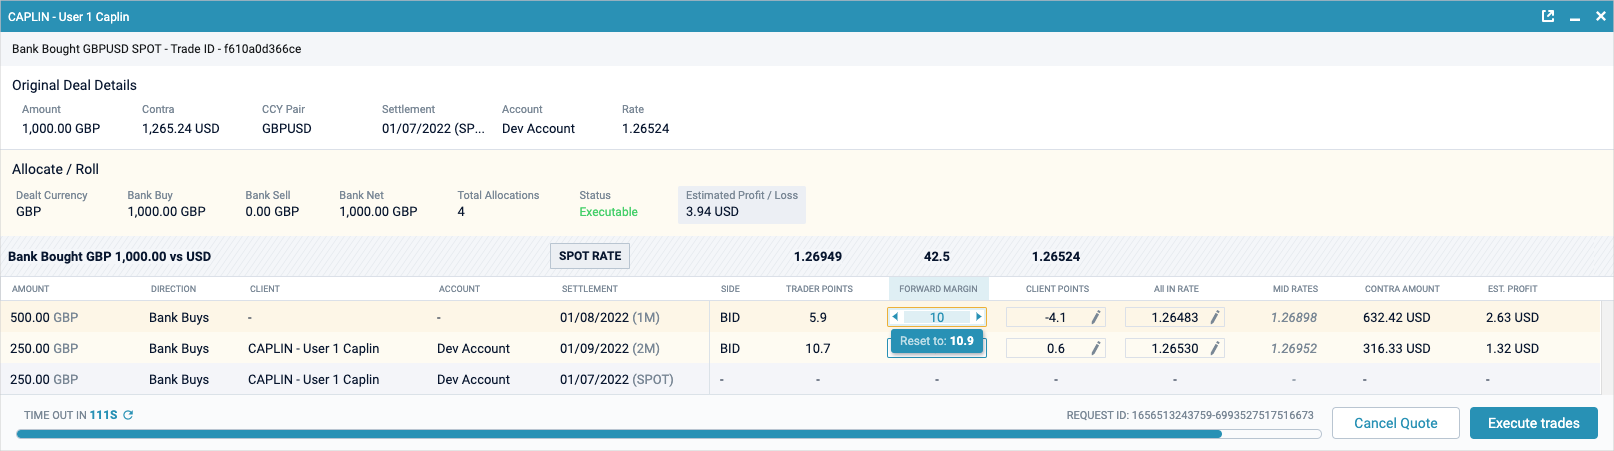
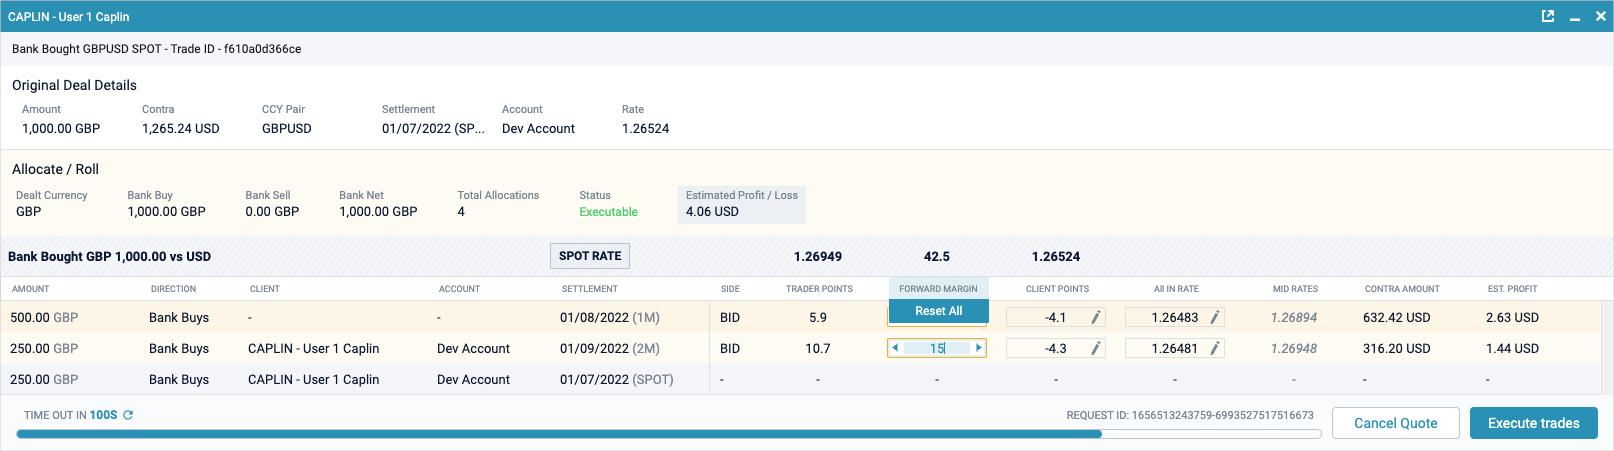
On this screen, you are also able to change the forward margin, client points and all-in rate by clicking on the respective click-to-edit cells in their columns. These cells have two states: Locked and Unlocked. Whilst Unlocked, the cell acts as an incrementor and the value can be changed. Any changes to the incrementor cell will dynamically update their respective counterparts, e.g. changes in the forward margin will also update client points and the all-in rate.
Once a margin has been changed, hovering over a margin cell will show a reset button:
Hovering over the column header will also reveal a button allowing to reset margin values for all legs:
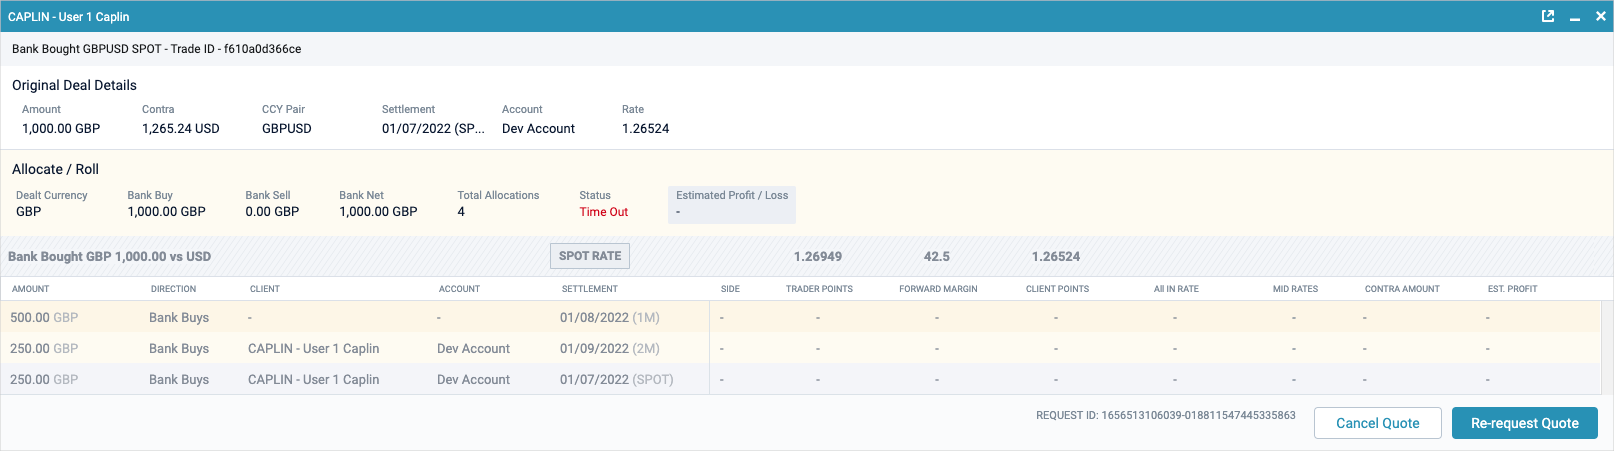
The repricing ticket is subject to a time out, which is set by the back end and is indicated by a timeout bar. If the ticket times out, you can return to the repricing state by clicking on the Re-request Quote button.
When you have made all the changes you wish to make, click the Execute trades button.
The repricing ticket then returns one of three server responses:
-
TradeConfirmed: the reprice was accepted
-
Rejected: the reprice was rejected
-
Error: there was an error processing the result
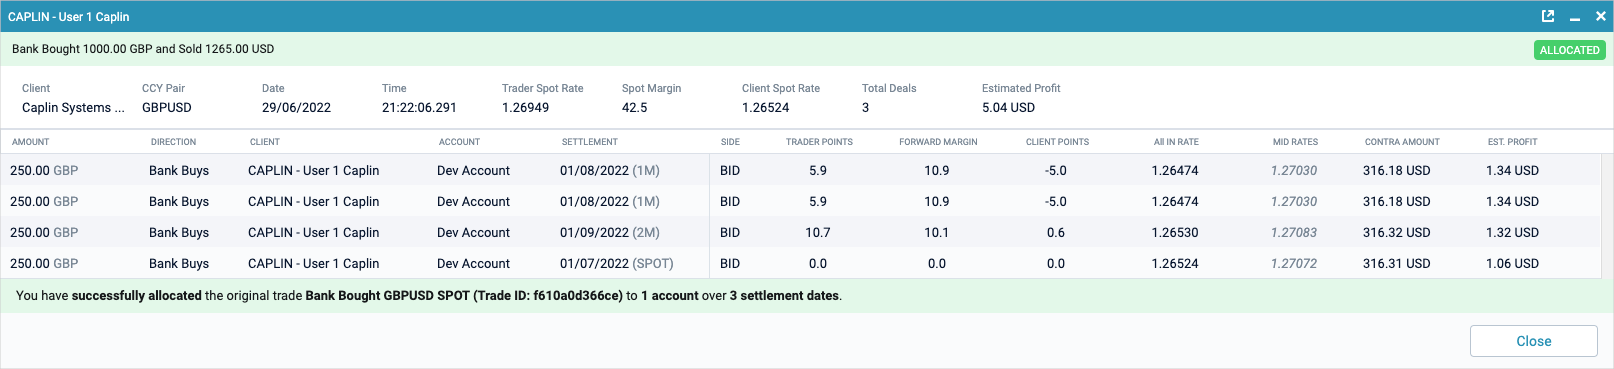
If the request is accepted, then your integration adapter changes the status of the original trade from Completed to Allocated (a status equivalent to Cancelled), and the new (non-netted) trade details are shown in the confirmation table. Each allocation in your request is created as a new trade. You can open these new trades from the blotter, and allocate them in turn (if supported by your trading system).
If your submission was rejected or raised an error, then the status of the original trade does not change, and the trade remains in the blotter. You can re-attempt the allocation now or in the future.
See also: