Post-trade allocations
Post Trade allocations allow the user to allocate parts of a trade between different accounts. This can be done either from the confirmation panel of the RFS ticket (immediately after a trade has completed) or later.
The allocation dialog box is opened by clicking the appropriate row in the blotter. When opened from the blotter, the component retrieves any existing allocations from the server.
It is implemented as a blade where all the code is under the <YOURAPP>/fxexecution-bladeset/blades/allocation directory. It consists of Presenter component whose main presentation model class is: caplinx.fxexecution.allocation.ConfirmationWithAllocation, and HTML template is <blade-home>/html/resources/trade-confirmation-with-allocation.html.
GUI Structure
The screenshot below shows an FX spot trade that has been divided equally between two accounts, but the allocations have not been submitted to the server.
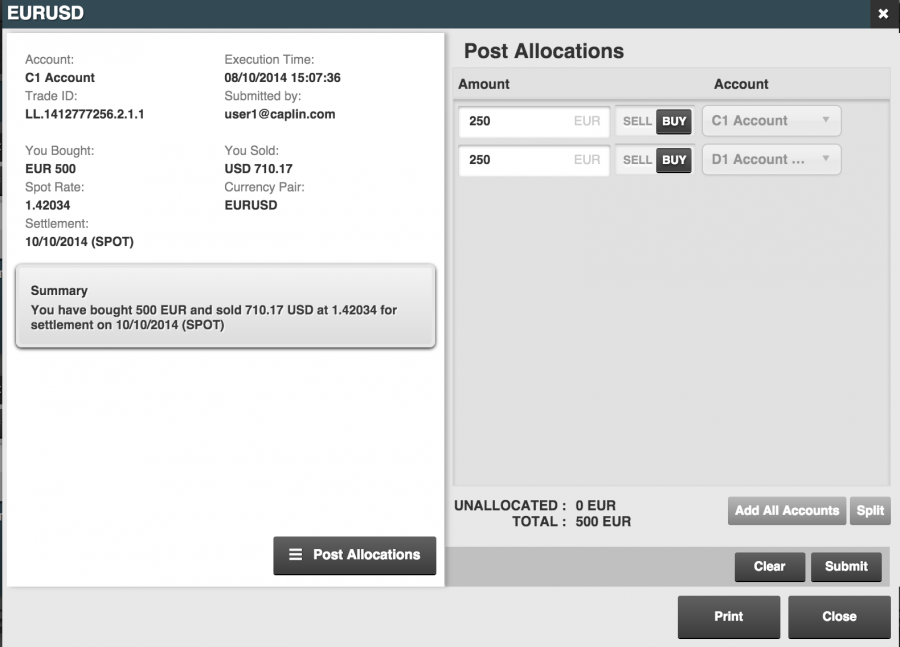
The component is split into four parts
-
Trade confirmation: Trade details and a summary message are displayed in the left panel.
-
Allocation action panel: This usually only becomes visible once the Post Allocations button in the trade confirmation panel is clicked.
-
Allocation summary panel: This is displayed after the allocations have been submitted to the server. It is a read-only version of the "allocation action panel".
-
Button bar: displays a number of clickable actions.
Code Architecture
The ConfirmationWithAllocation class is responsible for the overall behaviour of the allocation component. It is a subclass of caplin.fx.confirmation.TradeConfirmation and adds the Post Allocations button to the bottom of the confirmation panel as well as the Allocation panel to the right. The caplinx.fxexecution.allocation.AllocationBootstrap class registers the caplinx.fxexecution.allocation.trademodel.AllocationTradeFactory class with the TradeFactory: which creates instances of the caplinx.fxexecution.allocation.trademodel.AllocationTrade on behalf of the allocation component. The allocations panel creates an instance of the AllocationTrade model and creates a trade leg for each individual allocation.
The RFS Ticket simply supplies a subset of the trade data when it opens the allocation component. However the blotter publishes an event to the event hub containing the blotter row data. Then the caplinx.fxexecution.allocation.ConfirmationWithAllocationLauncher class subscribes to the event and launches the allocation component in a dialog box. It passes the blotter trade data to be displayed in the confirmation panel. It also creates an instance of caplinx.fxexecution.allocation.ConfirmationWithAllocationFetch that retrieves any existing trade allocations.
See more: