Containers
In this tutorial, we will use StreamLink to subscribe to a container and display the elements in a table.
Objectives
-
Use StreamLink to subscribe to a container and display the elements in a table.
-
Limit the size of our container.
-
Implement buttons that scroll though the list of elements.
Introduction
This tutorial uses the ContainerTable component as a template. The component folder is in apps/tile/src/container.
You can render the ContainerTable to your webpage using the following code in your index.js file:
import ContainerTable from "./container/ContainerTable/ContainerTable";

ReactDOM.render(
  <div>
    <ContainerTable
     containerSubject="/CONTAINER/FX/MAJOR"
     streamLink={streamLink}
    />
  </div>,
  document.getElementById("root")
);| Ensure no other React components are rendering to the "root" element, so you may need to comment out previous tutorial codes. |
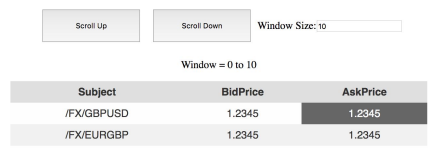
When you load your application you should see a simple HTML table with some fake data. This data is hard coded in the ContainerTable component, and is not currently received from the server.
During this tutorial we’re going to use StreamLink to subscribe to a container, and render all the Records in order in the table. We’re then going to limit the size of the container using the WindowSize parameter, so we only show a subset of all the available records. Finally, we’ll implement the "Scroll Up" and "Scroll Down" buttons which move the container window up and down, effectively scrolling through the list.
The ContainerTable component
Have a look at the ContainerTable component. The /CONTAINER/FX/MAJOR subject is currently passed in as a React prop, along with the StreamLink instance. It also holds some React state, which stores the data currently displayed in the table and container metadata (such as the windowing information):
  const [windowStart, setWindowStart] = useState(0)
  const [windowSize, setWindowSize] = useState(10)
  const [displayedFields, setDisplayedFields] = useState(["BidPrice", "AskPrice"])
  const [containerSubjects, setContainerSubjects] = useState(["/FX/GBPUSD", "/FX/EURGBP"]);
  const [recordData, setRecordData] = useState({
    "/FX/GBPUSD": {
      BidPrice: "1.2345",
      AskPrice: "1.2345"
    },
    "/FX/EURGBP": {
      BidPrice: "2.2345",
      AskPrice: "2.2345"
    }
  });
State items:
| Item | Description |
|---|---|
|
The current start position of the container window. We will use this later when we implement the scroll buttons to move up or down in the container. |
|
The size of the container window. Changing the size means that we show and subscribe to more or fewer records. |
|
This is a fixed array which specifies the fields / columns we want to display, and the order we want to display them in. |
|
An array of all the record subjects in the container. The order should match the order of the records in the Container, and the array should be updated whenever container updates are received from StreamLink. |
|
A map of record subjects up to the latest data for that record. The data for a record should be updated whenever record updates are received from StreamLink. |
Take a moment to see how these items in state result in the rendered HTML table. We use the Array.map function to render a ContainerTableRow component for every item in the containerSubjects array, which acts the body of the table.
Subscribing to the container
Currently it has two elements hardcoded in the state:
-
/FX/GBPUSD -
/FX/EURGBP
We’re going to delete these and subscribe to the container instead. Then we need to populate the containerSubjects array with subjects received from the container, and we need to populate recordData with the latest data for our records as we receive them.
Remove the existing dummy data from your state:
  const [containerSubjects, setContainerSubjects] = useState([]);
  const [recordData, setRecordData] = useState({});
Now add a useEffect hook to subscribe to the container subject received from props. You need to use the StreamLink.subscribe method, passing in a listener that implements the onContainerUpdate and onRecordUpdate callbacks.
useEffect(() => {
    const subscription = streamLink.subscribe(
      containerSubject,
      {
        onRecordUpdate(sub, recordEvent) {
          // Update record data
        },
        onContainerUpdate(sub, containerEvent) {
         // Process container event
        },
        onSubscriptionStatus() {},
        onSubscriptionError() {},
      },
      { window: { size: windowSize, start: windowStart } }
    );

    return () => subscription.unsubscribe();
  }, [streamLink, containerSubject]);
When you receive an onRecordUpdate event you will need to use the RecordType1Event API to get the field data, and store it in our state.
When you receive an onContainerUpdate event you will need to use the ContainerEvent API to process the container record movements. For now, don’t worry about windows or window sizes and just render all the records in the correct order. The ContainerEvent provides an updateModel method you can use which gives you the container updates in an easy to handle format:
containerEvent.updateModel({
    insert: (index, record) => {
        // Add the record to containerSubjects at the given index
    },
    move: (from, to, record) => {
        // Move the record in containerSubjects from / to the given index
    },
    remove: (index, record) => {
        // Remove the record at the given index from containerSubjects
    },
    clear: () => {
        // Remove all the records from containerSubjects
    }
});
Once these methods have been implemented, you should see your table populated with the correct data.
Adding container windowing
Now we’re going to implement the container windowSize property, and limit the amount of rows we subscribe to. The window size is already in the component state, and can be modified using the Window Size input box.
-
Change the
StreamLink.subscribecall so that it uses the correctwindowSizewhen it subscribes to the container. The subscription options can be passed as the third parameter. -
Try and change the component so that the window size of an existing subscription is modified whenever the
windowSizevalue is changed. To do this you need to use the Subscription API available on the existing subscription object. You may also want to use the second parameter to the ReactsetStatecall, which gives you a callback whenever the state has finished updating (React states may not be applied immediately). This ensures that your subscription only updates the window size when React updates its state.
After this you should have a table which displays the current container window.
Adding container scrolling
Finally we’re going to handle button clicks of the "Scroll Up" and "Scroll Down" buttons to change the container window start position. The windowStart value is already stored in state, but is always set to 0.
-
Add click handlers to the "Scroll Up" and "Scroll Down" buttons, so that "Scroll Up" lowers the number and "Scroll Down" increases the number.
Be careful when updating the state. You should pass a function to setStateto set the state asynchronously rather than setting it directly. You can read more about why this is here: https://legacy.reactjs.org/docs/state-and-lifecycle.html#state-updates-may-be-asynchronous -
Use the Subscription API to modify the window start value of the existing container whenever the
windowStartvalue changes.
Once you’ve implemented the Scroll buttons, you should be able to scroll up and down in the container by clicking them!
Optional exercises
Here are some optional additional exercises to get you comfortable modifying containers.
-
At the moment you can scroll outside the container range. You can scroll to a negative number if you click "Scroll Up" too much and you can scroll past the end of the container if you click "Scroll Down" too much. Can you stop this from happening?
The onContainerUpdateevent tells you what the current max size of the container is. -
Can you add another
<input>below the Window Size input box which lets you type in and apply a sort/filter to the container?You need to use the "select" property of the
StreamLink.subscribeoptions.